What's new
Van's Air Force

Don't miss anything! Register now for full access to the definitive RV support community.

Installed Janekom's fairings. He is the real deal!

Brantel

Well Known Member
Since I go in for paint on the first of June (Bobby Potts) I took a chance and ordered Janekom's fairings that he has been advertising here on VAF.

Let me just say that he is the real deal and I got just what I paid for in about 7 days from South Africa.

His fairings are ready to mount and paint. The finish is awesome out of the box. No pinholes!!! I only had to do some minor sanding back of the trailing edge in order to get the bottom half to align perfectly with the top. Other than that, what you see is what you get, easy peasy!

I had previously installed Van's intersection fairings on the top but the bottoms were unusable without much much work so I never did even try to mount and repair them. The ones for the top that I got from Van's fit pretty good after much trimming but they were very very rough.

Anyway, I mounted up the ones I got from Janekom today and I am pleased with the product. His price delivered to the USA is very competitive.

IMG_0063.JPG


IMG_0068.JPG


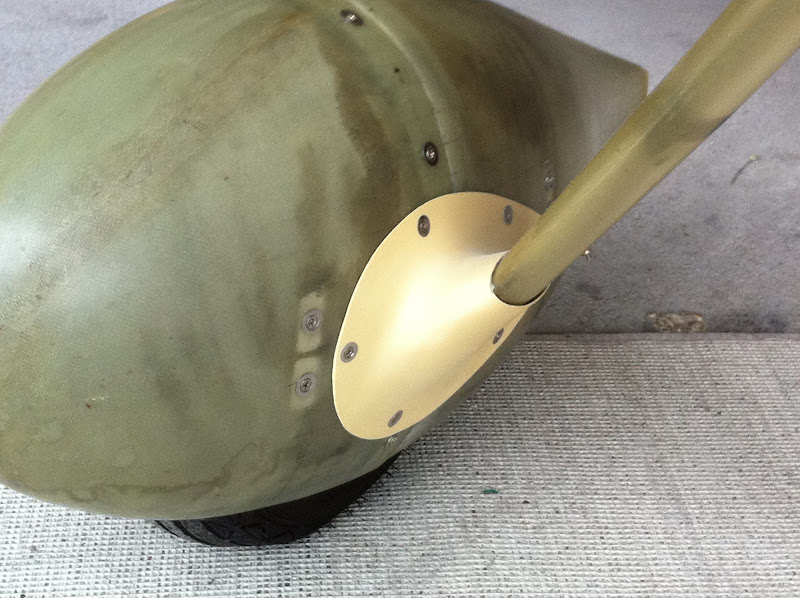
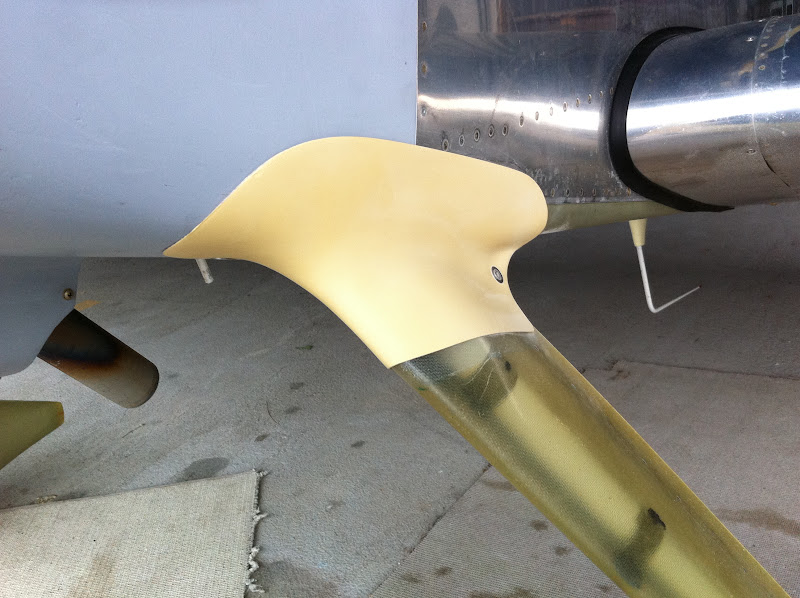
Here are more pics if you are interested.
 
They look great! Does anyone know if the RV-9 and the RV-7 have the gear legs coming down at the same angles? I know the -9 gear legs are significantly longer, but if they are at the same angle the -7 fairings should work. Last he mentioned, he didn't have a RV-9 to use as a model, but does he need one?
 
Not sure. My guess is that because they are longer, to get the wheels in the right place, they must have changed the angle in order to do that. I may be all wet though. Van's might be able to answer this question.

Van's does sell different part numbers for their intersection fairing "starter kits":mad: that they sell for the 9 vs the 7 so this also points to them being different.

Van's set are $146 less shipping and all you get is a rough, thin, oversized bunch of parts that don't fit well at all and which must be massaged into working, trimmed, extra layers of glass applied and then filled. Van's should take these off the market!

Janekom's fairings were $175 delivered in a week and are ready for paint out of the box and they fit pretty darn well.

Others are $300 plus shipping. Very good reviews from most.

Another brand is $230 plus shipping. Have not seen many reviews on these.

The two mentioned above are of the bond on type that require fairing in and final filling. These do look very nice but require more effort.
 
I am replacing the upper fairings and ordered from Jan this morning. They do look great. Thanks for posting the images.

Its time my 8 year old beast but on a new look, I guess you could call it a face lift. :)
 
Would you show a picture of how you put a nut or nutplate on the back of the upper fairing for the screw that I see.

Thanks. Oh, and they look very nice. Much nicer than the hours I had in getting mine paint ready.
 
Excellent report Brian! I have mine from Jan ready to mount...they are exactly as you've stated.

I am curious about how you mounted the upper one's as well. I was planning to use rivnuts...
 
I forgot to take a pic Chad... I used the existing nutplates that I put in when I mounted the Van's starter kit version of the uppers.

There is one in the cowl, one in the middle of the fairing and one back near the rear of the fairing. The are all on the bottom flat surfaces. I just crawed down in there and put the nutplates in. I had the fairings held very tightly to the fuse when I drilled the location holes. These really seem to hold the fairing well but I might have to add just one screw on the side later if they start to droop away from the side of the fuse.

Excellent report Brian! I have mine from Jan ready to mount...they are exactly as you've stated.

I am curious about how you mounted the upper one's as well. I was planning to use rivnuts...
 
Webb,

I will take a pic soon. I forgot to take one of this area.

Currently I do not have anything other than a nut. I really don't intend to keep it this way but I have not found the right solution for this. I think a modified "T nut" might work.

Tee-Nut.jpg


Or something like this:

parts_new-trussHead.jpg


If all else fails, I will get some low profile nuts and cut the screw off. It is not ideal but what else can be done about it???

Would you show a picture of how you put a nut or nutplate on the back of the upper fairing for the screw that I see.

Thanks. Oh, and they look very nice. Much nicer than the hours I had in getting mine paint ready.
 
Last edited:
RV-10 Fairings

I installed Jan's fairings on my ten. They fit nice and were easy to install. I epoxied my wheel fairings to the wheel pants and split them so they come off together. A lot less finishing work needed on Jan's vs. Van's before paint.
 
Sean,
Could you please illustrate the split? Did you just follow the lines where halves are joined?
 
Those look really great, Brian. Especially for "right out of the box"!
I'm building a 7A and would be interested in hearing from someone who has installed Janekom's on their 7A...and if they look as good as Brian's.

(At this point, I'm sort'a tired of doing any more fiberglass work than necessary.)
 
For what it's worth, my -6 had screws holding the fairings together in that location too... On the backside there's a nutplate, riveted to the fairing. On the front, the fairing is countersunk for a 6-32 countersunk screw. The screw used is only long enough to just protrude from the nutplate. Yes, it's "bumpy" there, but it is on the underside of the fairing and not visible unless you're crawling under the plane.
 
Thanks Rob, to me this is one of the small disadvantages to using the style of fairings that part in the back. You need something to hold them together back there but it is hard to come up with a flawless fastener to pull it off.

I will experiment with the "T" nut and see how that works. The glass may not be thick enough in this area to use one even if I grind some of the barrel away.

It's not a perfect way to hold the aft end together but it works....a couple small dabs of silicone glue on the inside, hold the ends together over night with a clamp and it is "together". When the fairing needs to be removed, cut the glue with a razor blade.

(with the LEZ and Cozy we glued wing tip lights to the structure in a similar manner - Burt Rutan invention)
 
Nice!

Have to agree with other posters here. I have just opened my order of RV6 fairings received from Jan today and they are very nicely finished. Preliminary fit looks great and they will need very little work to prepare for painting. All in all a very fair price and money well spent. Thanks Jan.

Clive Whittfield
Auckland
New Zealand
 
Installed my fairings from Jan today...absolutely PERFECT fit on top, and with a bit of heat, they fit my James pants perfectly as well!!

Intfair1w.jpg


Intfair3w.jpg


Intfair2w.jpg
 
second that comment

I installed Jan's fairings on my ten. They fit nice and were easy to install. I epoxied my wheel fairings to the wheel pants and split them so they come off together. A lot less finishing work needed on Jan's vs. Van's before paint.

I too have Jan's fairings done the same way (split on the wheel pant). My plane is in the paint shop and I can confirm the ease of finishing the fairings. They got one coat of filler/primer and were sanded for paint. The Vans glass has been taking 6-8 coats of filler to get all of the pinholes. 2 hours of labor on the intersection fairings before paint, 26 and counting for Vans glass and the cowl and canopy haven't been started yet.

Eric
 
Back
Top