What's new
Van's Air Force

Don't miss anything! Register now for full access to the definitive RV support community.

Fuel Sender unit/access panel leak fix

mantry

Well Known Member
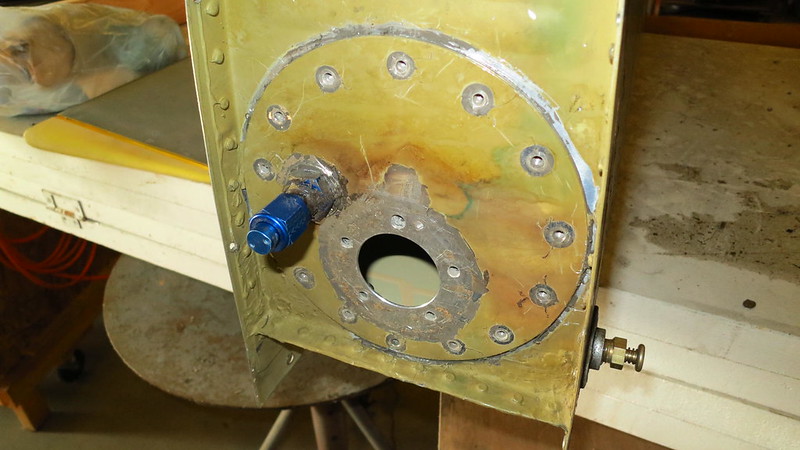
Ok, I spent quite a bit of time searching and have looked at all of the previous threads but I wanted to see what the current consensus is. Back in January I noticed the tell tale signs of a fuel leak on my right tank. I pulled off the wing root fairing and noticed that the leak seemed to be coming from the Fuel Sender mount and the fuel Sending unit mount on the wing root. Here is what it looked like:
qou0xf.jpg


I took a right angle screwdriver and checked each of the screws and they didn't seem overly tight, so I gave them each 1/4" turn and cleaned it all up and seemed to solve the problem. Seems the leak was coming from just those two places and you could see that the majority of the leak was actually coming from the access panel screw at the FIVE O'CLOCK position as it was wet and seeping.

Well, last week, I noticed that the fuel leak is back. Full disclosure, I have not pulled the WING ROOT fairing again, yet.

It appears that when it was assembled that the cork gasket was used on the access panel and the rubber gasket was used on the sending unit. Looks like there was a thin layer of PRO SEAL put on the gasket before being installed and then also a blob was put on each screw hole before the screws were installed. I'm not sure any were put on the threads or not.

So, what to do...... Well the first thing I'm going to do is give the screws a little more of turn, being careful not to overdo it and risk striping the threads of the nutplates.

In the event that doesn't take care of it then I'll need to do a more in depth repair.

1. Can this be done on the plane without removing the tank? If on the plane on a scale of 1-10 (10 being extremely difficult)? On a scale of 1-10 how difficult to removing the tank(my screws have NOT been painted over, can't vouch if the tanks were removed or if the line/gaps have been painted over and would require they be scored with a knife so it won't peel the paint. On a scale of 1-10 on doing the repair with the wing off?(I would assume this is a 2-3)

1a. If I remove the tank where can I find out the necessary steps to take to remove the tank. (I can understand the remove the mounting screws, the wing root fairing, the fuel supply line, the fuel vent line, and the sending unit wire. What about aileron pushrod and the "Z" brackets on the back side of the tank?)

2. What is the current best practice for sealing these two places?

I realize that this has all been covered before but it has been a few years back and I was wondering if there are any new opinions? Then based on those answers I may have more questions such as more detail on how to accomplish.

3. Where should a get the required parts? VANS? Spruce?

My searching has revealed, gaskets, no gaskets, gaskets with PERMATEX, PROSEAL only, PROSEAL with gaskets, Put on PROSEAL and then let is set up and then tighten further, etc, etc.

Thanks in advance folks!

Mark
 
If you change the screws use allen head ones as a replacement. Much easier to tighten when the tank is attached.
 
Which model? There is a significant difference in the work invovled in remoivng an early (-3,-4,-6) tank versus a later model.

Many people have had tank leakes, and many of those have tried a wide variety of sealing methods - including magical incantations. I doubt that you'll stop the leak by tightening the screws any more. In fact, tightening them might just increase the leak from the rubber gasket on the sender unit.

Personally, I have had no leaks with proseal and no gaskets - and as Gil suggests, I use Allen head screws to make future work much easier. This is not a fun job, but it is quite doable once you resign yourself to it.
 
Last edited:
In fact, tightening them might just increase the leak from teh rubber gasket on the sender unit.

I agree with Paul.

Turning any of the screws that mount the plate at this point will likely do nothing but start more of them leaking. Further tightening of the sender screws may stop leaks there temporarily but it will leak again.
 
I had to do this on my 7a to fix a bad fuel sender. The prospect of doing it was worse than actually doing it. You DON'T have to remove the tank. A putty knife and patience will get between the plates and the proseal. I would recommend you do as Paul suggests and remove all gaskets, clean all the old proseal off, scuff it with sand paper, clean it with laquer thinner and use just proseal, including around the screws. It won't leak and you can still get it off if needed with another putty knife and patience. I know this because I over tightened the sending wire screw and broke the solder joint and had to do the whole process a second time:mad: It is remarkably easy to over torque that screw!

I kept telling myself " It's a hobby, it's a hobby...":D
 
Last edited:
The tank should be removed from the wing to repair the leak although it could be done working from the bottom of the tank between the fuselage and the inboard rib, but space is limited. I do believe the float assembly will come out but I am not sure about the fuel pick up line attached to the large plate.

It is time consuming to remove the tank but it is not difficult.

There are 21 "Z" bracket bolts (3 can be reached from the outside next to the fuselage, 18 from inside the through the 3 access covers on the bottom of the wing), some 50+ screws top and bottom plus one AN4 bolt at the leading edge break away bracket. And of course the fuel line, vent line and sender wire.

With tank on a bench the fix is easy. Just remove all the screws, all the old sealant, clean it up and reassemble with new preseal from Van's. One tube will be enough.

The consensus seems to be to not use gaskets. I do not.

Do a pressure check after 24 hours and reinstalled the tank. Total labor is about 6 hours give or take. Cost of the sealant is less than $20.

re Jeremy, I kept telling myself " It's a hobby, it's a hobby..."

AMEN to that!! :)
 
Last edited:
Thanks David and all, yeah I didn't think about the FUEL PICKUP line being in the access plate, I bet that would complicate things unless you were able to push that inside the fuse to get that out of the way and by the time you fuss/fart with that well, you might as well of removed the tank.

Is it necessary to remove the aileron pushrod to get access to the "Z" bracket bolts? I thought I had seen that mentioned somewhere.

Ok, so lets say I have the tank out, on the bench, sending unit and access plate removed and all cleaned up. How do I go about putting the PROSEAL on the parts. My guess is one way to NOT do it would be to smear a bead of PROSEAL on the wingroot and then install the access panel and crank down the screws squishing all of the PROSEAL OUT.

If I'm going to remove the tank, should I order new screws for the access plate and the sending unit? Should I get HEX HEAD? ALLEN HEAD? PHILLIPS HEAD?

So I looked at the electronic versions of the plans and also read through the Construction manual (which I didn't think I actually had...)

Looks like the screws on both the T-708 Access plate and the sending unit are: AN515-8R8 (8-32 x 1/2") I would need a total of 17 for each wing(5 + 12). Can someone help with the HEX or ALLEN Head part numbers?

Then also reading the construction manual some of the key points are:
  • Put a 1/8" bead of tank sealant between the coverplate and the rib
  • Dab sealant on the threads of the screws
  • tighten until 1/32" of sealant squeezes out
  • Some may use the T-407 cork gasket with sealant
  • Mount the sending unit using the same methods (DO NOT USE THE MFG SUPPLIED RUBBER GASKET ON THE SENDING UNIT)

Mark
 
The sender and/or the cover plate can both be removed without removing the tank from the wing (I have done it a number of times).
If the cover plate is to be removed, it is easier if the sender is removed first but it is not essential.
 
David, (anyone) I'll look over the Const Manual and plans, but can you give me a quick synopsis on how to remove/move the Aileron push tube?

rvbuilder, how much trouble was getting the FUEL PICKUP line out of the way so the access panel could be removed?

Any quick pointers on draining the fuel? My thoughts so far once I round up 1-2 FUEL CANS would be to push it out of the hanger, get a screw in fitting that I can screw into the drain after removing the CAV and with a hose attached to that and put that in the FUEL CAN, then a way I can ground the Plane to the Can, maybe have it go into the actual fuel itself and then grounded to a good earth ground. (or am I making that too complex?)

Mark
 
I see three ways of emptying the fuel from that tank.
1: Fly it till it's empty, switch tanks and land. This has the advatage of telling you exactly how much useable fuel you have. Also, you're getting to fly but it can be nerve wracking. Many people would recommend not letting it actually quit but rather keep an eye out for the first sign of fuel pressure dropping and then switch and to do this within gliding distance of an airport. Others do this routinely to maximize endurance and to know exactly how much fuel they have.
2: disconnect the fuel line at the carb or fuel injection servo and turn on the boost pump to pump it into gas cans. This will also tell you pretty closely how much useable fuel you have. Use an alligator clip or any functional jumper between the metal funnel or metal can and the airframe.
3: Undo the quickdrain and use a metal funnel into gas cans. This has the advantage of draining out any crud that has accumulated in the bottom of your tank. Use an alligator clip or any functional jumper between the metal funnel or metal can and the airframe. In all of these scenarios be sure to clean any filters after you've emptied the tank. There can be some crud lurking at the bottom.
 
No need to remove the tank

No need to remove the tank for this repair. Just remove fuel sending unit if that's the gasket leaking. I have done several leaks at the inspection plate and fuel sending unit on RV6,7,and 8's without removing the tank.
 
Done it without tank removal to replace failed sender. A couple hours and you will have it done. I didn't find removing the Philips head screws to be a big deal and put new #8 Philips screws back in. Didn't expect to be back in there anytime soon and haven't been.
I have a socket that accepts standard bits along with a stubby ratchet. Piece of cake.
 
No need to remove the tank for this repair. Just remove fuel sending unit if that's the gasket leaking. I have done several leaks at the inspection plate and fuel sending unit on RV6,7,and 8's without removing the tank.

Mark,
Squeak and RV Builder are right, it can be repaired without removing the tank, I just have not done that way since the leak I recently repaired required going in through the aft bulkhead between ribs 2 and 3.
If you decide to remove the tank, the aileron tube is easily disconnect at the fuselage bell crank and in the wing at the outboard access panel. It then can be slid outboard to clear the "Z" bracket bolts.

A good mechanic could fix this problem in a couple hours....that might be a good option if you don't want to get into it.
 
David and all, thanks. I don't mind getting into it and more than capable and enjoy the work, just want to take advantage of all the knowledge here and understand the problem best I can before I tackle it.

After disconnecting both ends of the push rod do you need to remove the wing tip to slide the pushrods outboard far enough?

I know these are trivial questions but I'm on the road 20 days of the month and can't run down to look at the plane and scratch my head as I read this thread.

Vans small tube of sealant recommended for the sealant? 3.5oz? 1oz? Dispenser gun or plastic bag or popcycle stick?
Is the POLYGON worth it? I'd be nervous on it getting somewhere I don't want it!
 
Last edited:
As an update, I pulled off the root fairing and it looks like it is only leaking on the access panel, I tightened the screws up on it a little more but it hasn't stopped it. I'll probably let it continue to seep thru the summer and the address it in the fall.

Anyone care to comment on best practices to get the aileron pushrod out? I've looked thru the drawings and the manuals but it would sure be nice for someone who has done it before to describe.

Also, any special tricks getting to the "Z" bracket bolts thru the access panels. "WOBBLY" sockets? etc?

Thanks
Mark
 
Another tip from a friend: If you're using the standard Stewart-Warner sensors, glue the float arm to the sensor snap fitting with some ProSeal (after masking carefully to protect the electronics). Said friend has had the float arm come off at least once....no fun to fix when you don't even have a leak!!!

 
draining the tanks

When we performed the anti-rotation bracket S/B on my -8 I burned up a lot of the fuel and then pumped down the fuel in the tank using the boost pump. We disconnected the fuel line on the engine side of the firewall from the bulkhead fitting, put an unused fuel hose on the bulkhead fitting, and directed the unattached end into a 5 gallon fuel can.

It could be done with one person but I had a buddy monitor the level in the can while I operated the boost pump. The first couple of can loads went into the tank on the opposite side. The last little bit was removed by unscrewing the tank drain.

On the -8 we had no particular problems getting the sender and pickup out. I wish I had thought about using Allen head screws but the normal Phillips head came out ok the first time so it did not occur to us to change to Allen.

We used new gaskets with Proseal on both sides and have not had any leaks. That was how the builder did it 15 years and almost 900 flying hours before and I never had a leak.
 
As an update, I pulled off the root fairing and it looks like it is only leaking on the access panel, I tightened the screws up on it a little more but it hasn't stopped it. I'll probably let it continue to seep thru the summer and the address it in the fall.

Anyone care to comment on best practices to get the aileron pushrod out? I've looked thru the drawings and the manuals but it would sure be nice for someone who has done it before to describe.
The aileron push tube is connected to the control system in the fuselage and out in the wing at the aileron bell crank assembly with AN3 bolts and associated hardware. Once the bolts are removed the aileron will slide outboard through rib access holes far enough to clear all the "Z" brackets. The wing tip faring need not be removed.

Also, any special tricks getting to the "Z" bracket bolts thru the access panels. "WOBBLY" sockets? etc?

A 1/4" ratchet with 3/8" socket will do the job.

If the leak is at the sender plate, it would be a lot less work doing it as others have. A 1/4" ratchet can be rigged up with a phillips screw head to remove the screws. Good luck.

Thanks
Mark

zzzzzzzzzzzzzzz
 
You guys are AWESOME! Thanks again! Glad I don't have to pull the wingtip too.

The leak is on both the sending unit plate and the access plate. I'd like to put it all on the bench to work on it.

THANKS!
 
Ok, I got some time at home and with an upcoming 30 day runway closure to resurface the runway it was time to TIE INTO IT! Plus the fact that the leak has become so bad it has drained all the fuel out of the tank(well almost, down to the level of the bottom of the access plate).

Here is what I have done so far, there may be better order to the steps I performed so feel free to re-arrange them as necessary.

Again, almost all of the fuel had drained out of the tank, if you have fuel in the tank you may want to safely drain that out or pump it out using the fuel pump. Again, safely!

1. I first removed the WING ROOT FAIRING:
2dgjqeg.jpg


You can now see the wing root with the Fuel VENT, Fuel PICKUP, Fuel Sending Unit and the ACCESS PANEL.
j6orgp.jpg


I also disconnected the FUEL VENT LINE, the FUEL PICKUP LINE, and the FUEL SENDING Unit wire.

Looking closer you can see the fuel leak at the bottom of the access plate and it is heavily stained from letting it go almost 7 months. The Fuel dye is NASTY stuff and even if you get it on you it is hard to get off. Lacquer Thinner seems to be the best to clean the dye but be careful as it is also does a good job on paint! Cured glossy paint obviously better than say a light primer or new paint.
2zqh6s3.jpg


It appears that the leak is again isolated to the bottom portion of the access plate(I certainly hope so). The initial leak that I found this winter showed that there had been some leaking from the FUEL SENDING unit but after tightening the screws on it, it does not appear to be leaking from there anymore. Both the Sending Unit (Rubber) and Access Panel have gaskets as well as PROSEAL on them. My Plan will be to eliminate the gaskets and just use PROSEAL.
2r7lfds.jpg

2zqdbx4.jpg


2. I removed most of the MILLION screws of the tank perimeter where it holds the tank skin to the surrounding wing skin. I initially left a few of the screws in place to hold the tank in place. Reality is that due to the DIMPLES in the tank skin it pretty well holds itself in place and is not going anywhere. I then also removed the 3 access panels on the bottom of the wing.
This is showing the 3 bolts that attach each of the TANK "Z" brackets to the spar. Note: There are a total of 7 of these brackets. 6 of them are access from the back of the spar and the one closest to the wing root is access from the forward side of the spar.
5lb0he.jpg


3. I was hoping that I would NOT have to disconnect and remove the AILERON PUSHROD but after trying some of the miscellaneous 3/8" tools that I had gathered up for this project. Wrenches, 1/4" drive sockets, Socket Wobble adapter, Socket THUMB drive, Ratcheting Wrench, etc. It was apparent that it would be best to move the AILERON PUSHROD out of the way. Doing so would make access SO MUCH easier! I know in the picture it looks like you should be able to work around it, but I could just tell you would take you 5 times as long as your wrestled your way around it.
5lb0he.jpg


4. To remove the PUSHROD involves disconnecting it from both ends, those being the Passenger Control stick(this is the right tank I'm working on) and then also the aileron bellcrank (In the picture the pushrod has already been removed). I printed out the detailed picture from the PLANS so I would know exactly what washers/bolts/nuts were involved(having access to them online or in printed form is INVALUABLE, so if you don't have the printed copies, BUY THE CD FROM VANS NOW!!!).
mw4awk.jpg


5. This is the PASSENGER Control stick where the pushrod is connect. Disconnect this. (I loosened up the both before I took the picture).
2uyn2hs.jpg


6. I also loosened the PUSHROD BOOT (Orange thing in the previous picture). It was just glued on the pushrod with what looked like some SILICONE or simple rubber cement.
(to be continued)
 
7. I then disconnected the PUSHROD from the Aileron BELLCRANK, again keeping track of which washers/bolts/etc went in place. I noticed that the JAM nut had backed off from this control end so I tightened it up and put some torque seal on it before I disconnected it.
Bottom of Bellcrank
o9nu37.jpg

Top of Bellcrank
2hdqvde.jpg


I then was able to simply SLIDE the Aileron pushrod OUTBOARD. I did NOT have to remove the WING TIP. I was able to push it outboard enough that now I had clear access to all of the BOLTS on the back of the spar for the "Z" brackets and I then removed them.

8. I saved the "Z" bracket that is next to the wing root as I figured it would be the easiest. BOY WAS I WRONG!!! The problem is the bolts are SO CLOSE to the bracket that you can not get a SOCKET on the bolt head and then because of the clearance between the tank and the fuselage you can't get a wrench on it and then even if you can get a wrench on it, the tangs on the wrench bump into the bracket. MODIFIED TOOLS TO THE RESCUE!!! First up was the GROUND DOWN socket (thin the wall). It worked for two of the bolts, but the last one it was not thin enough. I'm sure if I ground it down more it would split the socket out. So next up was a CROWFOOT. Bad thing about the CROWFOOT was again the big ear/tangs on the crowfoot wouldn't let it rotate around without hitting the bracket. So GRIND DOWN the tangs on the crowfoot and presto!
2958lfs.jpg


9. Then after removing that breakaway bolt (What purpose does it really serve?) it was time to remove the tank. Like I mentioned, the dimples to dimples really holds the tank on but I was able to work it free and remove it from the plane.
30jjxaf.jpg

and
54ayw7.jpg


10. Here is the back side of the tank
34yz85y.jpg


My biggest concern is where is it leaking from??? I pray that it is NOT leaking from the seam, that it is ONLY leaking from the access plate. As you know if the seam is leaking that is a MAJOR undertaking as you will have to cut access holes in the back of the tank to be able to get to the inside to work on sealing it up from the inside out. I believe that it is NOT leaking from the seam. If it was I think you would see fresh wet stains with HEAVY HEAVY staining like you see on the access plate. Plus there was oh, maybe a qt of fuel left in the tank. If that seam was leaking THAT would be the very, very low point and that ALL OF THE FUEL would have drained out. I believe the staining was simple fuel running down and getting blown around, etc. I will find out when I leak check the tank before doing anything else like tearing it apart.

30t2qyw.jpg


24pf8s8.jpg


Again, the next plan of attack is using the VANS leak testing setup (Ballon, Tire Valve, Line Cap) will be to pressurize the tank using a hand bike pump and then using maybe some PROPANE GAS leak checker spray I want to verify where the current leaks are before disassembling anything. Then once I've verified where the leaks are I will proceed with the next steps.

Part 2 to come in another week or so.

(thanks in advance guys!!)
And thanks to those people that have helped so far, that have had the modified tools to loan, the free advice and for my wife who helped me remove the thank off the plane. She is my handy helper!!! Thanks in advance to a local expert craftsman who said he hill help me with the proseal portion!
 
Last edited:
Quick question guys, a few of the rivets that are in the crappy leak area(Wing root near the access panel and 1 or 2 on the back seam area), the proseal that is on top of them has gone soft. Suggestion on what to do with them?
Leave them alone?
Clean them off using ________ and put some more proseal on top of them?
Clean it all up down to bare using whatever you have(Dental pick, toothpick, etc)?
Put more (good) proseal over top of the (bad) gone soft area?

The tank removal took me a lot more time that I hoped it would(I think someone quoted 1 hr removal), about 4 hrs total time. But I hope it makes things easier and doesn't make things worse.

Thanks!
 
2n064a1.jpg

Ok, I mounted the fuel tank in a cradle that my hanger neighbor had and using the VANS PRESSURE test kit, I installed the TIRE VALVE in place of the fuel drain, placed the CAP on the fuel pickup tube and then installed a ballon on the fuel vent line.

Using my bicycle pump, I started pumping up. The ballon was slow to inflate but then once you had it started it blew up all on its own after overcoming the initial stretch of the ballon.
Then using some Soapy water mixture (5 parts of water, 1 part soap) started spraying. I check the filler cap and the rear baffle seam all were good. On the wing root it seemed the majority of the leak was around the fuel sending unit. I didn't get many bubbles from the access panel, was kind of surprised.

28kq3a8.jpg

Then removed the fuel sending unit and unscrewed the access panel. The sending unit only had a rubber gasket on it that was getting a little stiff and also had cracks around the cutouts for the screws.

66izki.jpg

Then using a plastic putty knife started in on the access panel. BOY IS THAT PROSEAL TOUGH STUFF!!! It was a bear getting this off. We were able to work from the leading edge towards the spar but after a point we couldn't push the putty knife any further. My helper (THANKS IN ADVANCE HAL!!!) made up a piece of scrap aluminum so it was about 1" wide and 14" long and we rounded all the corners off. Using this and working it around we were able to get it separated. I think it was to our benefit that there was a cork gasket with proseal on both sides otherwise I think it would have been tougher. I hope it never leaks again because it will be a pain in the rear to get off.

33v1awy.jpg

Inside of tank.

r02ntk.jpg

Before cleanup. To clean it up we used the plastic putty knife and then some acetone on a rag to get the residual and it cleaned up pretty nice.

1533dxx.jpg

I thought I had a picture of it all cleaned up before re-assembly, but I guess not.
My first time mixing proseal and that was a little different. We used the "cartridge" and the instructions were foreign to me. Dasher Rod, Mixer tube, etc. Luckily Hal had done it before! After the 50 strokes and a few more for extra caution we filled up a small syringe that we had cut part of the tip off and that work PERFECT for running a bead around the parts. I then dipped the threads of the screws into a little proseal for good measure and snugged things down.

It was interesting about the time we started mixing the proseal up the "PEANUT GALLERY" showed up and everyone had an idea on how tight the screws should go! I'm pretty sure the VANS folks I talked to and saw mentioned on here is you didn't want to tighten them down tight. I thought VANS said to run a bead around the parts and then tighten the screws down and when it squishes out 1/8" or so its good and leave it. So I think we did something in between.

It's funny, after tightening down the screws prior to the tear down to stop the leaks the sending unit had stopped leaking but the access panel had not. It seems that the leak on the access panel was really related to the screws. May have gotten away with draining the tanks, removing the screws, putting a dab of proseal on them and sealing them back up.

Also, there were a few rivet heads that had some proseal that was soft, so we cleaned them up and I dabbed some proseal on them as well.

I got out of town for a week, so the tank will sit and cure and I'll pressure test it again when I get back. If all goes well, I may take an put 2 gallons of fuel in the and stand it on its end and let that sit for a day or two and then if all goes well then back on to the plane. Fun adventure!! Learning new skills.
 
Hey guys, thanks so much for the awesome info. Today I replaced a leaking sender unit (originally had black rubber gasket that had been prosealed in 9 years ago during original build). Took a few hours to remove the goop, used scotchbrite and wooden ice cream sticks to do it. Finally I used flamemaster cs3204 sealant on the unit with no gasket and sealed it up. I strongly recommend the 6oz container that comes with its own mixing and dispensing tube! All done without removing tank and for a useless bugger like myself only a few hours. Removing old goop is the most time consuming part!
 
Access panel is cemented to the rib

This is a 23 year old RV-3 with a leaking fuel sender (terminal screw), retaining screws and fuel line. It was suggested I removed the assembly and redo the whole enchilada and add the anti-rotation device. Well, as you can see everything is off but the access plate which is "welded" to the rib. A call to Van's resulted in a suggestion about sharpening a hacksaw blade and work it between the rib and access cover. No joy. A razor blade is not working either. I would be encouraged if I saw some progress but this thing is sealed.

Can I use that anti - proseal stuff and work it around the edge of the plate? Anyone is SOCAL that would like to demonstrate?

Send help.

34172749933_e2e5ec6bf0_c.jpg
 
Perhaps a suggestion or two?

Still could use some constructive comments. Items to note:
1)New fuel sender rod was bent to specs per Vans but it sure seems like the range of motion is not correct for my RV-3. Shall I just proceed or calc more accurate bends.
2) Access panel is not going to be removed from rib. Hard type Proseal used, not the removable type. If I use the heavy duty scraper I will destroy my rib for sure.
3) I am not seeing any washers used. Should I removed the washers I planned on using as original equipment did have washers, and a ground lead from the fuel sender.

Any thoughts?

Mark
 
Hi Mark,

I know this isn't pleasant news, but it's just a time consuming, frustrating process to get it loose. Be creative in tool selection. One option is a cheap utility knife with those 'snap off' blades. Another is single edge razor blades in a scraper style holder. You just have to keep 'worrying at it' until you can get separation started somewhere around the perimeter. Once you get it started, it will go faster. If you can get even a needle poked through from edge toward middle, you can try thin piano wire (try a high-E guitar string) as a cutter.

Once you get it off and everything cleaned up, you have to decide how to re-seal the covers. After a couple of frustrating experiences, I did some research & decided to go down a somewhat unconventional path. I found this stuff:
http://www.permatex.com/products-2/product-categories/gasketing/gasket-sealants/permatex-permashield-fuel-resistant-gasket-dressing-flange-sealant-detail

I put a bead around the flange, and a match head size blob over each screw hole before inserting the screw. Has worked great for several years now. It never hardens. It withstands avgas, and any conceivable blend of mogas. Did I mention that it never hardens? So the next time you have to fix a proseal leak (and you will), it won't be a leak in your cover causing the problem and you won't have any problem removing the cover (I can testify on both points).

FWIW...

Charlie
 
Last edited:
Back
Top