What's new
Van's Air Force

Don't miss anything! Register now for full access to the definitive RV support community.

HELP! I'm about to throw this rudder in the can!

tkatc

Well Known Member
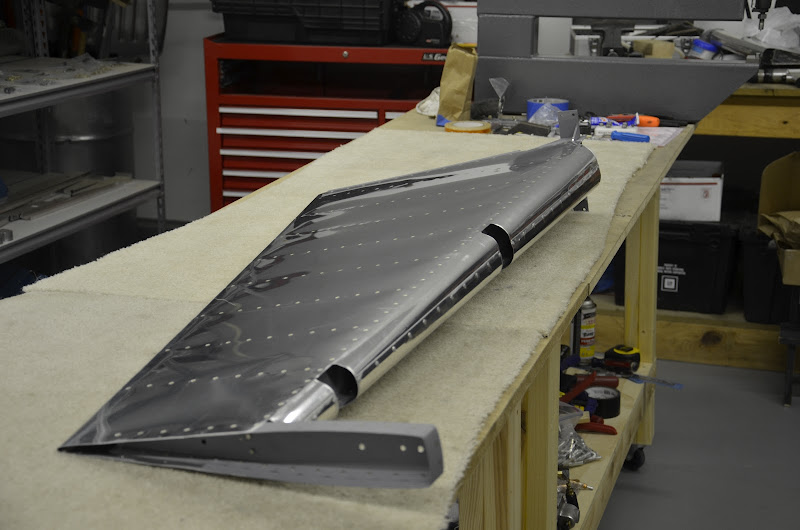
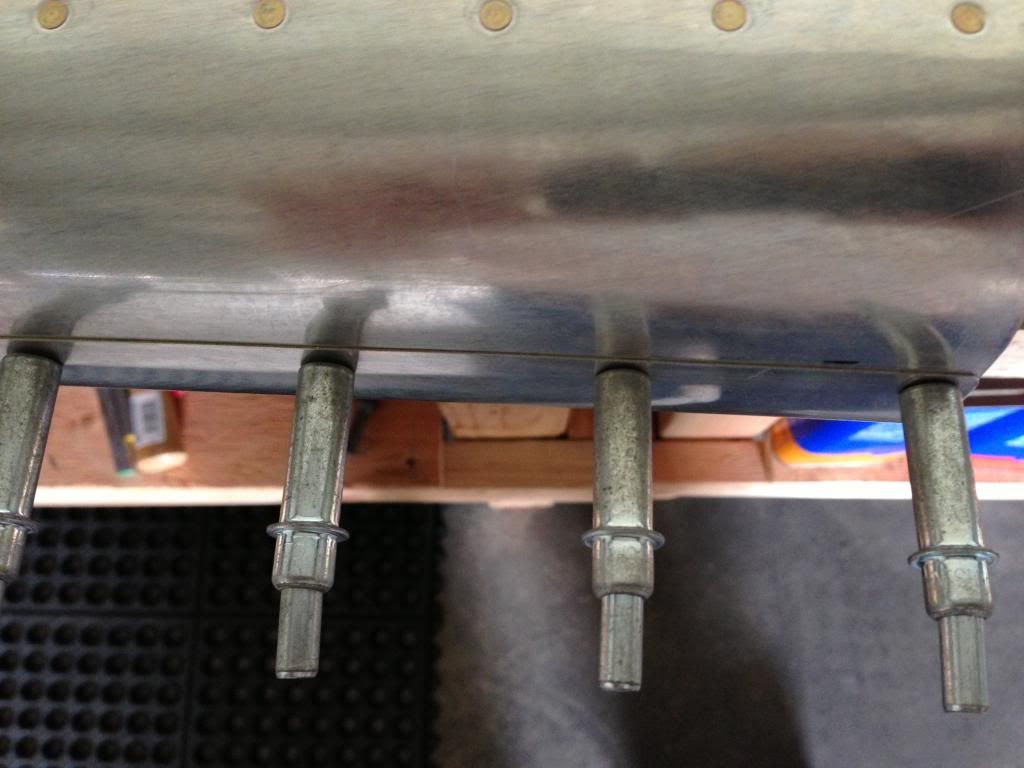
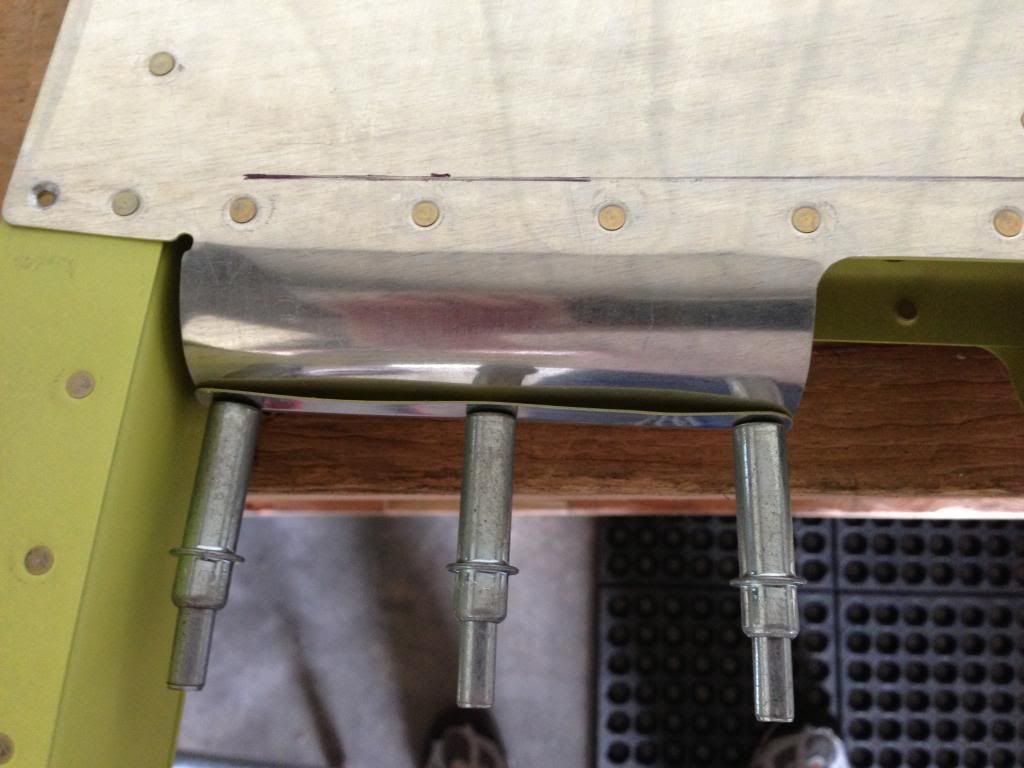
At my wits end with this leading edge. I bent it twice now. The first one came out too wavy and extremely hard to cleco. On the second attempt I REALLY bent it and got the top half looking good. Still cannot get the bottom half. I am using tape, clamps, and brute strength. I need gorilla grip!!

Top half
309241_3876441982628_849278284_n.jpg


Bottom half :mad:
408238_3876442662645_2014579879_n.jpg
 
Looks about like mine did.

I'm pretty sure a large diameter stick and see if that helps too.

Phil
 
Looks pretty good to me. It's tough to bend and get it looking as good as the rest of the tail, but you're coming pretty close. Just use tape to hold it together, cleco it, and begin riveting. You'll be sore by the time you're through, but it will be okay. Don't forget, this fits inside the back of the stabilizer and will not be seen. On mine I added a couple of extra pop rivets on some gaps I was not happy with, but all that did was help my peace of mind. Really doesn't make a hill of beans.

You'll also be surprised that when you bend the elevators you will have learned a lot more than you thought by doing the rudder. Took me all day to do the rudder, but only a few hours to do both elevators. For some reason doing the elevators just seemed to go a lot better.

Hang in there. If I could do it, you'll do just fine!
 
Yup; looks just like mine did. Mine is going to be leaving for Larry Vetterman's Fly-In in the morning. Build on and you will be joining us sooner than you think.
 
I have read other people saying the same things. I appreciate the helpfulness....but I can't even get it clecoed. I bent a cleco tip trying to force one in and I can see that will just enlarge the hole anyway...**** thingy!
 
Fornwhat it is worth, I used duck tape to help me hold it to get it clecoed. Previous post beat me to it.
 
I feel like the ENDS (edges with holes) are bent enough but I need more bend on the sheet closest to the spar...which the directions specifically caution against. So I am timid to ruin the entire rudder.

My builder friend has reached celebrity status now and is ABOVE coming down to help!!
 
I have read other people saying the same things. I appreciate the helpfulness....but I can't even get it clecoed. I bent a cleco tip trying to force one in and I can see that will just enlarge the hole anyway...**** thingy!

I used a broom handle well taped to the aluminum with duct tape and a couple pairs of vice grips clamped to the broom handle for leverage. Was a problem before the vice grips but I don't remember it being a problem after started using the pliers.
 
Rest up a bit then get the wife (or someone else) to help. You force the two ends to come together, then have the other person duct tape it together. Even if it's not exact yet, it's much easier to keep working the ends together if they are already close. Yeah, I think I bent a cleco, too.

Oh yeah, one other thing, don't mess it up! :D
 
My builder friend has reached celebrity status now and is ABOVE coming down to help!!


C'mon Tony. Did you see the sky today? I was at the airport for two hours and could not get my nose out of hangar it was pouring so heavy. Listen to the people I told you so. Wait till Monday we will get this thingy riveted.
 
Ours came out fine, but the image illustrates what we thought about it at the time.

Remove if over the top

928065888436d5c4d0f25a.jpg
 
One thing that helped me is to make the bends in the front by sections individually. I cut the dowel to fit in between the hinge points and used pliers to roll each section. That way I was not trying to roll the whole length at one time.

Bird
 
Tony, bring it to our Fly-In at Sky Manor N40 and I'll help you, you need to massage the two skins together! If not Vald's your man!
 
difficult - but this may help

I remember at the time, and for quite a while afterwards, thinking that this was the hardest step to get done with real craftmanship that I had encountered on the kit.

I didn't have much luck with duck tape and broom stick - the tape would creep too much, especially in the middle. Here's what I did instead:

I took a 1" diameter aluminum tube, and match-drilled every other hole in the leading edge skin to the tube. Then, I cleco'ed the skin to the aluminum tube. I drilled a cross hole in one end of the tube to stick a phillips screw driver through the hole to make a handle, and twisted. I was able to get nice constant bend curve without a crease at the spar, so when I did both sides, they fit naturally together and did not have much stress in them when cleco'ed. Same treatment of course on the elevators.

I kept the aluminum tube, so if (when) I build another one of these things, I'll do it the same way again.
 
I bent a cleco tip trying to force one in and I can see that will just enlarge the hole anyway...**** thingy!

OH NO! Not a bent cleco!!!

:eek:

Hahahaha Tony, Tony, Tony...

Don't give up that easily now. You have a looooong road to hoe!

It will fall into place once you have formed it enough!

Bring it to Hangar 5 this weekend. We will be working on the Six, doing Acrogirl's oil change and we can get that done too!

:) CJ
 
...just monkeying around

I need gorilla grip!!

We used Gorilla Tape instead of plain duct tape to tape a length of iron pipe to the aluminum, and a monkey wrench (actually a pipe wrench) on the end of the pipe for leverage to turn it :p

Same technique to curl the upper flap skins too, but it took three of us primates to bend those.
 
Last edited:
Rudder leading edge

1) 3/4" copper pipe to length
2) "Gorilla Tape" and only that brand...cuz it grips without slipping...period. Cut tape to the same length as the pipe.
3) vise grip(s)
4) perhaps one other person to hold down the rudder
You know the drill. Torque, torque, torque.
 
Thanks guys. Sorry for the rant. I just thought it would be much easier than it was. It was by far the hardest thing to do on the build so far.

Finished product!
_DSC0031.JPG
 
Looking good! If I were to do it over again, I would use Steve's method of clecoing to the pipe and putting a good "prebend" in the skin.

Greg
 
One thing I really appreciate about his forum is the fact that if you can't get an easy solution to a problem, you'll at least get a lot of moral support ... And a little bit of humor. "Support" and "Humor" go a long way to making challenging tasks easier!

Tony - it looks nice. Have something from the mini-fridge and on to the next page !
 
i see 1 problem no one else has mentioned. I used the exact "BroomStick" you show in pic. Make sure the wife doesn't see it all buggered up at the ends!!! Mine did! Ain't gonna tell ya what she did with it!!! They seamed to get real upset when we use their "stuff". Oh yeah, my rudder leading edge looks just like yours! build on!
fred
 
You've just experienced one of those precious RV Building moments - the ones where you go from the depths of despair on a part that just isn't working to "hey, that actually turned out OK!"

You'll get a few more....:rolleyes:
 
tk, i'm building my rudder right now.


wanna race? ;)


i get 6 month handicap for moving across the country though :D
 
also, wasn't there some method involving "J" bolts in the table to hold the dowel down?

i thought this was the standard method but haven'ts seen it mentioned.


...__
../ . \ <--bolt
__O)| <--skin/dowel
===== <--table
......|
 
Doing some research on the subject because despite my research on how to get a good bend...I didn't. Well, I should say I got most of a good bend but I am so not happy with the other bits.
The bottom portion is a thing of beauty.
IMG_1474_zps71741592.jpg


About 3/4 of the way up the middle portion the skins start to pillow up between the clecos. By the time it gets to the short top section it looks like this.
IMG_1475_zps688b482a.jpg


I think what has happened is the skin started to roll up too close to the spar. I rolled the three sections separately but think I need to futz with it so that the roll doesn't begin until further out.
For those of you who have encountered this, am I on the right track or how did you fix this?
 
I think you are on the right track. That last picture doesn't look too bad actually. The rivets will pull it in line much better but if you are still concerned, I rolled the overlapping edge "just a hair" so the joint will lay flatter. Some builders added extra rivets. Either way, as long as it doesn't interfere with operation, you will be fine. That joint sits tightly inside the HS and will not be seen.
 
A trick I found was to use an 1" aluminum tube and some quickly-made hold down brackets to keep the tube pressed down to the bench. I cut the tube to barely fit between the cutouts for the eyebolts, so that I could snug down the tube and put in a phillips head screwdriver (or other rod-like thing) into holes drilled into the tube. I used the screwdrivers as handles and rotated the tube to bend the skin. Gorilla grip tape is a must!

See the photos in my log for more info. this worked well on rudder, but better on the elevators with thicker and stiffer skins. Patience is key; gently bend and check a few times to get it right. Do one side first, starting and the tip end, the the other.

http://www.mykitlog.com/users/display_log.php?user=wjbencze&project=2206&category=0&log=166078&row=3

Tho, this idea from DanH looks better:

http://www.vansairforce.com/community/showpost.php?p=323184&postcount=4
 
Last edited:
confused ??

Tony,
In another thread you said you were buying new skins, the apex and some proseal.

The rudder in your photo is the smaller rudder with the bent trailing edge.
Did you take our advice and decide to build the smaller rudder?
If so, you will be glad you did!

Mark


Thanks guys. Sorry for the rant. I just thought it would be much easier than it was. It was by far the hardest thing to do on the build so far.

Finished product!
_DSC0031.JPG
 
Tony,
In another thread you said you were buying new skins, the apex and some proseal.

The rudder in your photo is the smaller rudder with the bent trailing edge.
Did you take our advice and decide to build the smaller rudder?
If so, you will be glad you did!

Mark

No, Mark

This is an old post the a different poster just revived today. I originally posted this awhile back when I was having trouble building my -8 rudder. (working on the fuse now)

The rudder you are referring to is my damaged -7A rudder, which I ordered the new parts to rebuild as designed by Van's (the second time, meaning the larger -9 rudder)

I know it's confusing. I BOUGHT a flying -7A and I am building an -8 so many of my posts probably have people guessing if they don't realize that. :D
 
Oil Canning

Tony,

I think, but haven't confirmed it, but if you use the rivets to pull the skins together you end up with tension on the rudder skin that can cause oil canning. That's how mine is, and folks on this forum a few years ago had confirmed that oil canning of the rudder is common.

Seems to me, that if you pull the skins together rather than massaging the bend so they lay together naturally, that the skin will want to teeter on the front rudder spar and tend to bow out towards the trailing edge, creating the oil canning.......I think.

I'll be re-doing mine prior to flying.
 
Oh I see

I understand now. Thanks.

You should stick the 8 rudder you have on your 7A.

That way you could fly sooner!
But be prepared to leave it there. You will like it too much :)

Mark


No, Mark

This is an old post the a different poster just revived today. I originally posted this awhile back when I was having trouble building my -8 rudder. (working on the fuse now)

The rudder you are referring to is my damaged -7A rudder, which I ordered the new parts to rebuild as designed by Van's (the second time, meaning the larger -9 rudder)

I know it's confusing. I BOUGHT a flying -7A and I am building an -8 so many of my posts probably have people guessing if they don't realize that. :D
 
Don't think anyone mentioned it, but I used what I think is called an "edge seamer" to bend the edges slightly down. This had the effect of eliminating most of the edge gap after rolling which might otherwise occur.
 
Back
Top