What's new
Van's Air Force

Don't miss anything! Register now for full access to the definitive RV support community.

Check those fuel lines...

Walt

Well Known Member
I hate when I find this stuff, it's a lot of work to fix :mad:
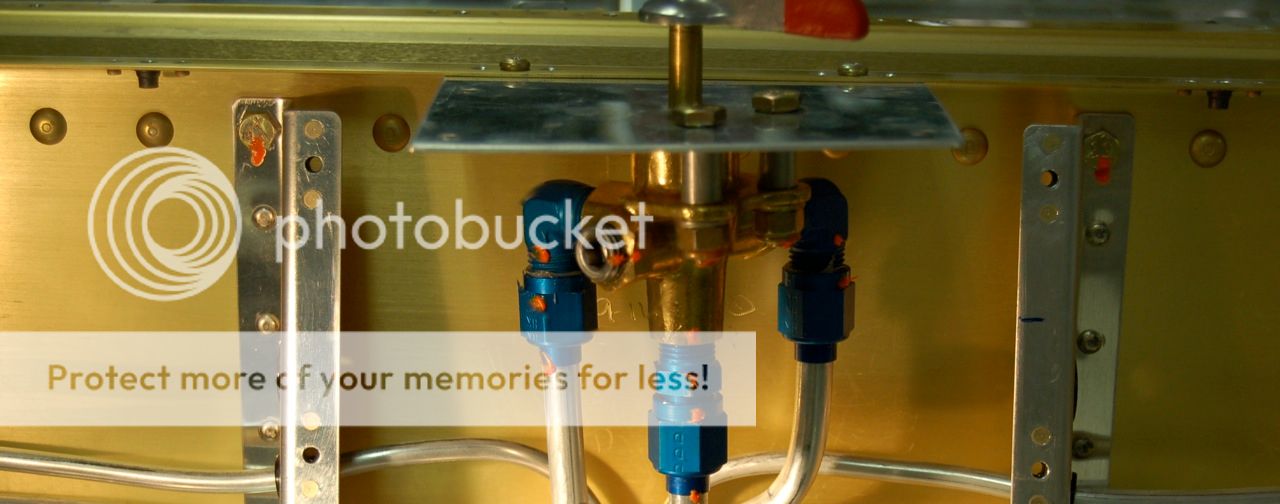
All this stuff in the tunnel of a 10

Leak at fuel selector

fuel%2520leaks%2520001.jpg


Leak at feedthru from tank L/H side (notice the blue staining on insulation)

fuel%2520leaks%2520004.jpg


Leak at fuel pump 'T'

fuel%2520leaks%2520005.jpg


Making your own FWF hoses? Maximum gap allowed between nut and collar is 1/16" (this one is over a 1/4")

fuel%2520leaks%2520014.jpg


If your flares look like either one of these you've got more work to do!

fuel%2520leaks%2520013.jpg


fuel%2520leaks%2520017.jpg


Quick tutorial on flaring. One of the more important things is lubricating the cone before starting the process, if you don't you will "smear" the metal in the flare.
http://www.sportaviationonline.org/sportaviation/201001/?pg=80#pg80
 
Hi Walt. Not to hijack the subject but you are a great RV anatomist what's that extra port on stock Vans selector for? Can I plumb aux cabin tank into it?


Gee Walt----great catch. Thank you for taking pics for everyone to see.
This get serious in a BIG hurry.
Tom
 
Thanks for sharing Walt, you find a lot of stuff, too bad you aren't closer, I could use your eye. Meanwhile, I was planning on pressure (air) testing my fuel system in stages. 1. fuel pump assay, 2. 1+ selector valve and all cabin connections. Then that leaves each tank, and FWF. The plan was to use 50 psi and let it linger and if pressure drops then search for the leak. Fantastik works well for this purpose, taking care for drips on the aluminum of course. I have plugs for the connections and will not use an addition volume of air.

What do you think about this progressive validation approach?

Thanks in advance.

I personally like testing with fuel, others may have good luck with air but I've seen plenty of tanks that were "pressure" tested with air leak when fuel was put in them.

Plumbing is really pretty simple stuff, goop the pipe threads and tighten the **** out of them, then make a good flare and put it together, look ma no leaks
 
Last edited:
Thanks for sharing Walt, you find a lot of stuff, too bad you aren't closer, I could use your eye. Meanwhile, I was planning on pressure (air) testing my fuel system in stages. 1. fuel pump assay, 2. 1+ selector valve and all cabin connections. Then that leaves each tank, and FWF. The plan was to use 50 psi and let it linger and if pressure drops then search for the leak. Fantastik works well for this purpose, taking care for drips on the aluminum of course. I have plugs for the connections and will not use an addition volume of air.

What do you think about this progressive validation approach?

Thanks in advance.

I used this...

http://www.waresdirect.com/products...kURL=froogle&gclid=COj16LGep7sCFepaMgodT1gAOA

and this...

http://www.amazon.com/UEi-Test-Instruments-CD100A-Combustible/dp/B000HHTY7Q

Or pay your HVAC guy a svc call to check for you. They should have both of these items. Use nothing corrosive around your plane or it may come back to bite down the road.
 
One of the more important things is lubricating the cone before starting the process, if you don't you will "smear" the metal in the flare.

I've found that the aviation isle of my favorite bike shop has a good, light lube for flaring:

http://www.whitelightningco.com/products/epic.htm

Kerosene is often recommended; I don't have that around the house, but this I do. The flares come out very smooth ad pretty ... unlike the ones posted in here.
 
OMG those flares look terrible, it's hard to catch in a Prebuy.
I was afraid it was going to turn ugly when you got into the tunnel.
Thanks for taking to time to make it right.
 
Funny.. no diesel, without the kerosene heater running I can't feel my hands!
This weather is just not right for Texas!

OH, MY, GAWD!

Kero in a yellow container? Guvmint man gonna git you! :)

(I've actually had people chastise me about color vs. product at the pump.)
 
My understanding was that AN fittings were to be installed with dry threads...I take it that I am misinformed?

The PIPE threads (and only the pipe threads) must be sealed (I generally use tite-seal). The flares, B nuts etc. go together dry.
OH, MY, GAWD!

Kero in a yellow container? Guvmint man gonna git you! :)

(I've actually had people chastise me about color vs. product at the pump.)

Walmart had them on sale :D
 
Sorry for the multiple posts. I kept getting a "database error" and thought the response wasn't posting...
 
Wow!

Fuel in the tunnel of a -10 is an explosion waiting to happen.....unfortunately for one gentleman on here, already has.

Best,
 
Hi Walt. Not to hijack the subject but you are a great RV anatomist what's that extra port on stock Vans selector for? Can I plumb aux cabin tank into it?


Vlad is that sealant I see on the B-nuts? If so that's a no-no.
 
Gee Walt----great catch. Thank you for taking pics for everyone to see.
This get serious in a BIG hurry.
Tom

FYI: Tom is making me a full set of FWF teflon firesleeved lines to replace the homade ones, I'm a big believer is letting the pro's do what they do best and Tom is a pro at making lines!

I would suggest everyone do the same unless you have the proper tools/materials/training to do it properly.
 
Last edited:
Vlad is that sealant I see on the B-nuts? If so that's a no-no.

Thanks RocketBob for looking over it.
It's a bit of EZturn on threads only flares installed dry. Every one hundred hours I inspect fuel lines the only seep was found at a gascolator fitting.
 
I hate when I find this stuff, it's a lot of work to fix :mad:
All this stuff in the tunnel of a 10

Leak at fuel selector

fuel%2520leaks%2520001.jpg


Leak at feedthru from tank L/H side (notice the blue staining on insulation)

fuel%2520leaks%2520004.jpg


Leak at fuel pump 'T'

fuel%2520leaks%2520005.jpg


Making your own FWF hoses? Maximum gap allowed between nut and collar is 1/16" (this one is over a 1/4")

fuel%2520leaks%2520014.jpg


If your flares look like either one of these you've got more work to do!

fuel%2520leaks%2520013.jpg


fuel%2520leaks%2520017.jpg


Quick tutorial on flaring. One of the more important things is lubricating the cone before starting the process, if you don't you will "smear" the metal in the flare.
http://www.sportaviationonline.org/sportaviation/201001/?pg=80#pg80


Dear Walt, did you have fuel smell in the cockpit?

Regards,
 
TS Flightlines

FYI: Tom is making me a full set of FWF teflon firesleeved lines to replace the homade ones, I'm a big believer is letting the pro's do what they do best and Tom is a pro at making lines!

I would suggest everyone do the same unless you have the proper tools/materials/training to do it properly.

This exactly why I went with Tom to fabricate teflon lines for the fuel lines from tank to selector valve and selector valve to fuel pump. More expensive, but after critically reviewing MY flares it was an easy decisiion.
 
No carpet on my -12 Fuel Tank...

FWIW,

For the purpose of visually monitoring the fuel tank for early signs of weepage I elected not to carpet the tank. Part of my preflight is to eyeball the tank for signs of leaks.
 
Although like Walt, I hate to find those kinds of" issues", I'm reminded how fortunate it is that Avgas has such a powerful smell and has blue dye in it. It makes leaks --- even teeny ones - almost self detecting.
 
Dear Walt, did you have fuel smell in the cockpit?

Regards,

I can answer that question, No it did not have any smell of fuel in the cockpit. When I had the Pre-buy, it was noted that the tee below the valve had a blue stain but no visible sigh of a current leak. The other location at the time did not show any signs of a leak. I had assumed that the builder had found a leak and corrected it. I never thought to remove the line and inspect the flare.
 
Walt will be performing a pre-buy for me today on a 6A and I always knew I wanted Walt to be involved with my next purchase......this thread just reassures that I made the right decision to have Walt do the pre-buy. :D
 
Back
Top