What's new
Van's Air Force

Don't miss anything! Register now for full access to the definitive RV support community.

Cowl Damaged by Alternator

f14av8r

Well Known Member
Hi Guys,
Need a little help here. After my 5th flight in my new (to me) RV-4, I noticed a small hole on the outside of the lower, right side of the cowl. When I took the cowl off, there was about a 2x1 by 1/2" deep divot in the cowl. I was obvious to me that the area had been repaired previously and I thought the previous repair had just let go. I taped over the hole and flew a few more flights while contemplating the repair.

A few days back, I filled the divot with epoxy and went flying. When I came back, I was surprised to find the hole was back and all my epoxy was cleanly removed from the divot. Slow on the uptake, I though I'd just failed to adequately clean the area and began contemplating another repair. I taped over the outside of the hole and kept flying.

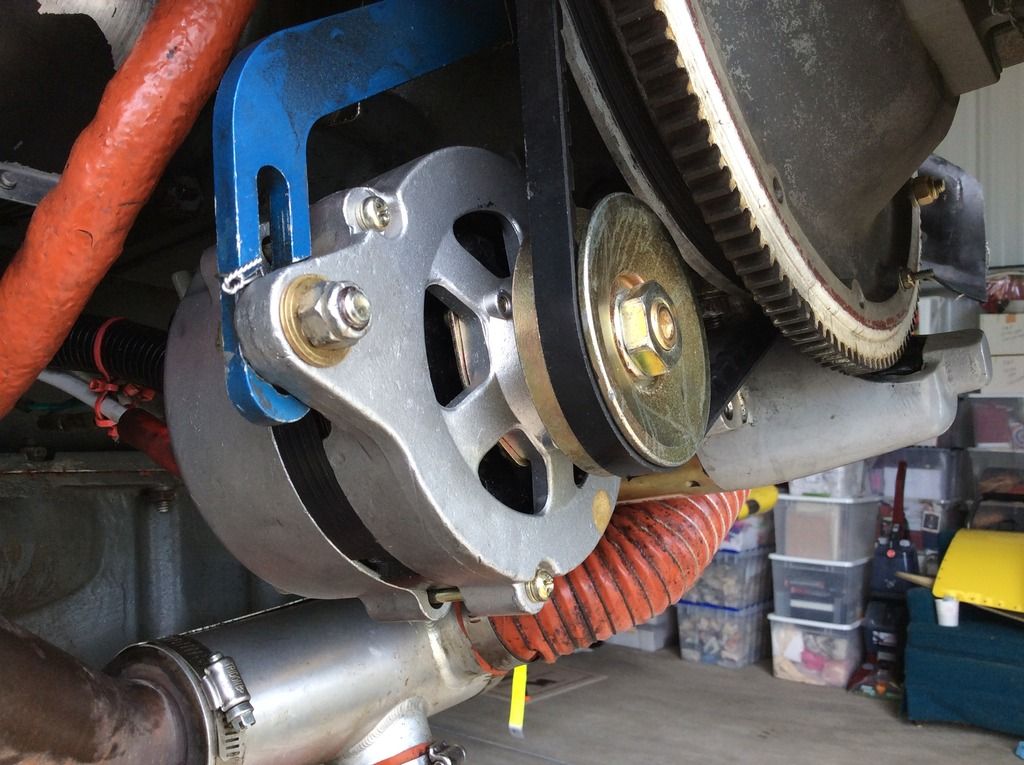
This morning, while re-cowling after some other work, I looked through the gap between the upper and lower cowl halves (piano hinge removed) and it instantly became clear that the divot is being caused by the alternator. That fan thing on the alternator is grinding away at my cowl!

I suspect the reason this hadn't become apparent earlier is because the previous owner wasn't flying the airplane as aggressively as I am. I'm regularly putting 4.5g on the airplane during aerobatics.

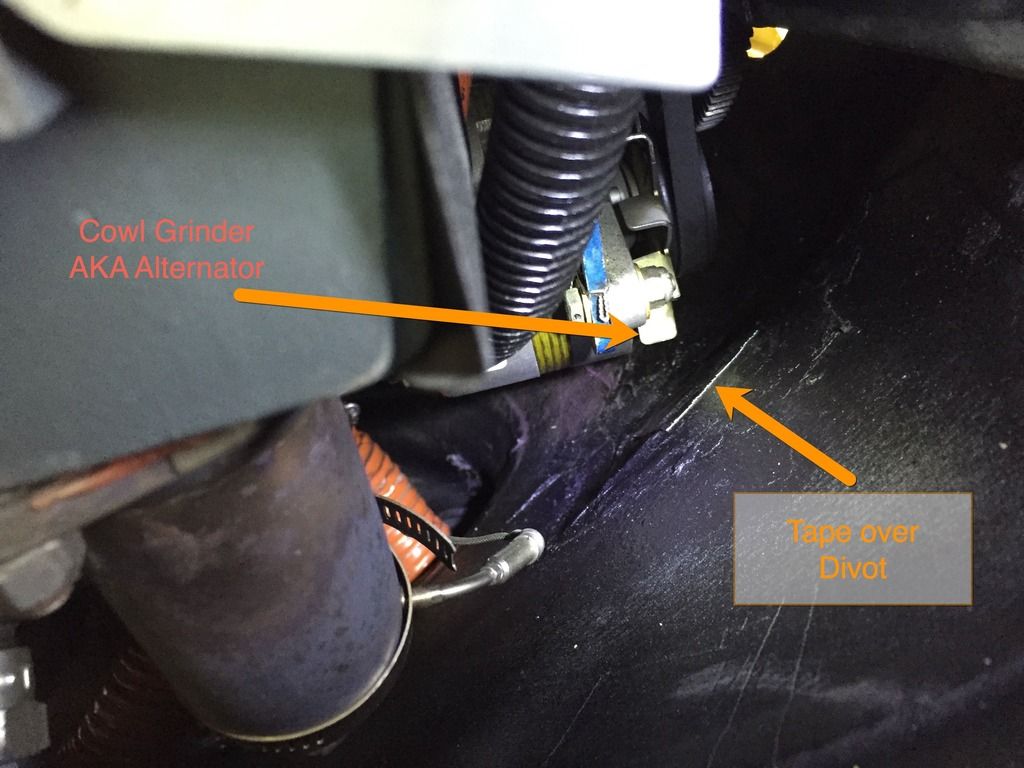
I attached a photo from the outside of the cowl, one of the divot from the inside of the cowl, and a photo through the cowl junction looking at the alternator. I put a piece of tape on the inside of the cowl over the divot. The white line visible in the photo is the edge of the tape covering the divot. I'm using the tape to confirm on my next flight that interference is still occurring but I'm about 90% sure that it is.

My questions for all you experts:

Is it normal for the engine to sag on the mount under "g" enough to cause this to happen?

What should I do to eliminate the alternator to cowl interference?


Thanks for the help!
Randy
Photo of cowl damage. The damage penetrated the cowl at this point.
IMG_1083_zpsthwetufr.jpg


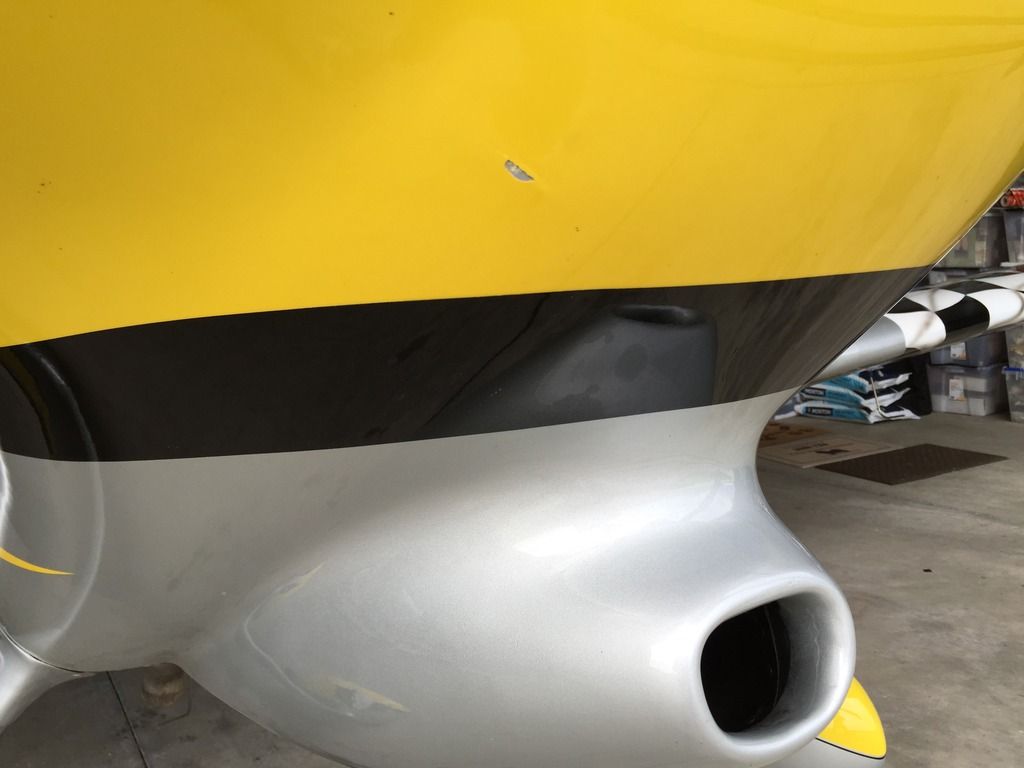
Photo of divot from inside of cowl.
IMG_1270_zps5cwiirju.jpg


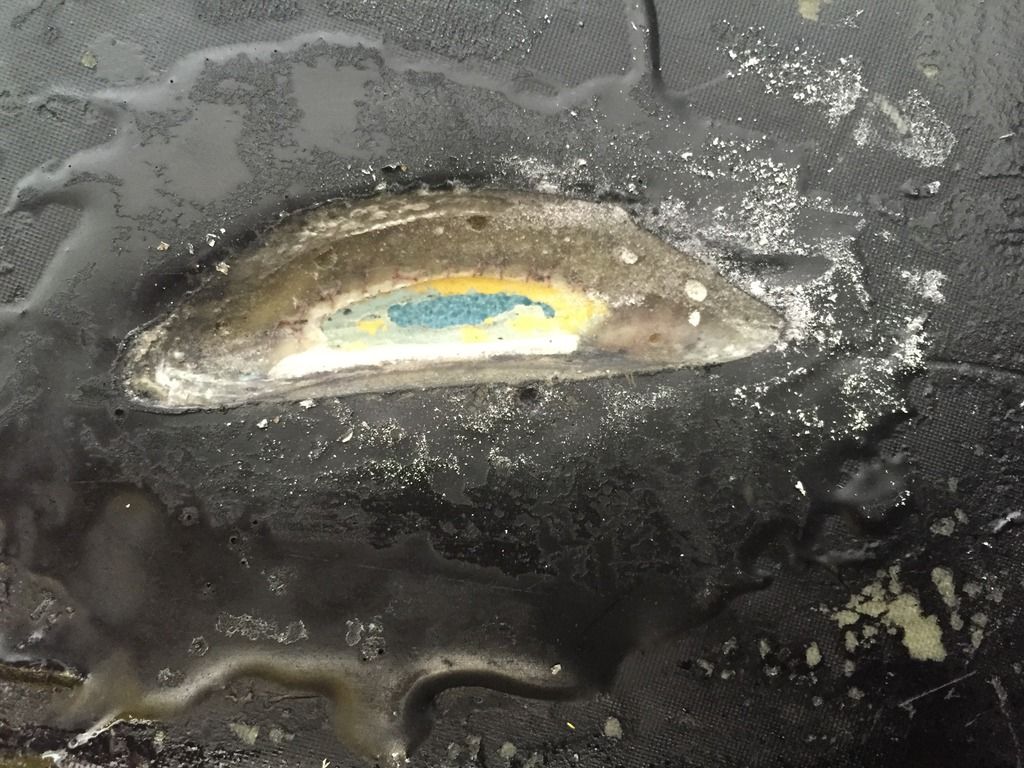
Photo of area through the right side of the upper / lower cowl junction
Cowl%20Alternator%20pic%20annotated_zpsa9evkwb1.jpg
 
I had to adapt the cowl on my RV-6 after this damage showed up following positive g loads of up to 6. I fabricated a bubble to accommodate the pulley. With the black painted cowl the bubble is unnoticeable except under careful inspection. I was using the shortest alternator belt I could fit.
 
There are many RV's flying with bubbles in their cowls to accommodate the alternator rubbing. Another thing you can do, which is not a lot of fun, is remove the prop and put on smaller belts that have to be put on with tension and the tension bolt all the way at it loosest location. Often a little drilling or nashing of teeth is in order to get the alternator all the way up as high as possible, then get the tension arm bolt as high at it needs to to accommodate the high alternator, then put the belt on that is tight without needing to lower the alternator.
 
looks like he had "fixed" the cowl at least once.

Go to an auto part store and buy a shorter alternator belt. Take the other one with you so they can match it. That fixed the same issue on my RV-4.

Unfortunately that will be a lot of work but you don't need the blister. The prop and starter ring will need to come off. Good luck.
 
Last edited:
So, my choices are:
- New alternator (B&C or equivalent)
- Shorter alternator belt
- Cowl modification (external bump)

Since a shorter belt involves removing the prop / starter gear I'm not inclined to go that route. First, it would be a lot of work and, at least for me, involve an A&P.

I don't want to put a bump on the outside of the cowl. This is a brand new paint job and it's in very good shape. In fact, this new hole is the only real imperfection. Plus, the fiberglass work would be, well, a lot of work.

I think I'll explore the smaller alternator route.

Will I be able to use my current alternator belt and regulator if I replace the alternator?
Thanks,
Randy
 
I think I'll explore the smaller alternator route.

Will I be able to use my current alternator belt and regulator if I replace the alternator?
Thanks,
Randy

Possibly------just no way to answer that one for sure.

Is the damage being caused by contact with the cooling fan fins, or with the pulley??

If it is the cooling fan fins, you could go to a larger pulley on the alternator, it will move the fins up away from the cowl by roughly half the difference in pulley diameters. But, it will also slow down the alternator, and if you are really close to the margin on your electrical load, there is a chance you might not get enough juice out of the system.

Now there's an innovative idea. I'm no where close to maxing out the electrical load on the alternator.

The damage is definitely being caused by the fan, not the pulley.

I think I'll be looking at new alternator pulleys tomorrow!
Thanks Mike!
 
Last edited:
Now there's an innovative idea. I'm no where close to maxing out the electrical load on the alternator.

The damage is definitely being caused by the fan, not the pulley.

I think I'll be looking at new alternator pulleys tomorrow!
Thanks Mike!

I suggest you get rid of the cooling fan.

Most of the alternators used on RV's have no fan.
When used on a Lycoming, the fan on an alternator is turning the wrong way anyway so it is not really helping to cool the alternator.

Even if you delete the fan, I would still concur that you should get a slightly shorter belt. If the fan is hitting, the pulley is not far behind. At 4+ positive G's, the engine sags more than you would ever believe.
 
Last edited:
You may want to look at the rubber engine mounts, and verify they are not tired or simply need a shim at the lower mounts. Does the spinner look to be in line with the cowling?
 
I agree 100%.

I suggest you get rid of the cooling fan.
Most of the alternators used on RV's have no fan.
When used on a Lycoming, the fan on an alternator is turning the wrong way anyway so it is not really helping to cool the alternator.

This is what most people have been doing for over 20 years.
 
I'll get rid of the fan first

I'm going to remove the alternator fan first. I've already got a cooling tube run to the alternator and, as others said, the fan probably isn't doing much anyway. If that doesn't work, I'll decide between removing the prop / starter gear or trying a different alternator.

I measured the distance from the outside surface of the cowl to the alternator blades by putting a ruler through the hole from the outside. There's only 3/4" from the outside so inside has to be less than 1/2 inch.

The engine mounts are in good shape and bolts have just been re-torqued.

I suspect what happened is the original owner / builder replaced the alternator when he reworked the electrical system a couple of years ago. He probably had a non-fan alternator before and, without considering the clearance issues, used one with a fan this time. I know he never flew it hard after putting it back in service so the problem wasn't revealed until I got it and started flying some aggressive aerobatics.

Thanks for the help everyone!
Randy
 
No A@P

Randy, you can do all the work on your experimental without needing an A@P.

You only need one for the annual/condition inspection. You can legally remove the prop, ring gear and belt.

Best,
 
Randy, you can do all the work on your experimental without needing an A@P.

You only need one for the annual/condition inspection. You can legally remove the prop, ring gear and belt.

Best,

Pierre is right.
But if it is not something you have ever done before, getting some assistance from someone with experience is a very good idea.
There are a number of things that can be done wrong if you don't know what you are doing.
 
Randy, you can do all the work on your experimental without needing an A@P.

You only need one for the annual/condition inspection. You can legally remove the prop, ring gear and belt.

Best,

Thanks Pierre! You're right of course but, since I'm not a builder, I'm trying to take a go slow approach with the more complex task. My friend Vic Syracuse has already helped me accomplish several other repair and maintenance items and I was saying I'd probably rely on a more experienced person, like an A&P, if I started pulling off the prop, ring gear and belt. Enough reading on VAF though and I might be willing to give it a whirl on my own!

Great advice here. How did anybody every do all this WITHOUT VAF?
 
New Alternator

As I was de-cowling the airplane yesterday, still deciding what to do about the alternator interference issue, I discovered the previous owner gave me a new alternator along with the rest of the contents of his hangar. I literally was just looking around while working and saw this box up on the shelf that said, "New Alternator - No Fan." Lottery ticket kinda stuff. Cool!

So, I jumped in and, with some help from Tony Bingelis (his book(s) actually, not in person) I managed to change out the alternator.

I haven't put the cowl back on and tried it out yet but I'm sure this will solved the clearance issue.

Thanks for all the help guys!

IMG_0032_zpssgygyhop.jpg
 
you can remove the prop yourself, just get help putting it back on :D
but I guess that is a moot point now. In a few years you will be doing this stuff in your sleep. there is no rocket science involved.

check out "EAA hints for homebuilders" video series. It's free and you will learn all kinds of stuff on maintenance and setup, timing mags, changing tires, making hoses, electrical connections - you name it. That is one of the best things EAA has ever done in my humble opinion.
 
As I was de-cowling the airplane yesterday, still deciding what to do about the alternator interference issue, I discovered the previous owner gave me a new alternator along with the rest of the contents of his hangar. I literally was just looking around while working and saw this box up on the shelf that said, "New Alternator - No Fan." Lottery ticket kinda stuff. Cool!

So, I jumped in and, with some help from Tony Bingelis (his book(s) actually, not in person) I managed to change out the alternator.

I haven't put the cowl back on and tried it out yet but I'm sure this will solved the clearance issue.

Thanks for all the help guys!

IMG_0032_zpssgygyhop.jpg


That looks like the 14184 ND alternator for a 1978 Honda Civic. It is a 35 amp device that has been in common use on RVs for many years. But be sure the alternator you removed was an externally regulated one because your new alternator requires a regulator.
 
That looks like the 14184 ND alternator for a 1978 Honda Civic. It is a 35 amp device that has been in common use on RVs for many years. But be sure the alternator you removed was an externally regulated one because your new alternator requires a regulator.

That's exactly what it is Sam, a 14184 ND. I didn't know that's what was used on a 1978 Honda Civic though. I used to have one of those! And yes, the previous alternator was externally regulated. That made things easy - I wired it right up to this one using the existing wiring. I had to adjust the regulator for my AGM battery but otherwise it's all good.
Thanks!
 
Back
Top