
Van's Air Force
You are using an out of date browser. It may not display this or other websites correctly.
You should upgrade or use an alternative browser.
You should upgrade or use an alternative browser.
Show us the status of your 9/9A project!
- Thread starter DeltaRomeo
- Start date

ArVeeNiner
Well Known Member
I hung my engine on Friday!
It sure was easy since I have a conical mount. It's a "pre-owned" (as the car dealers say) O-320 B2B "Frankenstein". I call it that because I swapped out the sump to move the carb forward to clear the nose gear.

I will be removing at least two jugs so that I can perform a rattle can overhaul on them. Plus, those red valve covers will go away.
It sure was easy since I have a conical mount. It's a "pre-owned" (as the car dealers say) O-320 B2B "Frankenstein". I call it that because I swapped out the sump to move the carb forward to clear the nose gear.
I will be removing at least two jugs so that I can perform a rattle can overhaul on them. Plus, those red valve covers will go away.
Lionclaw
Well Known Member
The canoe is rolled!
I completely underestimated the amount of work required to put this thing back together after the first fitting. Now that it's done, I can't help but waste time ogling the fuselage! Finish kit ships tomorrow, and I really can't wait to get this thing on wheels.
Hurry up Smitty! You're site has been an awesome resource so far.
llavalle
Well Known Member
Milestone Day for me
It was milestone day for me, I just completed the rudder... (well sort of).
Because we still have pre-close inspections, here in Canada, I left one of the skin unriveted to the ribs, left the top rib unriveted, left the trailing edge as-is.
I could have rolled the leading edge but if I need to replace rivets along the spar, I will be easier this way.


The last image was taken by my brother using his cellphone... sorry for the quality") As you can see, I've been using a free room in my basement to store the finished parts. Having a small 1 car garage has its disavantages.
As you can see, I've been using a free room in my basement to store the finished parts. Having a small 1 car garage has its disavantages.
FYI, the total rivet count as of today is 1242. Remember that this number does not include the holes left open for inspection (HS & VS rear spar + rudder right skin)
Now I can start the right elevator!
It was milestone day for me, I just completed the rudder... (well sort of).
Because we still have pre-close inspections, here in Canada, I left one of the skin unriveted to the ribs, left the top rib unriveted, left the trailing edge as-is.
I could have rolled the leading edge but if I need to replace rivets along the spar, I will be easier this way.
The last image was taken by my brother using his cellphone... sorry for the quality
As you can see, I've been using a free room in my basement to store the finished parts. Having a small 1 car garage has its disavantages.FYI, the total rivet count as of today is 1242. Remember that this number does not include the holes left open for inspection (HS & VS rear spar + rudder right skin)
Now I can start the right elevator!
rv9aviator
Well Known Member
Cutting Canopy
Well, I got the canopy cut into two pieces. I now have a windshield and a canopy.
I researched the tools others used to cut the canopy with with and here is what I ended up doing.
I heard the Fein Mutlamaster tool was just the thing to have so I bought one at a little over $300.00. I tried several different blades and for me it just wasn't the answer. It melted the plastic and was slow as smoke. I tried several different methods of cutting and none worked very well. I contacted Fein's tech support and they told me the Multimaster maybe wasn't the best tool for that particular job. After I got the canopy cut I did use the Multimaster to sand all the cut edges smooth to make sure nothing cracked later. I will say this about the Multimaster, it is a great profile sander and I'm sure I will find many other uses for it. It is a very high quality and soooo smooth operating tool.
The picture below shows the different tools I tried to use. The one on the left is a 1/4 inch die grinder, the one in the middle is a Harbor Freight 3/8 angle drill. http://www.harborfreight.com/cpi/ctaf/Displayitem.taf?itemnumber=2439. The one on the right is the Fein Multimaster. The die grinder spun up way to fast and melted rather than cut. The explanation above is why the Multimaster didn't work for me. The Harbor Freight 3/8 angle drill was the tool that I ended up cutting everything with. The secret is torque and slower speed. It says it's max speed is 1,800 rpm and it had plenty of power. It is one of the more expensive Harbor Freight drills at $39.00 but it worked great. I used the abrasive 3 inch wheel that Van's sends with the finish kit to cut the canopy. It probably took 15 minutes of work to separate the two halves after I had it marked and taped. I made one pass about half way through and one more that cut through in a few places and the last cut to completely cut it all the way through.

I know others have had very good results with the Multimaster but I just couldn't get the process figured out or I wasn't holding my mouth just right, I don't know.
Here is few shots of the carnage.

Got to warm it up first. Little ceramic heater worked great.

My shining face for FSDO and Mel

Done and no cracks
You can't see it but there are two strips of clear packaging tape that are holding the sides from spreading out.
Well, I got the canopy cut into two pieces. I now have a windshield and a canopy.
I researched the tools others used to cut the canopy with with and here is what I ended up doing.
I heard the Fein Mutlamaster tool was just the thing to have so I bought one at a little over $300.00. I tried several different blades and for me it just wasn't the answer. It melted the plastic and was slow as smoke. I tried several different methods of cutting and none worked very well. I contacted Fein's tech support and they told me the Multimaster maybe wasn't the best tool for that particular job. After I got the canopy cut I did use the Multimaster to sand all the cut edges smooth to make sure nothing cracked later. I will say this about the Multimaster, it is a great profile sander and I'm sure I will find many other uses for it. It is a very high quality and soooo smooth operating tool.
The picture below shows the different tools I tried to use. The one on the left is a 1/4 inch die grinder, the one in the middle is a Harbor Freight 3/8 angle drill. http://www.harborfreight.com/cpi/ctaf/Displayitem.taf?itemnumber=2439. The one on the right is the Fein Multimaster. The die grinder spun up way to fast and melted rather than cut. The explanation above is why the Multimaster didn't work for me. The Harbor Freight 3/8 angle drill was the tool that I ended up cutting everything with. The secret is torque and slower speed. It says it's max speed is 1,800 rpm and it had plenty of power. It is one of the more expensive Harbor Freight drills at $39.00 but it worked great. I used the abrasive 3 inch wheel that Van's sends with the finish kit to cut the canopy. It probably took 15 minutes of work to separate the two halves after I had it marked and taped. I made one pass about half way through and one more that cut through in a few places and the last cut to completely cut it all the way through.
I know others have had very good results with the Multimaster but I just couldn't get the process figured out or I wasn't holding my mouth just right, I don't know.
Here is few shots of the carnage.
Got to warm it up first. Little ceramic heater worked great.
My shining face for FSDO and Mel
Done and no cracks
You can't see it but there are two strips of clear packaging tape that are holding the sides from spreading out.
Last edited:
I hit 500 hours last night, I'm about done, right?
Right wing is done except for the bottom skin, I'm ready to deburr and proseal both left fuel tanks, I'm guessing I've got about 50-60 hours left on the wings. I ordered the fuselage kit last week.
For those following my work, I have converted the outboard leading edges to an auxiliary fuel tank holding 15.9 gallons per side. I estimate this mod cost me about 50 hours additional build time total, added 11 pounds of empty weight, and added about $200 of materials.
Last edited:
Pilottonny
Well Known Member
Additional 17 lbs??
Ouch, that is a lot of extra empty weight! I added 2,4 kg (approx 5 lbs?) for my long range tanks, that hold a total of 204 ltr (how many gallons is that?). I just made the tanks a few bays longer and the leading edges a few bays shorter. Simple. No additional plumbing, filler caps, pumps, valves, sensors, wiring, etc.
To everybody his own, though.
Regards, Tonny.
Tony,
Sorry - typo - it's actually 11 (eleven) pounds additional weight. Actually measured weight for additional parts minus removed parts comes to 4 pounds 1 ounce per side, and I'm adding some for the wiring and switches, so somewhere around 10-11 pounds is going to be right on it. I think it will actually be closer to 9 pounds, but projects like this nearly always find a way of gaining weight before flight, so I've got a bit of a "fudge factor" in there and we'll call it 11 pounds to be conservative.
Weight addition on a 9 imparts a very slight speed penalty with its high aspect ratio wing, and since this airplane will be destined for a life of leisurely business travel the extended range tanks were a larger factor than half a knot of top speed. Besides - by putting the IO360 in there speed (and weight) won't be a problem. I'm a lightweight guy, only 160 pounds, so I can spare the empty weight gain.
What really surprised me about this mod was how much additional time it took to do it. When I first conceived the idea, I thought maybe 20 hours tops would have it done. Now that I'm almost there, it's going to be very close to 50 additional hours to make it happen.
Last edited:
pilottony..How did you extend your bays. I just ordered my wings for my 7 and am currently investigating added extended tanks..any pics or anything I can look at.??
Honestly - on a 7 - I think I would seriously consider the SafeAir tanks. Not trying to talk you out of a tank mod - but it's a lot of work.
Pilottonny
Well Known Member
Not for builders in USA.
Miyu,
I bought additional tank ribs, rear baffle and non-punched tank skins from Vans and just made the tanks longer, with a join plate on the inside. Vans will not sell you the unpunched tank skins, if you are in the USA though! (Lawyers, lawyers!)
Regards, Tonny.
Miyu,
I bought additional tank ribs, rear baffle and non-punched tank skins from Vans and just made the tanks longer, with a join plate on the inside. Vans will not sell you the unpunched tank skins, if you are in the USA though! (Lawyers, lawyers!)
Regards, Tonny.
Don Jones
Well Known Member
Ahhh, leak free fuel tanks!
Finally got around to leak testing my tanks, no leaks! Making great progress, I have one wing ready to skin and the other ready to install the leading edge, etc. I built both of the ailerons while taking a break from proseal after 1 tank was finished.


Finally got around to leak testing my tanks, no leaks! Making great progress, I have one wing ready to skin and the other ready to install the leading edge, etc. I built both of the ailerons while taking a break from proseal after 1 tank was finished.
llavalle
Well Known Member
100hour mark!
I hit 100h tonight on the project.
I still have many hours to go but I went faster than I expected. When you like what you do, time goes by quickly!
I have most of my empennage done. The right elevator is almost finished, the left one is untouched. This might seems fast but remember, the rear spar on both the HS and VS are still on with clecos. Same thing for the rudder trailing edge. We still have pre-close inspection here...
I installed 1297 rivets so far! This number grows fast!
This is me, riveting the counterweight ribs together. (Taken by my webcam, see the link in my sig)

I ordered my wings last week... I should get them in about 7 weeks. yay
I hit 100h tonight on the project.
I still have many hours to go but I went faster than I expected. When you like what you do, time goes by quickly!
I have most of my empennage done. The right elevator is almost finished, the left one is untouched. This might seems fast but remember, the rear spar on both the HS and VS are still on with clecos. Same thing for the rudder trailing edge. We still have pre-close inspection here...
I installed 1297 rivets so far! This number grows fast!
This is me, riveting the counterweight ribs together. (Taken by my webcam, see the link in my sig)
I ordered my wings last week... I should get them in about 7 weeks. yay
Good Work Philippe! how did you find doing the elevator so far?
wings on order!! that is awesome. when do you plan on having the emp. inspected? hopefully there is someone that is local. our guy is about an hour away and we have to pay for travel expenses,etc. maybe we'll bring it to him!
anyway, good to see you're hard at it!
wings on order!!
that is awesome. when do you plan on having the emp. inspected? hopefully there is someone that is local. our guy is about an hour away and we have to pay for travel expenses,etc. maybe we'll bring it to him!anyway, good to see you're hard at it!
llavalle
Well Known Member
About the same as the rudder. Instead of 2 skins you have 1... so it's kind of weird to keep it opened when you match-drill it. I expect the same thing for the back riveting. The trailing edge will be more work since the wedge is not drilled but I don't think this will be an issue....how did you find doing the elevator so far?
when do you plan on having the emp. inspected?
I'm not sure... since the inspection costs $347, I think I'll wait until the wings are finished... or the complete fuselage... I really don't know. The other choice is to inspect it right after it's completed... That way, if I'm doing something wrong, I wont do it again on the wings! I sent an email to the Quebec MDRA rep and I'm waiting a reply on that.
I'm about 25km from Montreal, a 15min drive for the inspector.
ArVeeNiner
Well Known Member
I received my Cleaveland seat cushions today!
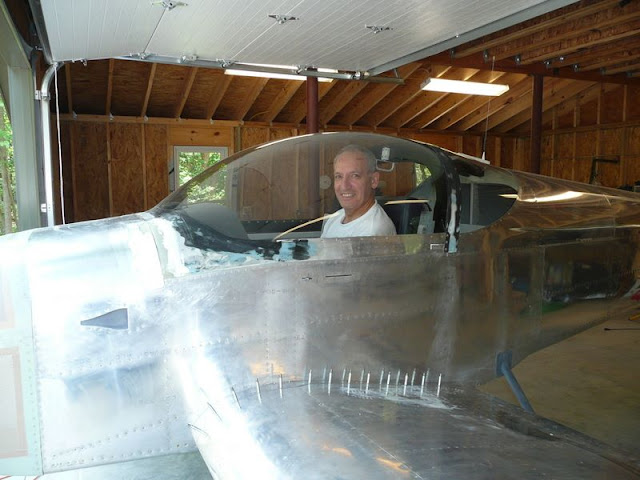
Sorry for another bunch of shots but I keep receiving expensive little boxes in the mail this week. Yesterday I got three little cardboard boxes that had just about everything I need to hook up my fuel system. Today, I received an expensive BIG box containing my seat cushions!

I had them done by Cleaveland Tools in Boone, Iowa (yea yea, I know, why Iowa and not Ohio?) They came out even better than I had imagined. A few months back I bought some fabric on clearance from the local fabric store to do the sides of the cockpit and to do the armrests. I had lots of extra fabric so I sent it to Cleaveland to incorporate into my seats. It's the darker fabric in the pictures.

You'll see some issues with the fabric on the sides of the plane. I had to pull a few panels out so that I could do my canopy frame. Doing so pulled some of the Velcros off so I have to glue those back on eventually. Also, you can see some ripples. The glue that I used doesn't seem to be holding well. I think I'll have to pull the fabric off the backing foam and re-glue. All in good time.

So, the seat cushions and harness are just laying in there in the photos and not installed. It's all Hollywood magic at this point. I'll install everything for good at a later date. For now, everything all goes back in their boxes.
Once again, thanks for allowing me to gush! This collection of aluminum is really starting to resemble a flying machine!!
Sorry for another bunch of shots but I keep receiving expensive little boxes in the mail this week. Yesterday I got three little cardboard boxes that had just about everything I need to hook up my fuel system. Today, I received an expensive BIG box containing my seat cushions!
I had them done by Cleaveland Tools in Boone, Iowa (yea yea, I know, why Iowa and not Ohio?) They came out even better than I had imagined. A few months back I bought some fabric on clearance from the local fabric store to do the sides of the cockpit and to do the armrests. I had lots of extra fabric so I sent it to Cleaveland to incorporate into my seats. It's the darker fabric in the pictures.
You'll see some issues with the fabric on the sides of the plane. I had to pull a few panels out so that I could do my canopy frame. Doing so pulled some of the Velcros off so I have to glue those back on eventually. Also, you can see some ripples. The glue that I used doesn't seem to be holding well. I think I'll have to pull the fabric off the backing foam and re-glue. All in good time.
So, the seat cushions and harness are just laying in there in the photos and not installed. It's all Hollywood magic at this point. I'll install everything for good at a later date. For now, everything all goes back in their boxes.
Once again, thanks for allowing me to gush! This collection of aluminum is really starting to resemble a flying machine!!
RV9-A Status - Panel Complete
I've just finished my panel with some of the latest technology. That is until next week when they come out with something new anyway. I've got the Trio Pro-Pilot autopilot, VP-100 electrical system, 696 and mystery EFIS. With the ARINC interface and a software update on the Trio in the near future I should have the capability of coupled approaches before it's ready to fly. The 330 transponder is wired for TIS traffic on the 696. Now I'm onto the engine. A IO-320 from Aero Sport just showed up about a week ago so that should keep me busy for a while now.


I've just finished my panel with some of the latest technology. That is until next week when they come out with something new anyway. I've got the Trio Pro-Pilot autopilot, VP-100 electrical system, 696 and mystery EFIS. With the ARINC interface and a software update on the Trio in the near future I should have the capability of coupled approaches before it's ready to fly. The 330 transponder is wired for TIS traffic on the 696. Now I'm onto the engine. A IO-320 from Aero Sport just showed up about a week ago so that should keep me busy for a while now.
By the way, the mystery EFIS in my panel is just a demo model. Rob from AFS let me borrow a demo model to finish my wiring for the EAA105 meeting last week. I think it's a 3500 in a 4500 case. So don't call AFS and ask why you're 4500 hasn't shipped yet because they are still in production.


llavalle
Well Known Member
Wow, the fuselage sure does look interesting to do!
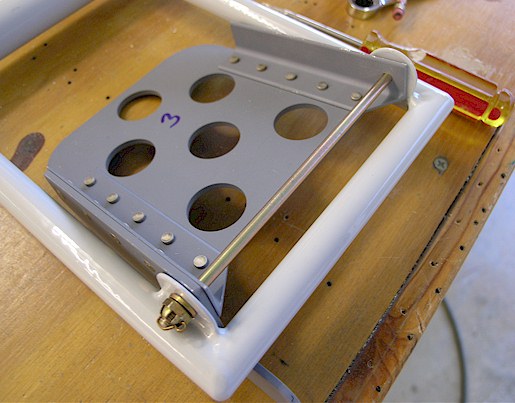
I just completed (sort of) my right elevator. I left the top skin unriveted to the 2 ribs + left the trailing edge unriveted...(Canadian Pre-Close inspection)

By the way, I used a 120deg dimple die for the lower skin + spar and the blind rivets (CS4-4) are really nice.
I just completed (sort of) my right elevator. I left the top skin unriveted to the 2 ribs + left the trailing edge unriveted...(Canadian Pre-Close inspection)
By the way, I used a 120deg dimple die for the lower skin + spar and the blind rivets (CS4-4) are really nice.
ArVeeNiner
Well Known Member
RV rocket propulsion?
OK, I'm considering adding a little bit of extra push to my RV-9A. Of course I have to figure out a suitable bracket for it, plus finding a spot for the fuel and oxidizer tanks will be a challenge. Handling that hydrazine won't be fun either.
The max I can get out of this puppy is only 5 lbs of thrust, not enough to make much difference but I'm thinking a few of these in strategically located places would be useful for my high altitude work ala Chuck Yeager and his F-104.
Seriously, this is a 5 lb thruster from work and yes, it is scrap. I'm borrowing it for a talk about satellites that I'm going to give to my daughter?s 2nd grade class on Monday. Fun stuff!!


OK, I'm considering adding a little bit of extra push to my RV-9A.
Of course I have to figure out a suitable bracket for it, plus finding a spot for the fuel and oxidizer tanks will be a challenge. Handling that hydrazine won't be fun either.The max I can get out of this puppy is only 5 lbs of thrust, not enough to make much difference but I'm thinking a few of these in strategically located places would be useful for my high altitude work ala Chuck Yeager and his F-104.
Seriously, this is a 5 lb thruster from work and yes, it is scrap. I'm borrowing it for a talk about satellites that I'm going to give to my daughter?s 2nd grade class on Monday. Fun stuff!!
Guy Prevost
Well Known Member
Seriously, this is a 5 lb thruster from work and yes, it is scrap. I'm borrowing it for a talk about satellites that I'm going to give to my daughter?s 2nd grade class on Monday. Fun stuff!!
I can't see if there are two inlets or just one. Are you going mono-propellant, or bi-propellant? Judging by the holes in the catalyst bed I would assume you're using a mono-propellant hydrazine system...
I don't wanna be around when you fuel it.
Pilottonny
Well Known Member
Milestone!
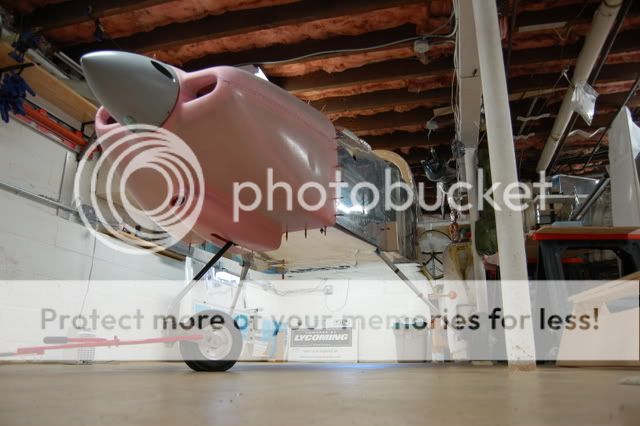
On gear, engine hung !!!

It's a milestone! One of the two cars will have to stay outside from now (I tryed to convince her, but lost that battle in jiffy).
I am not going to attend the Aero2009 at Friedrichshafen, this year, I have to build on! The end of the tunnel is in sight, I am hoping to fly this year?
You can see one of the two wings on the wall, the empenage is on the addict.
BTW, do you notice the flimsy nose gear leg? Did you ever try to wigle the plane sideways and notice the way the leg bends left and right? Scary!
Regards, Tonny.
On gear, engine hung !!!
It's a milestone! One of the two cars will have to stay outside from now (I tryed to convince her, but lost that battle in jiffy).
I am not going to attend the Aero2009 at Friedrichshafen, this year, I have to build on! The end of the tunnel is in sight, I am hoping to fly this year?
You can see one of the two wings on the wall, the empenage is on the addict.
BTW, do you notice the flimsy nose gear leg? Did you ever try to wigle the plane sideways and notice the way the leg bends left and right? Scary!
Regards, Tonny.
Congratulations
Tonny now it looks like an airplane. Hurry up the year is almost gone Where are all the aluminum shavings and fiberglass dust? Are you competing for RGA (Rudy Greyling Award)?
As for nosegear don't worry, I was told it's for towing bar only and not used when flying... After you add fairing to it the leg looks fatter if looking from the side.
Tonny now it looks like an airplane. Hurry up the year is almost gone
Where are all the aluminum shavings and fiberglass dust? Are you competing for RGA (Rudy Greyling Award)?As for nosegear don't worry, I was told it's for towing bar only and not used when flying... After you add fairing to it the leg looks fatter if looking from the side.
Last edited:

Lionclaw
Well Known Member
I think they were all inside eating their easter dinners I've actually been surprised at the lack of interest from my neighbors, especially since most of them are air force officers. Maybe I've done a good job keeping the project hidden, or perhaps I just seem unapproachable
I've actually been surprised at the lack of interest from my neighbors, especially since most of them are air force officers. Maybe I've done a good job keeping the project hidden, or perhaps I just seem unapproachable Andy,
You just rolled the plane out of the garage and nobody came?
Nice view of airplane lined up with cars in their driveways. Airplane wins.
pmccoy
Well Known Member
Engine Is Mounted
VAF-
Been quite awhile since I posted an update, and since I had one of those milestone days, I thought I was long overdue. Here is a photo of my Aero Sport Power; Lycoming IO-320 D2 EMS, hanging off the front of my plane!
It was a great feeling seeing the engine go up for the first time.

Like everything involved with this project, I did learn a couple of things along the way. We had a suggestion from a fellow builder to remove the motor mount from the firewall and attach that to the engine. This proved to be very good advice. Holding the motor mount off of the plane, allows you to look at the bolt holes to see how to align them. We just hoisted the engine up, held the motor mount in place, looked through the bolt holes to get the first bolt aligned. That first one, top right, was easy. The second, top left, proved a bit more interesting. We had taped the rubber mounts to the frame. But this required them to be in perfect alignment before getting the bolt through the hole. Not possible. So we loosened the first bolt, top right, back out to two or three threads on the nut. Then removed the tape holding the top left rubber mount. This allowed me to wiggle the rubber mount around a bit, making the alignment easier. Once the bolt was in, it was tightened to just a couple of threads. This process was repeated for both bolts on the bottom as well. For me, the key was having the bolts in, but not tight. That gave me just enough space to make small movements on the other rubber mounts to get the bolt started. Once all four bolts were in, then I tightened them all in sequence.
Great, now I had an engine mounted to the motor mount, hanging from the hoist, three feet away from the plane. I inserted the motor mount bolts through the firewall and slowly matched the height of motor mount to the bolts. This was actually pretty easy. The engine hoist was just adjusted until they matched, and the entire assembly slid right into place. I was kind of amazed at how easy this last step was. Using this technique worked well, and I now have the confidence to remove the entire motor mount, if I find I need to drill something through the firewall.
VAF-
Been quite awhile since I posted an update, and since I had one of those milestone days, I thought I was long overdue. Here is a photo of my Aero Sport Power; Lycoming IO-320 D2 EMS, hanging off the front of my plane!
It was a great feeling seeing the engine go up for the first time.
Like everything involved with this project, I did learn a couple of things along the way. We had a suggestion from a fellow builder to remove the motor mount from the firewall and attach that to the engine. This proved to be very good advice. Holding the motor mount off of the plane, allows you to look at the bolt holes to see how to align them. We just hoisted the engine up, held the motor mount in place, looked through the bolt holes to get the first bolt aligned. That first one, top right, was easy. The second, top left, proved a bit more interesting. We had taped the rubber mounts to the frame. But this required them to be in perfect alignment before getting the bolt through the hole. Not possible. So we loosened the first bolt, top right, back out to two or three threads on the nut. Then removed the tape holding the top left rubber mount. This allowed me to wiggle the rubber mount around a bit, making the alignment easier. Once the bolt was in, it was tightened to just a couple of threads. This process was repeated for both bolts on the bottom as well. For me, the key was having the bolts in, but not tight. That gave me just enough space to make small movements on the other rubber mounts to get the bolt started. Once all four bolts were in, then I tightened them all in sequence.
Great, now I had an engine mounted to the motor mount, hanging from the hoist, three feet away from the plane. I inserted the motor mount bolts through the firewall and slowly matched the height of motor mount to the bolts. This was actually pretty easy. The engine hoist was just adjusted until they matched, and the entire assembly slid right into place. I was kind of amazed at how easy this last step was. Using this technique worked well, and I now have the confidence to remove the entire motor mount, if I find I need to drill something through the firewall.
SmittysRV
Well Known Member
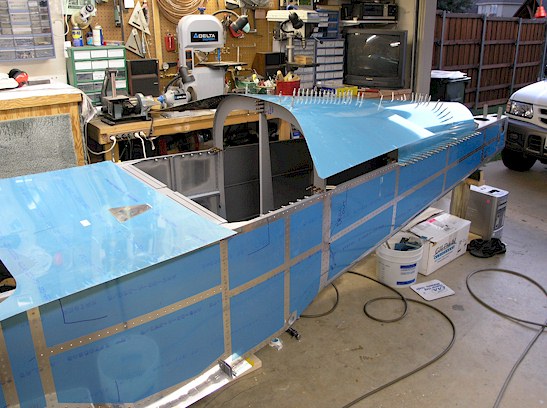
Rolled the Canoe!
I've been waiting a long time for this. Thanks to my best buddy Norwood Story for his hard work and dedication in helping me rivet this dude together.
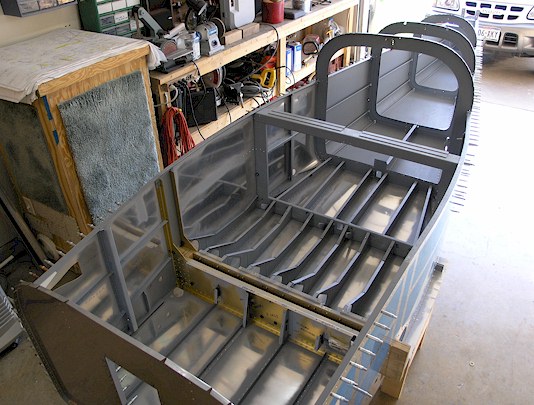
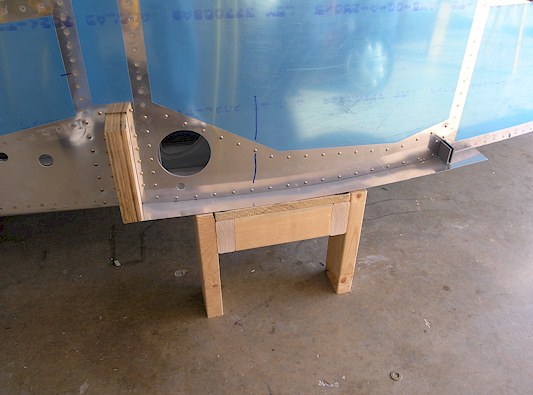
Here's my homemade flat sawhorse. It's made from an old piece of 1x12 shelfing and some 2x4s. It's 12 inches high. I hope that is an OK height. We'll see.
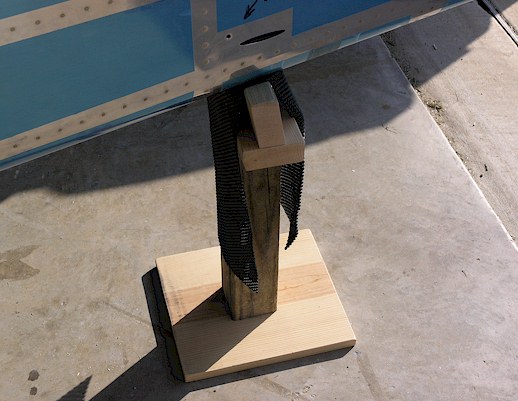
Here's my tail stiffleg. I was guessing when I made this dude before rolling the fuselage. The 2x4 on top was cut at an angle and has the inside scooped out to match the bottom of the fuselage so it won't slide off.
I've been waiting a long time for this. Thanks to my best buddy Norwood Story for his hard work and dedication in helping me rivet this dude together.
Here's my homemade flat sawhorse. It's made from an old piece of 1x12 shelfing and some 2x4s. It's 12 inches high. I hope that is an OK height. We'll see.
Here's my tail stiffleg. I was guessing when I made this dude before rolling the fuselage. The 2x4 on top was cut at an angle and has the inside scooped out to match the bottom of the fuselage so it won't slide off.
cln1owner
Well Known Member
The Bird has Wings...
Exciting weekend for me. Everything turned out perfect, sweep and incidence angle were almost dead on after just plugging the wings in. Only slight adjustment was necessary. Checked and rechecked about a thousand times... then the big drill. Done deal.
Here's a shot of her stretching her wings:

I think I'll fit the tail feathers next...
Exciting weekend for me. Everything turned out perfect, sweep and incidence angle were almost dead on after just plugging the wings in. Only slight adjustment was necessary. Checked and rechecked about a thousand times... then the big drill. Done deal.
Here's a shot of her stretching her wings:
I think I'll fit the tail feathers next...
Last edited:
Thank You Pythagoras
At least a year ago, in my first shop space that was not large enough to accommodate both wings mounted to the fuselage at the same time, and in an urban environment that was not conducive to an airplane out on a parking lot for a day (at least), I mounted my wings and drilled the rear spars one wing at a time. Sweep was set by ensuring the leading edges were perpendicular to the center longitudinal line of the fuselage by dropping plumb bobs from the leading edge to a string line that was one leg of a 3-4-5 right triangle. Actually it was a 9 ft - 12ft - 15ft triangle. Even though I trusted my math and measurement of string length at the time, I only pilot drilled the rear spar and fuselage rear spar carry-throughs after also setting incidence per the drawings. My thought was further down the line I would have a shop space large enough, or at the hanger, where I could attach both wings at the same time, double check and enlarge holes as required.
That point "down the line" was yesterday. I now have a workshop large enough to house a complete RV. So, my best friend Lanny (fellow pilot and homebuilder) and I hung both wings and went through the sweep, triangulation and incidence checks again. Van's says you should have no more than a 1/2" variance between any two points when dropping plumb bobs from, for example, each wing tip or a wing tip and root point. I had 1/4" or less. My triangulation measurements from wing tip to tail were within 3/16". There was no noticeable difference in incidence checks using a bubble level and the blocked method on the plans. So, I finished drilled both rear spars to 5/16" and patted myself on the back as the bolts slipped in to place. Greek mathematicians would be proud!
While the wings were attached, I needed to fit the wing to fuselage fairings. These are pre punched and fit really well. The pre-punched holes aligned with tank screws on either end of the fairing, and aligned with the pre punched holes in the wing skins. With it all duck taped and cleco'ed in place I also match drilled the tank skins. Finally, I scribed a trim line that will give just shy of a 1/4" gap, to be filled by the Van's supplied rubber molding. The plans say to ensure this gap is a min. of 3/16 and a max of 1/4" but measuring the rubber molding, it appears 1/4" is really the preference. I will slightly undercut my line.
BTW, a sharpie is exactly 1/2" in diameter. So, if you hold it up against the fuselage, its point scribes a line exactly 1/4" away. Thanks, Lanny, for seeing this and making my life a bit easier yesterday.

Before removing the wings (FOR THE FINAL TIME!), I rewarded myself by enjoying a moment (OK, several minutes) of sitting in the cockpit of the plane that is now so close to being ready for the DAR inspection I dream of it. My To Do list is down to less than 10 items (including putting fiberglass in primer). Registration paperwork is filed, I am in a dialog with my DAR and I am on Mike Seager's calendar for transition training in August. Holy cow Batman, the light at the end of the tunnel is so bright, I "gotta" wear shades!
Thanks Lanny for all the help, good ideas, encouragement and camaraderie.
At least a year ago, in my first shop space that was not large enough to accommodate both wings mounted to the fuselage at the same time, and in an urban environment that was not conducive to an airplane out on a parking lot for a day (at least), I mounted my wings and drilled the rear spars one wing at a time. Sweep was set by ensuring the leading edges were perpendicular to the center longitudinal line of the fuselage by dropping plumb bobs from the leading edge to a string line that was one leg of a 3-4-5 right triangle. Actually it was a 9 ft - 12ft - 15ft triangle. Even though I trusted my math and measurement of string length at the time, I only pilot drilled the rear spar and fuselage rear spar carry-throughs after also setting incidence per the drawings. My thought was further down the line I would have a shop space large enough, or at the hanger, where I could attach both wings at the same time, double check and enlarge holes as required.
That point "down the line" was yesterday. I now have a workshop large enough to house a complete RV. So, my best friend Lanny (fellow pilot and homebuilder) and I hung both wings and went through the sweep, triangulation and incidence checks again. Van's says you should have no more than a 1/2" variance between any two points when dropping plumb bobs from, for example, each wing tip or a wing tip and root point. I had 1/4" or less. My triangulation measurements from wing tip to tail were within 3/16". There was no noticeable difference in incidence checks using a bubble level and the blocked method on the plans. So, I finished drilled both rear spars to 5/16" and patted myself on the back as the bolts slipped in to place. Greek mathematicians would be proud!
While the wings were attached, I needed to fit the wing to fuselage fairings. These are pre punched and fit really well. The pre-punched holes aligned with tank screws on either end of the fairing, and aligned with the pre punched holes in the wing skins. With it all duck taped and cleco'ed in place I also match drilled the tank skins. Finally, I scribed a trim line that will give just shy of a 1/4" gap, to be filled by the Van's supplied rubber molding. The plans say to ensure this gap is a min. of 3/16 and a max of 1/4" but measuring the rubber molding, it appears 1/4" is really the preference. I will slightly undercut my line.
BTW, a sharpie is exactly 1/2" in diameter. So, if you hold it up against the fuselage, its point scribes a line exactly 1/4" away. Thanks, Lanny, for seeing this and making my life a bit easier yesterday.
Before removing the wings (FOR THE FINAL TIME!), I rewarded myself by enjoying a moment (OK, several minutes) of sitting in the cockpit of the plane that is now so close to being ready for the DAR inspection I dream of it. My To Do list is down to less than 10 items (including putting fiberglass in primer). Registration paperwork is filed, I am in a dialog with my DAR and I am on Mike Seager's calendar for transition training in August. Holy cow Batman, the light at the end of the tunnel is so bright, I "gotta" wear shades!
Thanks Lanny for all the help, good ideas, encouragement and camaraderie.
N941WR
Legacy Member
Hey, I recognize that fuselage stand. Good to see it worked out for you and congrats on the big drill!...Here's a shot of her stretching her wings:
I think I'll fit the tail feathers next...
One of my neighbors had a BD5 he was finishing up in an open carport (the only open carport in the entire subdivision). The Homeowners Association went crazy but there were no exclusions for airplanes, only boats, motor homes, commercial vehicles, and trailers.I'd like to do that just so I could frame the letter I'd get from the Homeowners Association!
Speedshopaero
Member
N908SA
On 5/19/2009, After 3 years N908SA finally took to the sky
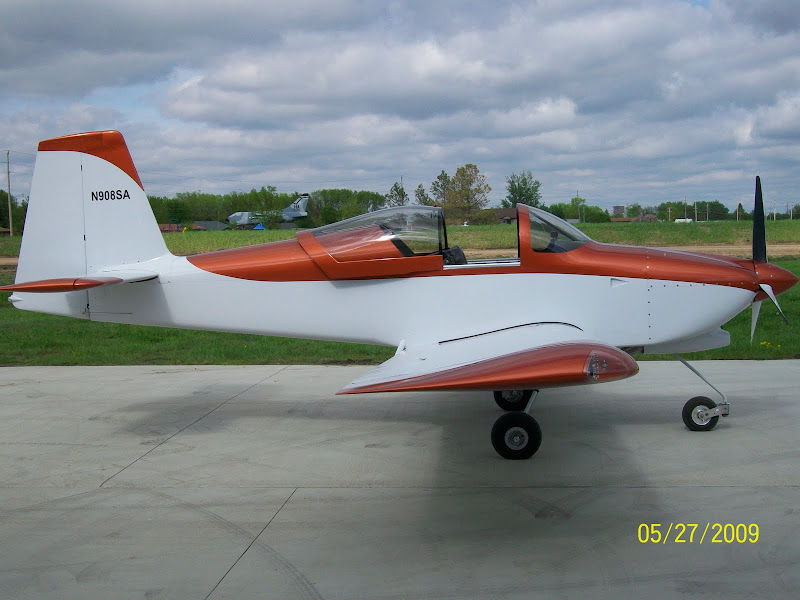
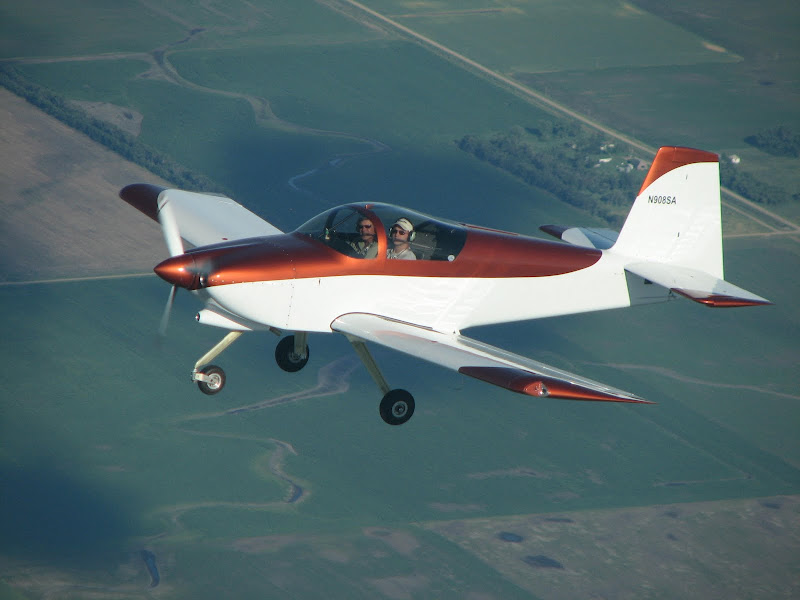
On 5/19/2009, After 3 years N908SA finally took to the sky
Last edited:
rscott5559A
Member
6-6-09 N472RV First Flight!

Well, June 6th 2009 was the day that N472RV took to the sky. Finally, after 7 years of building it was the day. First, thanks to John Rausch who flew chase in his beautiful RV 8. It was good having John’s voice in my headset offering suggestions, reminding me of certain tasks and just to know I had some help if something went wrong. John also did my transition training in Earl Thompson’s RV9A. Big thanks to Earl!
Taking off in a plane you built that has never flown before is almost indescribable; great pride tempered with uncertainty and fear mixed with enough adrenaline to power the West Coast.
The flight itself went well. We flew at around 3,000-3,500 due to clouds basically making large circles over the airport. Slight heavy left wing. Seems a lot of people have this same issue. Couldn’t be that 240 pound guy sitting on the left could it? John took some nice photos while flying. One small problem I had was the trim speed. (electric) I installed a speed control servo because I heard many times the trim was hard to set just right because it moved too fast. Well, too slow is also a problem. It took too long to trim out when I changed speeds and the stick force was high until it finally trimmed out. Other than that and my low approach, the flight went well and the landing was even good. Comments from a few on the ground confirmed the plane has the RV9A turbo whine.
Thanks to all my friends at Cable Chapter 448 who have helped along the way. Special thanks to Stan for all the tools loaned and his expert electronic knowledge, Gary Sobek for his DAR skills, Fred for his good enough for your airplane comment and good suggestions, the many of you who have stopped by, supervised and offered advice whether solicited or not along the way, John Rausch for the flight training and chase plane/photographer, Earl Thompson for the use of his 9A and finally, my Wife and family who put up with me and my passion for flight. If I left anyone out just let me know and I’ll move you to the front of the ride list
Thanks to all,
Robert Scott
RV9A Flying!
KCCB Upland, CA
Last edited by a moderator:
pmccoy
Well Known Member
Congrats on First Flight!
Robert,
Way to go! I look forward to hearing all about your phase 1 fly off at the EAA chapter hangar. Of course I will volunteer to share expenses and go flying in the right seat when you are ready.
Again, congrats on a safe first flight.
Well, June 6th 2009 was the day that N472RV took to the sky.
Robert,
Way to go! I look forward to hearing all about your phase 1 fly off at the EAA chapter hangar. Of course I will volunteer to share expenses and go flying in the right seat when you are ready.
Again, congrats on a safe first flight.
Gregmarlow
Well Known Member
Hung the Prop
Hung the prop today, with the help of a neighbor kid who is heading off to the USAF Academy in a couple of days. He wants to fly F-16's. I tried to set him straight on that... but what can you do?
Anyway, I was nervous about the spinner/cowling fit, because I fit the cowl before receiving the prop, and had to estimate the distance. But no worries, after getting the cowl back in place, and the spinner on, the spinner/cowl gap was perfect.
Great day in the shop!
http://img14.imageshack.us/img14/2456/prop003w.jpg
llavalle
Well Known Member
Milestone day for me : Wing on the wing rack!
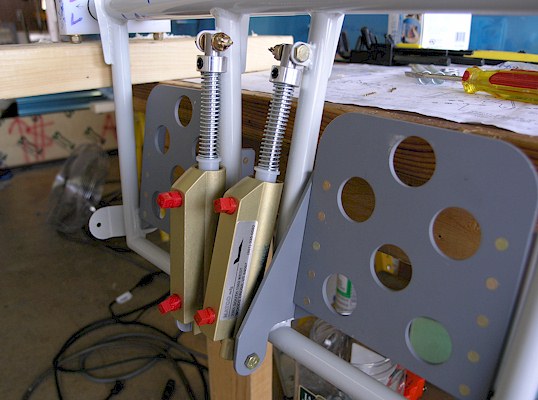
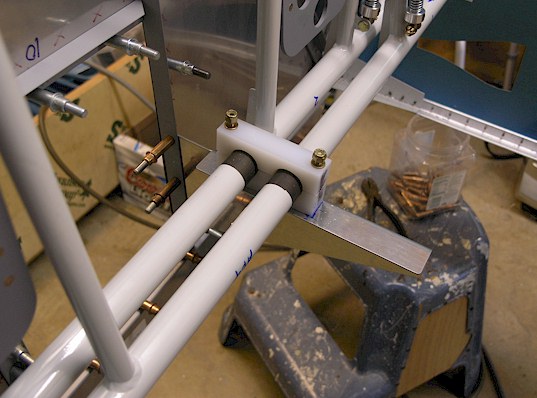
I completed the basic riveting (ribs to both spar) yesterday. I constructed the wing gig tonight. The design is inspired from Smitty's wing gig.

I still need to level everything but before I do that, I must move some stuff around. Having a single car garage is a pita for space management. I'm in the process of convincing myself that a 20x30 shop in my backyard is a GREAT idea.
I completed the basic riveting (ribs to both spar) yesterday. I constructed the wing gig tonight. The design is inspired from Smitty's wing gig.
I still need to level everything but before I do that, I must move some stuff around. Having a single car garage is a pita for space management. I'm in the process of convincing myself that a 20x30 shop in my backyard is a GREAT idea.
ArVeeNiner
Well Known Member
Received my Catto prop
I just received my beautiful 70X70 Catto prop on Thursday. I also had the spinner cut by Craig as well. Here is the scoop:
-It took about 10 weeks to get. I wasn't in a hurry for it and I told that to Craig.
-Shipping cost me $85 to my home in San Jose, CA and it took a day.
-Craig uses FedEx Ground to ship. Be forwarned. The packages require a signature. If you miss the delivery, they will try two more times. They don't normally hold your package for pick up. I had to go one level up in the chain to get it pulled from the truck. The pick up location has limited hours. My local one closed at 4 pm which didn't do me much good since I get home at 5 pm. They told me that these hours are different from location to location. They said that larger cities have locations that stay open later. With a population of just under a million, San Jose is the third largest city in California and the tenth largest in the US. So, you'll need more than a million people in your city for longer hours I guess!! Also, they won't deliver to another address on just the receiver's word. The shipper has to make that request.
-Anyway, my spinner and the prop were packaged in cardboard boxes and packaged very well.
-I thought that I would drive up to Catto to pick my stuff in person but decided not to. If you do, the boxes aren't very big at all and would easily fit in a mini van.
-The workmanship is great! Man, the prop looks super!! The back side of the prop is sprayed black but the paint doesn't seem very durable, at least in the area near the spinner. In a very small location, there isn't a crisp transistion between black and white. The transition is more of a fade out. As I fit checked my spinner on, a very small area of the black paint got scratched. A bottle of model airplane paint and a small brush will touch this up just fine. Make sure to tape up your spinner before installing.
Anyway, I give the prop and the service a big thumbs up.
Here are some pictures. The prop is not on the plane for good yet.


I just received my beautiful 70X70 Catto prop on Thursday. I also had the spinner cut by Craig as well. Here is the scoop:
-It took about 10 weeks to get. I wasn't in a hurry for it and I told that to Craig.
-Shipping cost me $85 to my home in San Jose, CA and it took a day.
-Craig uses FedEx Ground to ship. Be forwarned. The packages require a signature. If you miss the delivery, they will try two more times. They don't normally hold your package for pick up. I had to go one level up in the chain to get it pulled from the truck. The pick up location has limited hours. My local one closed at 4 pm which didn't do me much good since I get home at 5 pm. They told me that these hours are different from location to location. They said that larger cities have locations that stay open later. With a population of just under a million, San Jose is the third largest city in California and the tenth largest in the US. So, you'll need more than a million people in your city for longer hours I guess!!
Also, they won't deliver to another address on just the receiver's word. The shipper has to make that request.-Anyway, my spinner and the prop were packaged in cardboard boxes and packaged very well.
-I thought that I would drive up to Catto to pick my stuff in person but decided not to. If you do, the boxes aren't very big at all and would easily fit in a mini van.
-The workmanship is great! Man, the prop looks super!! The back side of the prop is sprayed black but the paint doesn't seem very durable, at least in the area near the spinner. In a very small location, there isn't a crisp transistion between black and white. The transition is more of a fade out. As I fit checked my spinner on, a very small area of the black paint got scratched. A bottle of model airplane paint and a small brush will touch this up just fine. Make sure to tape up your spinner before installing.
Anyway, I give the prop and the service a big thumbs up.
Here are some pictures. The prop is not on the plane for good yet.
Last edited:
RickWoodall
Well Known Member
rv9a
She needs an engine really badly...


Oshksoh should get her a nice io-320. Air for summer 2010.....maybe??
She needs an engine really badly...
Oshksoh should get her a nice io-320. Air for summer 2010.....maybe??
Last edited:

Kokemiller
Well Known Member
Engine hung
Engine in Oshkosh in Barrett display yesterday

Hung on plane today

Engine in Oshkosh in Barrett display yesterday
Hung on plane today
Last edited:
llavalle
Well Known Member
Wow, Kelley : you engine is one nice piece of work.
For my part, I just hit the 200h mark on my project. What was I doing : closing up the empennage. We still have pre-close inspections, here in Canada. I was working on my first fuel tank but since I bought the pro-seal for the tank and just had my EMP inspected, I figured I would try the proseal on the EMP before the tank!
I hit the 200h mark while closing up the rear of the HS

I was kind of weird working on the emp again but at least I can see progress : the wing is very repetitive and it's giving me a break!
For my part, I just hit the 200h mark on my project. What was I doing : closing up the empennage. We still have pre-close inspections, here in Canada. I was working on my first fuel tank but since I bought the pro-seal for the tank and just had my EMP inspected, I figured I would try the proseal on the EMP before the tank!
I hit the 200h mark while closing up the rear of the HS
I was kind of weird working on the emp again but at least I can see progress : the wing is very repetitive and it's giving me a break!

