What's new
Van's Air Force

Don't miss anything! Register now for full access to the definitive RV support community.

RH Elevator Issue

md9680

Well Known Member
Friend
I am almost always humbled (or humiliated, depending...) by the answers I get from the VAF community and, because my search has not returned a definitive answer, I suppose I may have done something out of sequence. Nevertheless, the need is for an answer, so here goes.

Section 6, Page 6-7:

"Rivet the E-903 and E-904 rib webs together. Rivet the E-913 counterbalance skin to the ribs beginning with the two center rivets at the counterbalance leading edge and working aft. Be sure to leave the holes that mate with E-901 open." Check.

"Rivet the spar assembly, E-906 rib and WD-605 together." Check.

"Back-rivet the skin stiffeners to the upper E-901-R skin." Check.

"Rivet the E-902 spar to the top of the skin, but do not rivet the E906 rib yet." Check.

"Rivet the stiffeners to the bottom of the E-901 skin." Check.

"Rivet the E-903/904/913 assembly to the E902 spar."

And here's where I can't seem to figure out how to get 2 of 4 470AD4-4 rivets bucked. There just isn't enough room or even an access route for the squeezer and the two rivets facing forward on the spar apparently require some sort of magic bucking bar that I do not possess. Is this something I will have to make?

Thank you all for your thoughts.

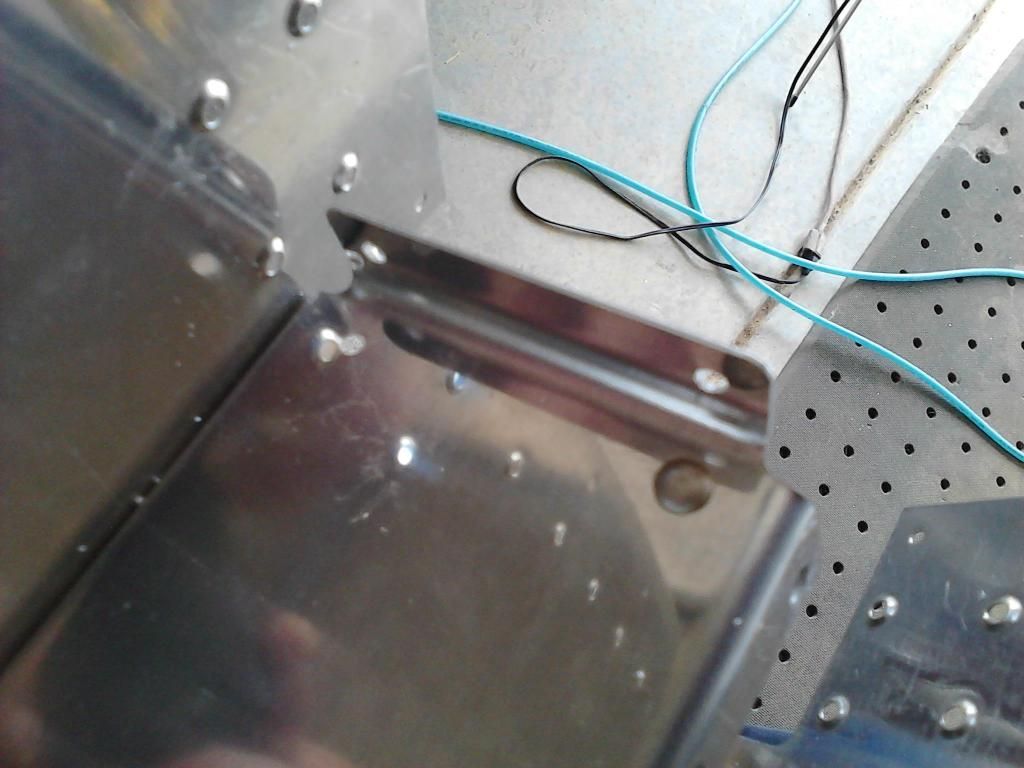
Here is the outboard end of the spar inside the skin. Top side is riveted to the spar. Bottom side is free. I have removed the counterweight assembly for ease of access.
0909121432-00.jpg


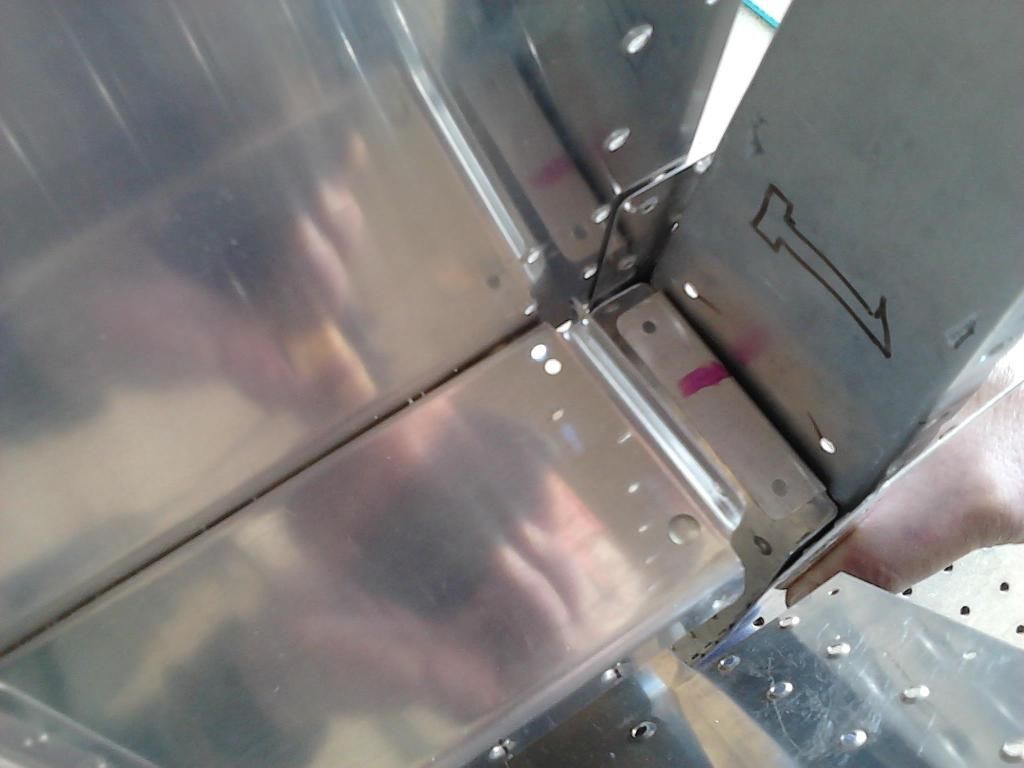
Here I am holding the counterweight assembly loosely. You can see there the two rivets I'm concerned about will join with the tab from the rib.
0909121433-01.jpg


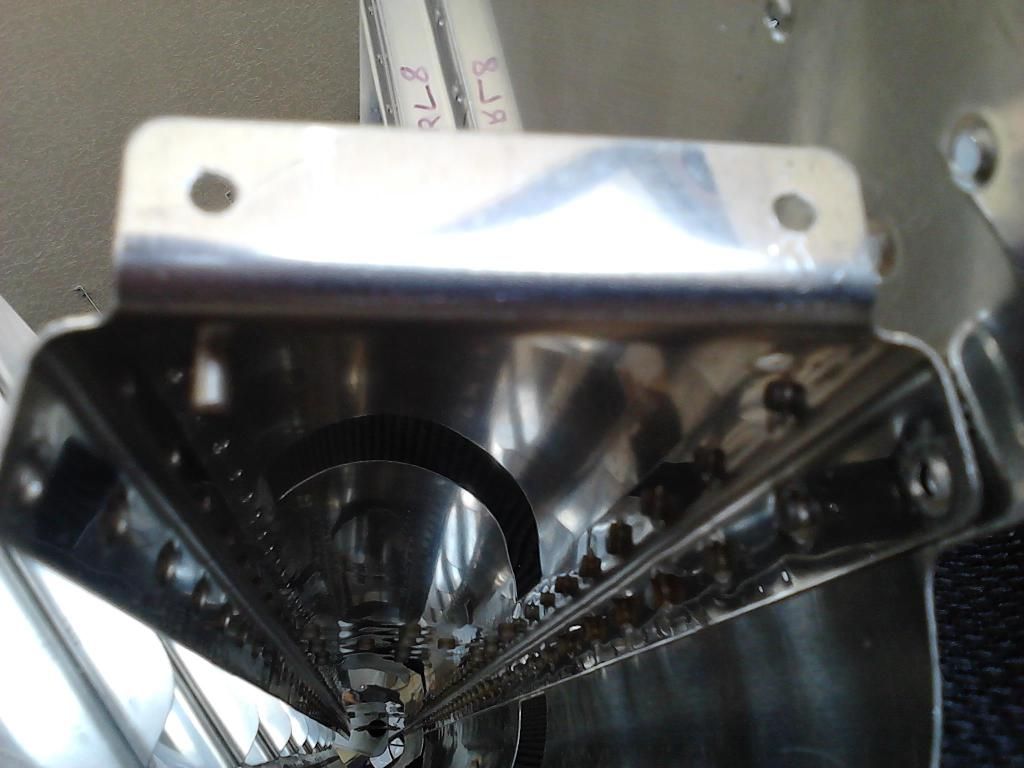
A shot of the underside of the rib with one of the two rivets that will have to be bucked sticking through. The only possible access appears to be with a small bucking bar through the bearing slot in the skin and some (to me) unknown way of holding it. Another thought is to use a very long offset rivet set, accessing from the narrow gap in the front skin-to-counter balance assembly.

0909121434-00.jpg
 
spar to c.b. arm

I believe I used a 1/2 inch by 2 inch bucking bar I made out of 1/2 inch strap and slid it in from the front of the elevator,there is just enough room to slide it in.Also an offset rivet driver was used to drive both rivets.Tight but it worked. Hope this helps
 
Likewise here Mike. Personally, I put the rivets in with the manufactured head on the inside. Then I held my tungsten bucking bar on end very carefully in the slot between the leading edge and the counterbalance assembly. Slid my rivet gun inside the skins, contorted my body, and just started a constant stream of expletives as I slowly got them riveted.

Though I don't have the link here on me right now, I've seen another builder here on VAF go to Lowes or Home Depot and get a wonder bar. He ground down the end of it, which apparently turned into a perfect 90 degree bucking bar to slide in the slot. Another idea in case you don't have a tungsten bar already.

Just take those two slowly in any case, since the gun is inside the elevator. I kid you not, I think those two rivets took me over 45 minutes, mostly in trying to twist my body into the right position to keep the gun on the head while I tried to feel around for the shop head with the bucking bar in the other hand (and I'm young and thin!).
 
Difficult rivets

I think Van's designed those two rivets in the elevator as practice for the dozens just like them later on in the build. :)
 
It's been a long time since doing the elevators, but if I remember correctly, I riveted the skeleton together first, before riveting the skin onto the spar. Seems like the directions have you rivet the skin to one side of the spar first, but on advice from another builder (alpinelakespilot2000) I started with the skin after the spar was riveted to the counterweight assy.

200704280908_92_12_m.jpg


Having the counterweight assy attached really doesn't get in the way.

You will need a long bucking bar for this rivet.
200704291149_89_0_m.jpg

As well as other bottom spar rivets, unless you use pulled rivets like I did.
 
Last edited:
I followed what Smitty did here.

I've got all solid rivets in place on the elevators/counterbalance connection.
 
It's been a long time since doing the elevators, but if I remember correctly, I riveted the skeleton together first, before riveting the skin onto the spar. Seems like the directions have you rivet the skin to one side of the spar first, but on advice from another builder (alpinelakespilot2000) I started with the skin after the spar was riveted to the counterweight assy.

200704280908_92_12_m.jpg


Having the counterweight assy attached really doesn't get in the way.

You will need a long bucking bar for this rivet.
200704291149_89_0_m.jpg

As well as other bottom spar rivets, unless you use pulled rivets like I did.

Too late for me -- I already followed Van's instructions and have the skin attached on one side!!! I have a little, and perhaps too light, bucking bar that I already used for that one rivet in your last picture. That's when I realized I wasn't going to be able to buck the others...

Thanks for the tips, though. The info will come in handy for the next one I build. (Yeah, right! :D)
 
Likewise here Mike. Personally, I put the rivets in with the manufactured head on the inside. Then I held my tungsten bucking bar on end very carefully in the slot between the leading edge and the counterbalance assembly. Slid my rivet gun inside the skins, contorted my body, and just started a constant stream of expletives as I slowly got them riveted.

Though I don't have the link here on me right now, I've seen another builder here on VAF go to Lowes or Home Depot and get a wonder bar. He ground down the end of it, which apparently turned into a perfect 90 degree bucking bar to slide in the slot. Another idea in case you don't have a tungsten bar already.

Just take those two slowly in any case, since the gun is inside the elevator. I kid you not, I think those two rivets took me over 45 minutes, mostly in trying to twist my body into the right position to keep the gun on the head while I tried to feel around for the shop head with the bucking bar in the other hand (and I'm young and thin!).

Yeah, Scott, manufactured head on the inside is the way I was going to go, and still will after I apply some post-manufacturing processes to a wonder bar! Thanks for your response. :)
 
I followed what Smitty did here.

I've got all solid rivets in place on the elevators/counterbalance connection.

Maybe I haven't fiddled with it enough yet, but I've got a longeron yoke which might be too small. Like Smitty's idea, though. Thanks for the link.
 
I believe I used a 1/2 inch by 2 inch bucking bar I made out of 1/2 inch strap and slid it in from the front of the elevator,there is just enough room to slide it in.Also an offset rivet driver was used to drive both rivets.Tight but it worked. Hope this helps

Thanks for the quick response. I was hoping to avoid this kind of scenario, but from the other posts it looks like this is something I'll have to get used to! :D
 
Not to worry. Sometimes it is just a matter of finding the right bucking bar. I borrowed a long, thin bar from a friend for these two rivets and it worked great.
 
Back
Top