What's new
Van's Air Force

Don't miss anything! Register now for full access to the definitive RV support community.

How do I fix this gap?

kyhunting

Well Known Member
How do I fix this gap? It is the point where the tip up canopy mates with the forward fuselage on the left side. It is 1/8" proud. The other side fits good. I bought this plane and it was like this when I bought it. Probably built this way. Any chance of just bending it down without damage to the tip up? Thanks David

eim0wVD.jpg
 
I don't know about bending it, given that it's already painted...others can chime in, BUT...

The usual fix is to build up the forward fuse area with some sort of epoxy filler and sand to match, then paint (I had to do both sides this way, but it came out veeerrrry nice and smooth). Just be sure to feather it in for quite a distance to avoid a "step-off" in the filled-area.

Others like DanH can probably give detailed instructions.
 
I have the same issue. I waited until the end to fasten the foreskin and it just doesn't fit as good now as it did. I believe the error was not fastening that side first. I riveted the firewall first.

I am not sure what to do. I took my canopy frame off to run the edge roller, but the vice grip type does not fit. I really hate the idea of redoing the foreskin because I have installed access panels and the thought of redoing them is about as bad as redoing the canopy itself!

I compounded the problem by opening the canopy earlier in the build with a couple clecos in the way and that bent things up a bit.

This is the last major issue I have before final assembly and Im stumped.
 
2 options that I used in conjunction.. You can slightly enlarge the holes in the aluminium that holds the UHMW blocks and invert & redrill these to bring the hinge point down.

If this doesn't completely solve it, build it up with micro & glass it, then sand smooth.
 
I have repaired my builder errors and have the way to do this in aluminum. Not filler. I am just stubborn and really wanted to know a definitive method to fix all the tip up issues. I was determined to be able to make Jay Pratt proud.

Knobs for adjustment. Smartly used, specific to problem and result. Mix and match. No particular order except try easy first.

1. off set pivot bushings - for fine adjustments to .025"
2. squeezer/stretcher for side rails - Not the tools you think
3. weld and redraw the pivot holes (if other conditions warrant and geometry dictates). You had better know this works before doing it. It may or may not be the right approach.
4. Bend the pivot arm - if the hole will interface atmo.
5. Remove front skin, shim. Make custom skin to fit new hole pattern. I did this. - Fantastic results. $150 in parts/shipping and about 30 hrs work. (I am slow)

You (anyone) can get it to fit nicely.

Look up my posts.

One last thing - It appears that this one needs to bend the canopy frame pivoting at the pivot arm as part of this solution. It will take some special tools( DIY tools).
 
Last edited:
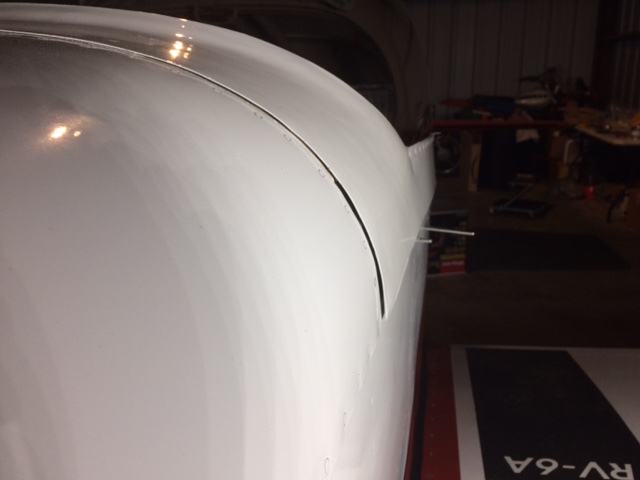
The other side is good/flush and you don't need height adjustment. Therefore bending/shrinking/stretching of the forward frame is required or possibly a cut and re-splice job. Not sure how you could address this with the hinges. Further, you may need to detach the skin from the canopy and that would be big work as then you'll need to re-do the fairiing to the plexi.

I would not recommend learning metal shaping skills on a finished canopy. Not much margin for error and will steeply increase the learning curve. It's hard enough when you can un-cleco everything before bending.

I would fair the forward skin with filler. This type of work is done daily in the auto repair business. The upside is that the learning curve is manageable. You just keep sanding it and re-doing it until you get it right and optically acceptable to you.

I got my canopy as close as I could with the skill and tools that I possessed. I got close, but used filler on both the fuse skins and canopy skins to make it look like an almost perfect fit.

I would recommend that you use epoxy for at least the intial build up. Poly filler (i.e. bondo) does well in thin coats, but is more prone to cracking and de-lamination once you get to the 1/8" range, especially on aluminum. Many internet resources for learning how to do this work. With a 1/8" gap, I would start my fairing a good 6" forward for a nice taper.

Be sure to take off all paint and agressively scuff (as in 80 grit paper) where the epoxy will bond.

Good luck. This is a very doable project for you and you'll develop a new skill.

Larry
 
Last edited:
Back
Top