-POSTING RULES

-Advertise in here!
-
Today's Posts
|
Insert Pics
Keep VAF
Going
Donate methods

Point your
camera app here
to donate fast.
VAF on Twitter:
@VansAirForceNet
|

06-17-2021, 02:10 PM
|
|
|
Join Date: Dec 2018
Location: Littleton, CO
Posts: 138
|
|
Simple fix, I just flipped the standard Van's bracket over to other side (with a little bending to clear the pan) and put the bolt and spacers on on the throttle arm on the other side also:
Untitled by Dave Hock, on Flickr
Tons of clearance now to the hot exhaust pipes!
__________________
Dave
RV7 Slider N732DH
YIO-360-EXP Thunderbolt
Garmin G3X panel w/VPX
Littleton, CO & KCFO (aka CO Air and Space Port)
Photo log: https://flic.kr/ps/9jjZz
|

06-19-2021, 09:01 AM
|
|
|
Join Date: Jan 2006
Location: Vonore, TN
Posts: 619
|
|
Here's how I shielded my throttle cable from exhaust. Works OK through 90-hours. I have a Superior cold air sump. so I had to fabricate an additional plate to use the Superior boss with the Van's bracket.
If I remember correctly, I did have to warp or flare out the sides of the shields a little bit due to exhaust pipe bends.
__________________
John Tierney
Vonore, TN
RV-7A - N777JT Flying
|

06-21-2021, 06:43 AM
|
|
|
Join Date: Jun 2011
Location: Hope Valley, Rhode Island
Posts: 190
|
|
Throttle bracket
Here are some pictures of my homemade throttle bracket. Like other's the Vans supplied bracket positioned the cable too low. I made this out of 4130 sheet. It positions the cable higher, closer to the sump. As an added benefit, it gave the cable a slightly better angle relative to the linkage.
Haven't flown yet, but I have run the engine on the ground and no problems so far.
Mine is a factory Lycoming IO-360-M1B bought through Vans.

__________________
Ivan Luke
Hope Valley, RI
RV-7 SB
Flying as of 9/13/21 (9 1/2 years!)
2022 dues paid
|

07-09-2022, 07:55 PM
|
 |
|
|
Join Date: Oct 2005
Location: Estes Park, CO
Posts: 5,868
|
|
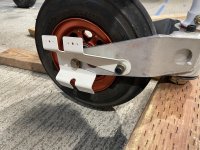
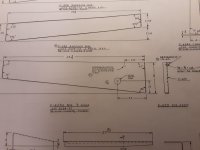
U-00713C, DWG-C1, Nose Wheel Fairing Bracket
They are loose if you follow Vans plans. The vibration couldn't be a good thing. Here's the fix.
The nose pant brackets are fixed.
If you haven't bored the forward holes to Vans dimension, just carefully bore them so the flat washer is a tight fit then add a stainless washer outside so the lock washer and hex bolt hold everything tight.
If you did bore the holes...
Buy washers. Two grade 8-5/16" washers and two 3/8" stainless washers. The grade 8 were ground down to fit tight in the forward holes then bored to 3/8 ID. That helped a lot. The stainless were placed over the holes and under the lock washers so the bolts would lock it down. Now the brackets are solid.
Edit...
I read the plans wrong. The 11/16" hole is drilled in the pant for the tow bar. Duh! The bracket is bolted with the socket head screws. Watch the excess screw protruding in toward the tire. I added a washer or two to move the bolts outboard a little.
Attachment 27890
__________________
Larry Larson
Estes Park, CO
E-mail: wirejock at yahoo dot com
Builder Blog: http://wirejockrv7a.blogspot.com
Donated 12/2022, plus a little extra.
RV-7A #73391, N511RV reserved
Disclaimer
I cannot be, nor will I be, held responsible if you try to do the same things I do and it does not work and/or causes you loss, injury, or even death in the process.
Last edited by wirejock : 09-30-2022 at 10:49 AM.
|

07-10-2022, 09:23 PM
|
 |
|
|
Join Date: Jul 2016
Location: Worland, Wyoming
Posts: 2,404
|
|
Quote:
Originally Posted by wirejock
U-00713C, DWG-C1, Nose Wheel Fairing Bracket
They are loose if you follow Vans plans. The vibration couldn't be a good thing. Here's the fix.
The nose pant brackets are fixed.
If you haven't bored the forward holes to Vans dimension, just carefully bore them so the flat washer is a tight fit then add a stainless washer outside so the lock washer and hex bolt hold everything tight.
If you did bore the holes...
Buy washers. Two grade 8-5/16" washers and two 3/8" stainless washers. The grade 8 were ground down to fit tight in the forward holes then bored to 3/8 ID. That helped a lot. The stainless were placed over the holes and under the lock washers so the bolts would lock it down. Now the brackets are solid.
Attachment 27890
|
Okay Larry, I'm confused again. Are you saying you modified how the black bolt in front holds everything with those new washers you made? Sorry this is taking so long but I'm wondering if our brackets are different somehow.
The problem I was referencing in our email chain is that the aft slots are ever so slightly loose and that is where I have a tiny bit of movement coming from.
__________________
Jereme Carne
Commercial ASEL; IFR
RV-7A Flying as of 03/2021
|

07-11-2022, 08:45 AM
|
 |
|
|
Join Date: Oct 2005
Location: Estes Park, CO
Posts: 5,868
|
|
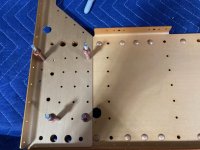
Bracket
Quote:
Originally Posted by jcarne
Okay Larry, I'm confused again. Are you saying you modified how the black bolt in front holds everything with those new washers you made? Sorry this is taking so long but I'm wondering if our brackets are different somehow.
The problem I was referencing in our email chain is that the aft slots are ever so slightly loose and that is where I have a tiny bit of movement coming from.
|
Yes. The hole Vans calls out is a few thou bigger than the washers. The were only a tiny bit loose but enough to vibrate. Vibration causes wear. I just made a washer that fit the hole then used a larger stainless washer over the bracket hole to allow the lock washer and bolt to hold the bracket firmly attached to the fork.
The aft slot on mine is also loose. No way to fix that without an accurate bushing. Fixing the forward hole tightened the bracket. No more vibration.
Edit...
I read the plans wrong. The 11/16" hole is drilled in the pant for the tow bar. Duh! The bracket is bolted with the socket head screws. Watch the excess screw protruding in toward the tire. I added a washer or two to move the bolts outboard a little.
__________________
Larry Larson
Estes Park, CO
E-mail: wirejock at yahoo dot com
Builder Blog: http://wirejockrv7a.blogspot.com
Donated 12/2022, plus a little extra.
RV-7A #73391, N511RV reserved
Disclaimer
I cannot be, nor will I be, held responsible if you try to do the same things I do and it does not work and/or causes you loss, injury, or even death in the process.
Last edited by wirejock : 09-30-2022 at 10:49 AM.
|

07-11-2022, 09:01 AM
|
 |
|
|
Join Date: Oct 2005
Location: Estes Park, CO
Posts: 5,868
|
|
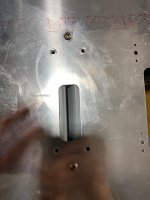
Bracket
Here's the problem. Notice the note to drill the forward hole 11/16". That's bigger than either washer so it's loose. You can't remove the bracket whithout removing the socket head cap screws anyway. Best solution would be to drill the holes 3/8" for the bolt.
Edit...
I read the plans wrong. The 11/16" hole is drilled in the pant for the tow bar. Duh! The bracket is bolted with the socket head screws. Watch the excess screw protruding in toward the tire. I added a washer or two to move the bolts outboard a little.

__________________
Larry Larson
Estes Park, CO
E-mail: wirejock at yahoo dot com
Builder Blog: http://wirejockrv7a.blogspot.com
Donated 12/2022, plus a little extra.
RV-7A #73391, N511RV reserved
Disclaimer
I cannot be, nor will I be, held responsible if you try to do the same things I do and it does not work and/or causes you loss, injury, or even death in the process.
Last edited by wirejock : 09-30-2022 at 10:49 AM.
|

08-28-2022, 10:24 AM
|
|
|
Join Date: Mar 2021
Location: San Antonio, TX
Posts: 101
|
|
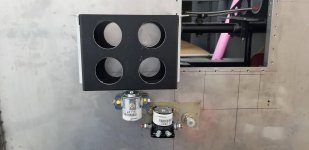
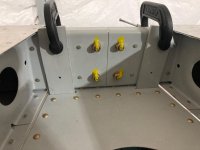
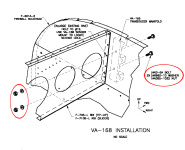
Would like to ask some clarification for "gotcha #14" (redoing the firewall work for the other components to be installed).
1. The gotcha mentions brake reservoir. However, DWG 19 seems to position such that it requires a two completely new holes (for AN3 bolts). So, doesn't really matter, could be done later with the same outcome.
2. The battery box. Do I understand correctly that per DWG 31A (tail-dragger), the battery box reuses 3 existing holes which need to be drilled up for the AN3 bolt. Again, other than removing existing rivets, no big deal, as the hole is upsized. The platenut go on the battery box mount.
3. The relays reuse two existing holes and add two more holes. However, in this case, the platenuts go aft, so this must be the place where you need to resort to counter-sinking if not doing it during an initial assembly, as mentioned in "gotcha #14". Existing holes are upsized to AN3, so, again, this part should be fine. Here if using NAS1097 rivets for platenuts, shouldn't make a difference because they require light counter-sinking anyway.
So, if using NAS1097 for the platenuts, this gotcha doesn't really impact the end result, only the frustration of removing perfectly fine rivets.
Am I correct?
__________________
Ivan Dubrov #75069
Building an RV-7
San Antonio, TX (near 1TT8 Bulverde Airpark)
My build log
|

08-28-2022, 10:58 AM
|
 |
|
|
Join Date: Oct 2005
Location: Estes Park, CO
Posts: 5,868
|
|
Firewall
Correct on all with a couple of caveats.
When you prep for the battery box, use the holes in the box for reference. Vans calls out reuse of existing holes but they do not match perfectly. Hopefully yours will be perfect.
When you start drilling for the contactors, watch the post on the starter contactor. The injected model has the fuel line very close to the starter contactor. Easiest fix is to move the fuel fitting a little. Drawings are pretty close for everything else but I had to move the prop cable penetration a little because I installedd a firewall oil cooler and the scat wouldn't clear.
__________________
Larry Larson
Estes Park, CO
E-mail: wirejock at yahoo dot com
Builder Blog: http://wirejockrv7a.blogspot.com
Donated 12/2022, plus a little extra.
RV-7A #73391, N511RV reserved
Disclaimer
I cannot be, nor will I be, held responsible if you try to do the same things I do and it does not work and/or causes you loss, injury, or even death in the process.
|

08-28-2022, 07:43 PM
|
|
|
Join Date: Mar 2021
Location: San Antonio, TX
Posts: 101
|
|
Got it.
But I see another "gotcha" here: the firewall doubler from OP-32 reuses two of the holes on the firewall. Since it goes to the front of the firewall, the firewall (ideally) should not be dimpled in these two holes (and stiffener behind the firewall should not be counter-sinked). Right?
__________________
Ivan Dubrov #75069
Building an RV-7
San Antonio, TX (near 1TT8 Bulverde Airpark)
My build log
|
Thread Tools |
Search this Thread |
|
|
Display Modes |
Linear Mode
|
Posting Rules
|
You may not post new threads
You may not post replies
You may not post attachments
You may not edit your posts
HTML code is Off
|
|
|
All times are GMT -6. The time now is 08:07 AM.
|