What's new
Van's Air Force

Don't miss anything! Register now for full access to the definitive RV support community.

New RV-10 Low Profile Handle Design

J Twilbeck

Well Known Member
I am very excited to be making this announcement! I've been secretly working for months, with help from Ed Kranz and Geoff and Zac from Aerosport Products, designing a new handle for the RV-10.

I wanted a door handle that:
1. Was easy to install.
2. Still used the safety pin from the original design.
3. Incorporated a lock.
4. Could be used with Planearound 180 degree third door latch.
5. Could be used with one hand.
6. Was aerodynamic.
7. Looked great and complemented this beautiful airplane.

So I hit the drawing board - a.k.a. Solidworks - and got to work. And after a lot of work, trial fits, and prototype installs I developed this:
Handle+2+Cropped.JPG


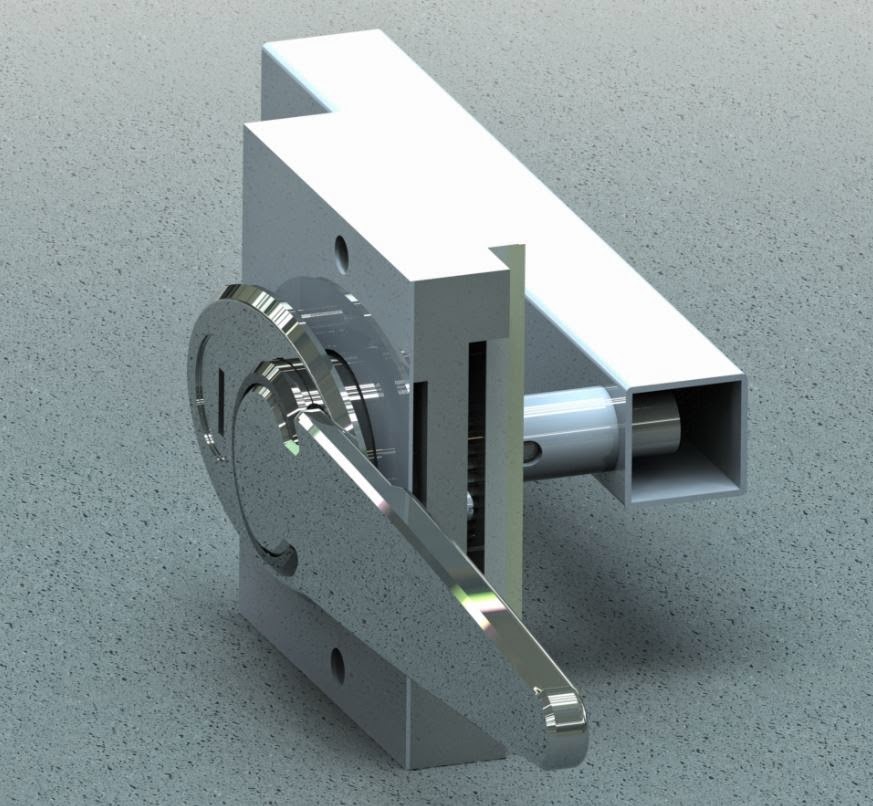
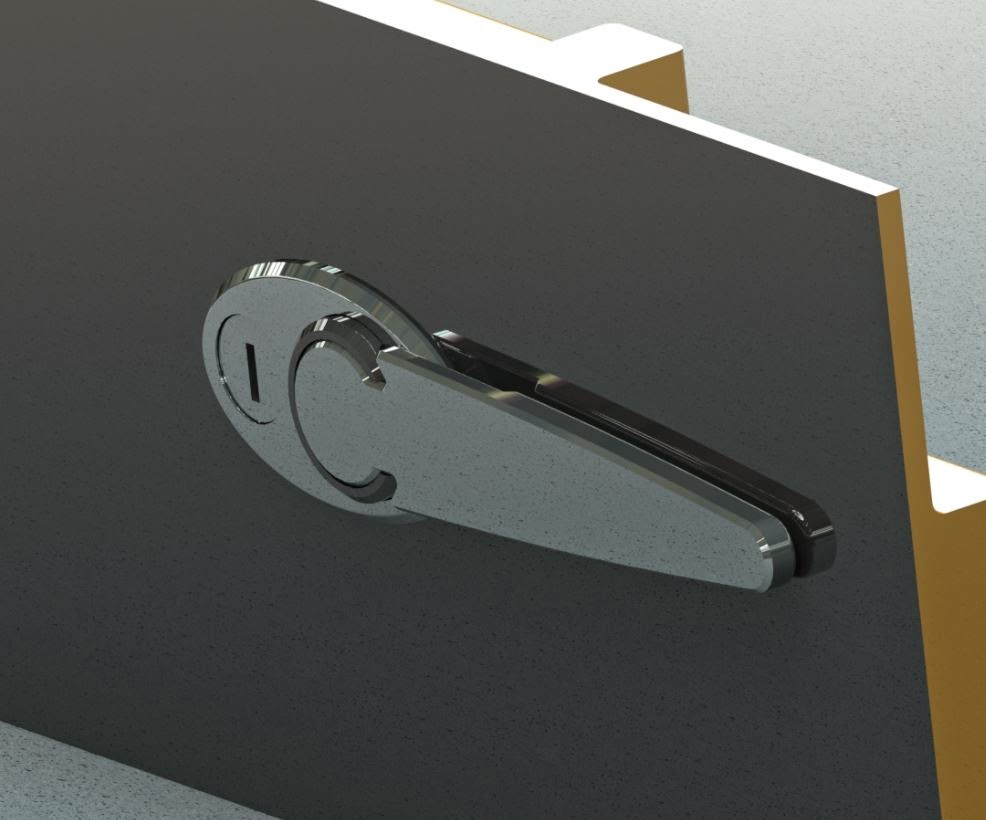
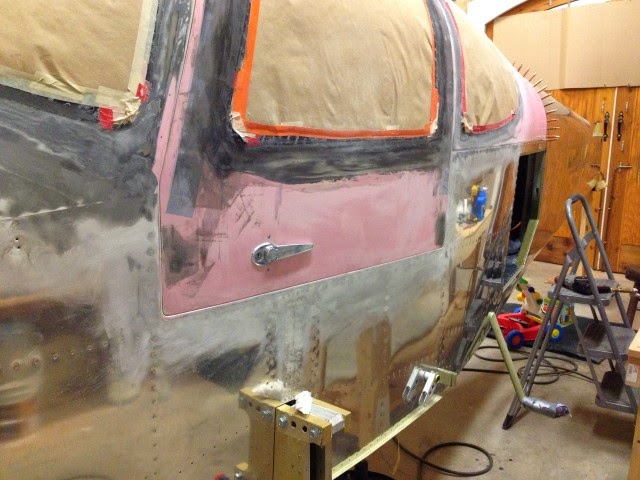
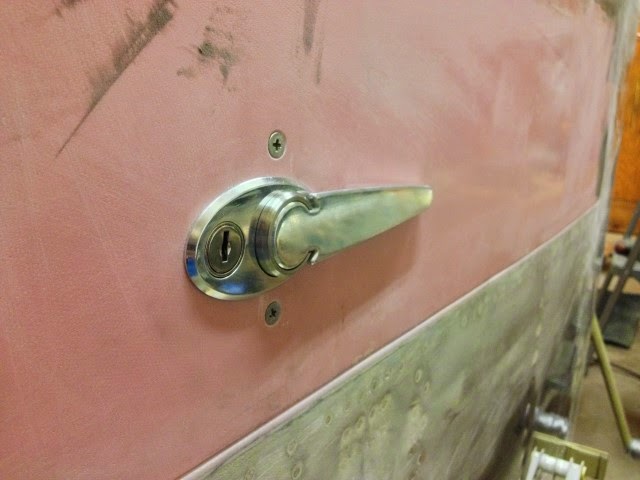
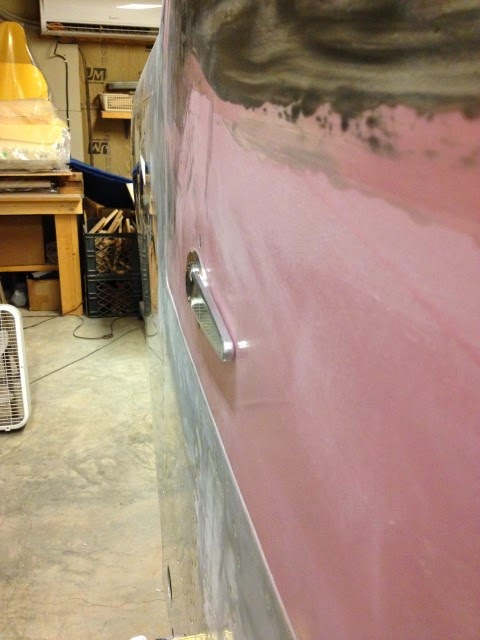
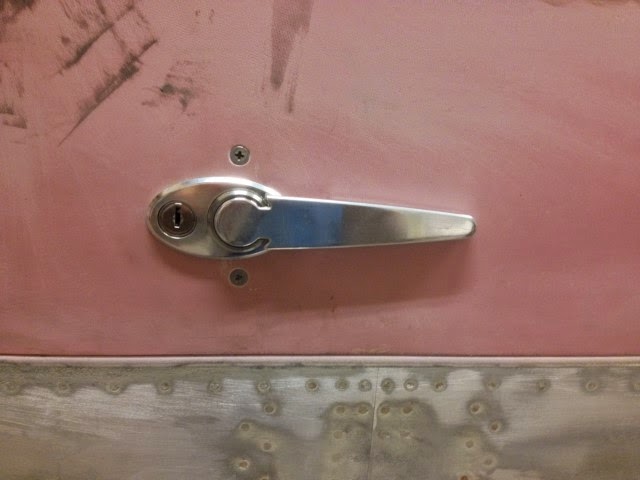
The Low Profile Handle is made from aluminum alloy and a high strength and corrosion resistant stainless steel inner ring. The handle replaces the standard RV-10 Van’s aircraft exterior handle that is supplied in the finishing kit. The handle has an aerodynamic design while maintaining the safety lock feature of the original design. The design also includes a location to install a lock flush with the handle giving the door a finished and well crafted look. Existing, installs can be retrofitted with the new handle.

The handle operates in a similar manner as the original Van’s handle; with the exception of the safety latch release button which is replaced with a lever action integrated into the handle design. The center of the circle is pushed lightly with the thumb releasing the safety latch mechanism and causing the back end to pull away from the door allowing access to grip the handle. The handle is then twisted to open the doors. The degrees of rotation are not limited allowing use of the 180° Planearound Third Latch if desired.

The handle is a fraction of the height of the stock Van’s handle reducing drag and improving the aesthetic appearance of the aircraft. The professional fit and sleek design are right at home on the modern and aerodynamic RV-10.

Handle+1+Cropped.JPG


Again, I owe many thanks to Geoff and Zac at Aerosport Products. Without them this would not have become a reality. We have been working on this design for many months now and are excited to say, that after some prototype installs, we plan on bringing this design to market! The handles will be produced and sold by Aerosport so if you are interested please give them a call to reserve an order. A price has not been decided yet. But I can tell you the work these guys produce is top notch!
 
Last edited:
....contd from above

Here are some pictures of the first prototype installed on my airplane...

IMG_4204+(Small).JPG


IMG_4211+(Small).JPG


IMG_4206+(Small).JPG


IMG_4212+(Small).JPG


IMG_4213+(Small).JPG


I also have a video posted on my blog showing the operation of the handle. And a few additional pictures. ....I'll see if I can figure out how to post a direct link to the video.
 
Justin,

I've been following your build progress and curious about the super-secret handle!

Yet another after-market addition that I'll have to add to the budget!
 
Beautiful

Justin,

I always wanted to take the time and figure this mod out. I know it had to be challenging with the thickness provided. You, Geoff and Ed NAILED IT!
I have had so many calls in the past asking about a lock feature incorporated in the handle. Hopefully Vans picks up this design!! Well done.
 
Very Nice!!! I like the lock.... I wanted to try to find way to do that too. In the end I designed a pretty basic( But Pretty) version that's very affordable.

Yours looks similar to the one Showplanes Designed....

29loksh.jpg
 
I would like to see it modified to replace the scissor latch on the side-by-side tip-up's.
 
Justin,

I always wanted to take the time and figure this mod out. I know it had to be challenging with the thickness provided. You, Geoff and Ed NAILED IT!
I have had so many calls in the past asking about a lock feature incorporated in the handle. Hopefully Vans picks up this design!! Well done.

Sean, Thanks! There was a lot of time put into the project . You can install the handle even on a finished airplane...just sayin ;). If you have any of those calls asking about a lock feature you can refer them over to Aerosport for the handles. I have the set installed on my plane with your third door latch and it works really well.
 
Very Nice!!! I like the lock.... I wanted to try to find way to do that too. In the end I designed a pretty basic( But Pretty) version that's very affordable.


John,
Thanks. I liked your design. I would have probably gotten a set if I didn't have this in the works.

Yours looks similar to the one Showplanes Designed....

And, yeah it does. Great minds think alike I guess. Plus how different could a handle really look... :)
 
Any info, photos or details for retrofitting this into an existing door? Wondering what has to be modified, removed, drilled to make these work.
 
Any info, photos or details for retrofitting this into an existing door? Wondering what has to be modified, removed, drilled to make these work.

Mark,
I installed the existing handles with the Planearound third door latch first before installing this new handle. I also had the Planearound guides and latch sealed in with fiberglass prior to the test install.

To modify an existing door the existing handle mechanism needs to be removed to cut back the internal handle tube and it's internal pin. The Delrin block is replaced with a new one. The door hole you cut for the Vans handle is opened up to a larger diameter and an additional hole is drilled forward of that for the lock. All of this is covered up with that external ring in the end. Then the handle is reassembled in the pocket and screwed back into place.

If you have sealed in your external screws, things could be a bit tricky, but its not impossible. This is just a suggestion for someone in that particular situation. This is untested so I have no guarantee that it would work. But I would suggest drilling out the rivets that hold the nutplate to the internal plates (the one that is turned upside down for your external screws) then you can turn the nutplate to remove it allowing you to then remove the internal workings. Do the work on the door, like I mentioned above, then reassemble. The internal plates (C-1006A, B, D) are reused in this design. After assembly, screw the nutplate back on and use pop rivets to hold it in place.

I have written complete instructions for the install including a lot of pictures. I don't know if Aerosport is wanting to release the instructions yet, but you could give them a call. It wouldn't hurt ask.

P.S. You did a beautiful job on your plane!...I check out you blog for insight on a regular basis.
 
For those that are interested in the Low Profile Door Handle, we are compiling a waiting list of interested clients.
We will be starting a production run in the near future. When we have them available, we will go right down the list of contacts in the order that we received interest.
We are currently unsure of what the final cost will be at this time.
I do, however, have the installation instructions available to those who would like.
Please contact me at [email protected] or 614-834-8659.

AerosportProducts.com
 
That looks great, very impressive! Working full time, building an RV, and designing and marketing a product - I am impressed.
 
I would like to announce that Aerosport Products is now taking orders for the
new low profile door handles designed by Justin Twilbeck. Introductory price of $345.00. These handles come with everything you need accept for the ACS door locks. These can be purchased from Aircraft Spruce part #11-01600.
All aluminum is polished and all stainless steel. We will only be taking phone orders for the first 2 weeks then they can be purchased online. Orders will start shipping 1-19-15.
Contact Geoff or Zac at Aerosport Products for more information and ordering at 614-834-8659
See earlier post in this Thread for video's and additional info

Geoff Combs

http://aerosportproducts.com
0_0_6fa5a0d60535c2a9e7e4a5a6930a9fec_1

0_0_d27857fa185f7652c0f7fffdeaddd44f_1

0_0_86ae8226e95a4140824b8858e8ee1569_1
 
Look good Geoff, couple questions.

What work (if any)is involved in replacing existing handles from finished planes?

Will they work with the PlaneAround center latch setup, which has a 180* rotation of the handle?

Thanks.
 
Mike they are very simple to install. I replaced my standard door handles with them. I recommend removing the doors but it could be done with the doors still on the airplane. As for the PlaneAround center latch they will work fantastic together. Either the 180* or standard.

Geoff
 
Small nit-pick: The position of the "<- Close - Open ->" sticker suggests that the lever is shown in the "Open" position, and to close it you would unlatch and then move the lever up (rotate it counter-clockwise) from it's current position.

Given that it's supposed to be aerodynamic, I expect it should be in the horizontal position during flight, and hence that would be the "Closed" position. Note that i'm not a -10 owner or builder, so I don't know how the handle should move... Just pointing out a UI issue that some might find confusing.

This is really not confusing to most.
Step 1. Determine if the door is open or closed. (Very important)
Step 2. If closed rotate the handle in the direction of the arrow.
OR
If the door is opened or unlatched shut door if open and rotate handle in the direction of the arrow.
Another note. It is opposite when inside the airplane

Pretty simple.
 
I've spent a fair bit of time studying human interface design... A double ended arrow with a lever positioned at one end of it communicates to people visually that the lever goes to the other end of the arrow when actuated. People naturally want to choose the shortest path between two points. People also naturally do NOT read text when they have a strong visual cue like an arrow. It's human nature that can be trained out, but human interface designers make use of this knowledge to design systems that work *with* human nature, not against it.
 
I've spent a fair bit of time studying human interface design... A double ended arrow with a lever positioned at one end of it communicates to people visually that the lever goes to the other end of the arrow when actuated. People naturally want to choose the shortest path between two points. People also naturally do NOT read text when they have a strong visual cue like an arrow. It's human nature that can be trained out, but human interface designers make use of this knowledge to design systems that work *with* human nature, not against it.

I must be abnormal then, because I generally tend to block out graphical cues and read text exclusively. I find it very annoying to read most new (post late 1990s) web sites because my eyes gloss right over the graphical buttons and icons and look for text.

I have also been involved in design for industrial control panels and process information display screens, where having a clean design and being able to quickly acquire and interpret critical information about an operating chemical process or piece of equipment is extremely important. Sometimes designers go overboard with the visual/graphical cues when what is needed is a clearly readable piece of text.

Looking at the arrow above, my immediate reaction is to ask who installed it backward. Now, depending on the point of view (literally) of the person viewing the arrow, the arrow head may end up being hidden by the handle itself, showing a single headed arrow, but the "open" text right near the handle to me indicates it is in the "open" position, not that I should move the handle to obtain an open position.

Ultimately, what matters is that the people who rely on information such as this can get the right message out of a sign. With appropriate training, and an understanding of the principles by which the labels were created, and an assurance that all such labels were created with an identical set of assumptions, the operator can interpret correctly the intent of the designer.

Where folks run into problems is often when competing or incompatible conventions are used in similar or related systems. For instance, I have worked at employers where all control screens used the color green to indicate that a pump or valve was off or closed, at others where green meant open or running, and have even seen panels designed (shudder) where green meant "safe" whether that was open or closed (that gets really scary)!

Anyway, not meant to critique, but rather to point out that some people's perceptions don't necessarily perfectly align with the research on what the average person sees when viewing a label or status display.
 
Gotta agree with most of the above comments-------the sticker shown is not very instinctive.

As a 10 builder, I had to put stickers on for the A/W inspection, and it was similar in design-------and in being misleading.

After having the plane painted, I did not put the sticker back on-----I just give new passengers a brief tour of how the handle works.

If I were designing the sticker, it would go under the handle, the handle would cover up the arrowhead, and word "closed" when in the closed position, and it would cover up the open arrow/word "open" when in the open position.

This would give all the correct clues.
 
Small nit-pick: The position of the "<- Close - Open ->" sticker suggests that the lever is shown in the "Open" position, and to close it you would unlatch and then move the lever up (rotate it counter-clockwise) from it's current position.

This label reminds me of a popular bar in Boulder CO where the restrooms are side-by-side; each door has a sign pointing to the opposite door. Almost everyone walks into the wrong room initially.

I agree that your label should be revised.
 
Wow, a lot of converstation over a old decal. If I was a betting person, I would guess that was from Geoff's previous set of factory handles. Which may explain their location being off a bit.

While most of the points probably are still valid between the two types of handles, I still don't see the value in the debate.

Personally, to me, I interpret the arrows as it moves both directions, with the text indicating the function that will occur when moved that way.


The good news is that we can each label our aircraft how we see fit.
 
Back
Top