
Van's Air Force
You are using an out of date browser. It may not display this or other websites correctly.
You should upgrade or use an alternative browser.
You should upgrade or use an alternative browser.
Overhauling Mikey?s Panel
- Thread starter Louise Hose
- Start date

Hi Paul,
how do you intend to do the switch and CB labelling?
Allan
I plan to use the same Brother labeler that I used on the Val. Haven't decided on black or white yet....I like white, but on the Val, the gray is very light, and you couldn't read it. Might be better on this gray, but I'll let Louise choose.
Paul
cytoxin
Well Known Member
wow
i was wondering how long a post about a panel could go but now i must ask the question, which kind of tape do you use in the labelers. i was at a office supply store and had about 100$ worth of stuff when i put it all back because i couldnt find any thing that would "hold up to the weather so to speak." please share the PN's if you have them. i need to label soon and dont want to EXPERIMENTal anymore.
i saw someone ,maybe andy karmy or dual rudder davethat used clear address labels and excel in the computer and that worked out real nice. but is the ink in my printer gonna stand up for long?
both have excellent sites btw.
i was wondering how long a post about a panel could go
but now i must ask the question, which kind of tape do you use in the labelers. i was at a office supply store and had about 100$ worth of stuff when i put it all back because i couldnt find any thing that would "hold up to the weather so to speak." please share the PN's if you have them. i need to label soon and dont want to EXPERIMENTal anymore.i saw someone ,maybe andy karmy or dual rudder dave
that used clear address labels and excel in the computer and that worked out real nice. but is the ink in my printer gonna stand up for long?both have excellent sites btw.
Last edited:
alpinelakespilot2000
Well Known Member
Have you tried the "Extra Strength Adhesive" variety for Brother P-Touch labelers?:i was wondering how long a post about a panel could go
.
http://www.advizia.com/brother/Advisor.asp?User=tapesacc&Rnd=85
Checkmark the boxes for "TZ Tape" and "Extra Strength Adhesive" and the tape item numbers will come up to the right showing various heights and colors. ("TZS" = extra strength and "TZ" =standard adhesive.)
I've heard good things about this stuff, and have used some, but I don't have any actual time with the sun on them, so take this FWIW.
Good luck.
TZ - Laminated
The stuff I used on the Val and will use on Mikey is the TZ (I think that designates the size and type cartridge) Laminated tape. It is available many ways - the ones I get are white or black letters (two different cartridges) on clear backing - and it has a clear laminate layer on top of the printer, so it's pretty much indestructible. I have used ink-jet printing on clear (actually, sort of mat finish) Avery stuff for larger labels, and it works, but the ink is subject to abrasion - use it in low traffic areas.
At least, this stuff has worked for me!
Paul
Paul Tuttle
Well Known Member
This is what I use. Works great, all kinds of different fonts and sizes.

That's mine, too, except yours is clean Mine's been in the hangar now for 2 years. I also use this and print 3/4 lines in small font for wire labelling as well. Stick beside connector and then cover with transparent heat shrink. In bright yellow with black lettering.
Paul, I haven't found a tape that covers the printing with a clear laminate over the lettering to protect it. Guess I'll google EZ tape and find it.
Allan
Mine's been in the hangar now for 2 years. I also use this and print 3/4 lines in small font for wire labelling as well. Stick beside connector and then cover with transparent heat shrink. In bright yellow with black lettering.Paul, I haven't found a tape that covers the printing with a clear laminate over the lettering to protect it. Guess I'll google EZ tape and find it.
Allan
Sam Buchanan
been here awhile
i saw someone ,maybe andy karmy or dual rudder dave that used clear address labels and excel in the computer and that worked out real nice. but is the ink in my printer gonna stand up for long?
If you have access to a laser printer, clear Avery labels can be used and they last a loooong time. Mine have been in service for over eight years and still look great. Many ink jet inks will run if exposed to moisture but the laser toner is pretty tough stuff. Details of the laser labels here (bottom half of the page:
http://thervjournal.com/panel2.html
I used a very similar Avery label and put the boxes around it, just like you did. I think I saw it as a tech piece in Sport Aviation. Unfortunately the labels are now frosting and scratching. I should probably replace them to make the cockpit look "fresh".
Karl
(Did I just say fresh?)
Louise Hose
Well Known Member
Are you trying to stir up trouble?
I had to laugh when I saw this note. I had exactly the same reaction: Cool! Room for a map box! Paul, however, has been like the Vera Wang character in The Incredibles..."No map box! I won't have it! No map box"
That discussion probably isn't completely over, but we figure a map box can be added after the plane is up and flying again. It certainly isn't a priority at this time and we have plenty of other, higher priority things to address this month. However, if the STS-122 ends up scrubbed, there might not be much left to do when I get back to Houston. Then, maybe, I'll have to insist on the map box so we have a project to work on!
I'm curious. Do people who have map boxes like them and find them useful?
Very cool refit, Paul. You are a craftsman.
So why no map box? The area over on the right looks ripe for one.
I had to laugh when I saw this note. I had exactly the same reaction: Cool! Room for a map box! Paul, however, has been like the Vera Wang character in The Incredibles..."No map box! I won't have it! No map box"
That discussion probably isn't completely over, but we figure a map box can be added after the plane is up and flying again. It certainly isn't a priority at this time and we have plenty of other, higher priority things to address this month. However, if the STS-122 ends up scrubbed, there might not be much left to do when I get back to Houston.
Then, maybe, I'll have to insist on the map box so we have a project to work on!I'm curious. Do people who have map boxes like them and find them useful?
Bruce Reynolds
Active Member
Map box is most important
I designed a map box before Vans had a kit for one. Mine is vertical instead of horizontal and hinges on the right. Being vertical, all the sectionals and the Flight Guide sit upright and nothing is on top of anything. Putting it in vertical leaves more useful panel space (I think). Just a personal opinon, but I think that a map box is a necessity, not just an option. Our planes being as small as they are, need to be kept clutter free. I have never understood those panels with all the breakers on the right side taking up valuable map box space.
Sorry, but this a hot button for me. By the way every one of Vans planes has one.
Bruce Reynolds
RV-6A
Sam Buchanan
been here awhile
Quote:
Originally Posted by Sam Buchanan View Post
If you have access to a laser printer, clear Avery labels can be used and they last a loooong time. Mine have been in service for over eight years and still look great. Many ink jet inks will run if exposed to moisture but the laser toner is pretty tough stuff. Details of the laser labels here (bottom half of the page:
http://thervjournal.com/panel2.html
I used a very similar Avery label and put the boxes around it, just like you did. I think I saw it as a tech piece in Sport Aviation. Unfortunately the labels are now frosting and scratching. I should probably replace them to make the cockpit look "fresh".
Maybe there is a difference in the labels "similar" to the ones I used.......
Sorry your labels haven't held up well. I intended for mine to just be temporary but they still look good as new.
L.Adamson
Well Known Member
Many ink jet inks will run if exposed to moisture but the laser toner is pretty tough stuff. [/QUOTE] I clear coated my ink je...ink jet, but works great! L.Adamson -- RV6A
Sam Buchanan
been here awhile
I clear coated my ink jet labels while still on the full page sheet. They've been on the panel, for at least six years now. Clear coat is a necessity for ink jet, but works great!
L.Adamson -- RV6A
The newest ink jets may be quite suitable for labels with no topcoating. I'm using a new photo printer from Epson and the inks are supposedly highly moisture and UV resistant. Time will tell.
cytoxin
Well Known Member
thank you and paul tuttle
your info was dead on the money...i didnt know where to start there are all kinds of labels. i found the TZS labels on the internet about 1/2 of office depot.refurbished p1900 on e-bay for 12.50 the tape was more than the printer. it can also be hooked up to the computer to print on wider tape.
oh BTW Ironflight, you blew by me like i was standing still with this project...very nice work.
Have you tried the "Extra Strength Adhesive" variety for Brother P-Touch labelers?:
http://www.advizia.com/brother/Advisor.asp?User=tapesacc&Rnd=85
Checkmark the boxes for "TZ Tape" and "Extra Strength Adhesive" and the tape item numbers will come up to the right showing various heights and colors. ("TZS" = extra strength and "TZ" =standard adhesive.)
I've heard good things about this stuff, and have used some, but I don't have any actual time with the sun on them, so take this FWIW.
Good luck.
your info was dead on the money...i didnt know where to start there are all kinds of labels. i found the TZS labels on the internet about 1/2 of office depot.refurbished p1900 on e-bay for 12.50 the tape was more than the printer. it can also be hooked up to the computer to print on wider tape.
oh BTW Ironflight, you blew by me like i was standing still with this project...very nice work.
Wiring....
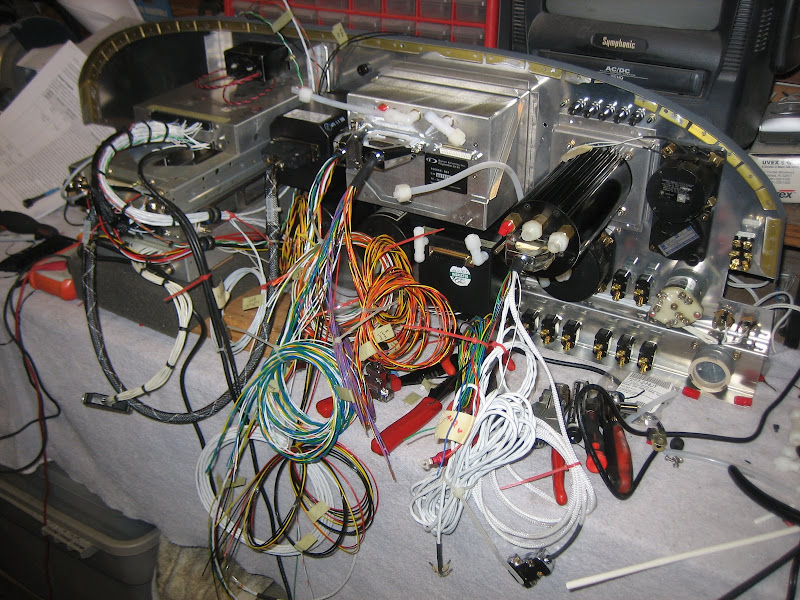
Well, my world has been a bit topsy-turvy the past few days trying to get the Shuttle in the air (I am on a midnight shift for pre-launch, but all of the serious discussions are going on during the day - it's hard to figure out when to sleep....), but I am into the wiring phase of the project. here is a two-day old picture (as I got started).

Wiring is fun because with the panel at home, I can wander in, do a couple of runs, wander back out.....I have also decided to do this panel with lacing cord instead of tie-wraps, and find it to be a very peaceful experience. Quite, slow knot tying, with none of the screams and cursing that comes with tie-wrap cuts....
One piece of advice if you're installing an ICOM tray - don't wait until it is in the rack to install the BNC connector for the antenna - I spent two hours today getting it installed - finally by removing much of my previous work and getting down to bare access. Live and earn...
Pay no attention to the pitot-static lines....that's NOT the way they are going to end up!
Paul
Well, my world has been a bit topsy-turvy the past few days trying to get the Shuttle in the air (I am on a midnight shift for pre-launch, but all of the serious discussions are going on during the day - it's hard to figure out when to sleep....), but I am into the wiring phase of the project. here is a two-day old picture (as I got started).
Wiring is fun because with the panel at home, I can wander in, do a couple of runs, wander back out.....I have also decided to do this panel with lacing cord instead of tie-wraps, and find it to be a very peaceful experience. Quite, slow knot tying, with none of the screams and cursing that comes with tie-wrap cuts....
One piece of advice if you're installing an ICOM tray - don't wait until it is in the rack to install the BNC connector for the antenna - I spent two hours today getting it installed - finally by removing much of my previous work and getting down to bare access. Live and earn...
Pay no attention to the pitot-static lines....that's NOT the way they are going to end up!
Paul
The Plot (and the wire bundle) Thickens!
OK, here is tonight's progress report - not bad for operating on 4 hours of sleep in 36, hey? (What's that pink elephant doing buzzing around here?)
The audio wiring is finally finished (yeah! I hate grounds and shields...), and I started labeling the multitude of wires for the various Dynon and Tru track harnesses. The coiled bundles are wires going to similar destinations, like FWF, Aft fuselage, staying in the panel, etc. Los of temporary cable ties that will be replaced by lacing cord when all the runs are finished.
Now if I can only figure out why the D180 has three different sets of DSAB wires, I'll be a happier man...
I still need to start power wiring and build a harness for the ADI Pilot II... cover me while I go for more D-Sub pins!!
Paul
GrayHawk
Well Known Member
Looking at the photo, what are the dimensions of the recessed sub-panel are where the switches, key switch, etc. are mounted?OK, here is tonight's progress report - not bad for operating on 4 hours of sleep in 36, hey? (What's that pink elephant doing buzzing around here?)
(Since I am getting ready to rebuild and older RV-6A panel).....
Looking at the photo, what are the dimensions of the recessed sub-panel are where the switches, key switch, etc. are mounted?
QUOTE]
That's a piece of Z-channel I had made up - the web is 2.0", and the flanges are each 1.0", but I cut the top one to 0.75" to make the recess a little less.
Paul
ccarter
Well Known Member
DSAB Wiring
Paul,
Your answer may be on page 4-9 of the FlightDEK installation guide. From the description there the sets of wires really do create a "buss" using the pairs of wires wired in series between Dynon units. I have a stand alone D-180 only, my backups are steam guages so the DSAB is not being leveraged in my 7.
Chris...
Thanks Chris - I managed to talk to Dynon, and was told that they are all paralleled inside the units, so just pick a pair...makes sense - just a big party-line bus!
And the smoke stays in!!
I got power on the panel for the first time tonight - all the big stuff works, just have to work on details like lighting, backup battery charging circuit, etc. Best news is that none of the magic smoke left the boxes, so I call that a successful test!
I realized that I have a bit more airframe sub-panel work to do, and that will probably be a day of metalwork. then when Louise gets here to report for work we've got servos to install, long wiring runs, panel hook-ups, antennas, firewall sealing...oh, and the entire interior to clean up, paint, and prep for new upholstery. (She's been worried that the project would be done and there'd be nothing to do. This is a great example of the "90% done, 90% left to go" part of homebuilding....
Paul
Invisible Progress....
It's obviously a lot of fun to post new pictures that show a project progressing and changing, but there comes a time in all airplane building where your working hard, putting in long hours, and nothing looks significantly different! It's easy to see how people get frustrated at that point, but you just have to keep plugging away. One thing that I do when I reach this point is that I start making lists of things to do - for the express purpose of then crossing thing off the list! That way, I can see actual progress taking place (the list has lots of crossed off stuff), and I know I'm still moving forward.
the last couple of days I have finished up all of th myriad little detailed wiring projects. Things like the autopilot disconnect switch, the pigtail for the Garmin 396, a switch for instrument lighting - a long list of little stuff that you have to do to get things "finished". Today I took most of the day off and carted the panel to the airport for another test fitting so that I could figure out what modifications were needed o the airframe's sub-panel. I then spent a good four or five hours cutting metal and pounding rivets. Unfortunately, the camera was at home....
A few random observations:
1) I am really getting to love lacing cord - I had almost forgotten about it, something I learned as a kid, but had abandoned for the instant gratification of zip-ties. The Val is all zip-tied behind th panel, and I have to be careful not to scratch or cut myself when I work on the harness. Mikey s now all laced - and the harness are much smoother.
2) Stein's guys came through again! I had ordered a spool of lacing cord when I purchased all of the wiring supplies, but it was back ordered. Paul Story was good enough to "pillage" (his words' enough for me to do an average panel from someone's work bench. The past couple of days I've been lacing, and carefully conserving my supply, wasting as little as possible. Just as I was almost finishing up, with just a little bit left, UPS showed up - with my spool of cord from Stein! I now have enough to last for several more airplanes....)
3) The VAF forums database is one heck of a resource. It was only just getting started as I was finishing the Val, but now when I have questions like "Hmmm...which wires do I use from the 396 pigtail for audio - the audio pair, or the alarm wire?" I can do a search and bingo - there is the discussion. Beats having to ask again!
4) Panel punches are good for more than just instrument holes. I needed a hole in one of the ribs forward of the sub-panel to pass a connector through - got out the punch, and made a beautiful round hole. I did the same thing in the sub-panel itself. Much easier than trying to hack a hole in that hard-to-reach spot. (Oh, a DB-25 connector is JUST a little too large to fit through a 2-1/4" hole.....gotta go for the 3-1/8" side of the punch)
5) I must say that I appreciate the fact that the original builder stuck with a "normal" light-plane wiring plan. It makes deciphering what is what a whole lot easier as I rip through the old wiring. The trim system was a bit of the norm, but once you get down to the two wires that go to each servo, you have a place to start from. Yeah, I am guilty of doing a few things differently than the average plane - but I never intend for anyone else to have to work on it....(yeah, right!)
6) I have been accomplishing an awful lot each day...but my "to-do" list is longer now than a week ago! I sure am glad that Louise is coming to town to help get this pile of parts airborne again....
The new Mikey will fly again!
Paul
It's obviously a lot of fun to post new pictures that show a project progressing and changing, but there comes a time in all airplane building where your working hard, putting in long hours, and nothing looks significantly different! It's easy to see how people get frustrated at that point, but you just have to keep plugging away. One thing that I do when I reach this point is that I start making lists of things to do - for the express purpose of then crossing thing off the list! That way, I can see actual progress taking place (the list has lots of crossed off stuff), and I know I'm still moving forward.
the last couple of days I have finished up all of th myriad little detailed wiring projects. Things like the autopilot disconnect switch, the pigtail for the Garmin 396, a switch for instrument lighting - a long list of little stuff that you have to do to get things "finished". Today I took most of the day off and carted the panel to the airport for another test fitting so that I could figure out what modifications were needed o the airframe's sub-panel. I then spent a good four or five hours cutting metal and pounding rivets. Unfortunately, the camera was at home....
A few random observations:
1) I am really getting to love lacing cord - I had almost forgotten about it, something I learned as a kid, but had abandoned for the instant gratification of zip-ties. The Val is all zip-tied behind th panel, and I have to be careful not to scratch or cut myself when I work on the harness. Mikey s now all laced - and the harness are much smoother.
2) Stein's guys came through again! I had ordered a spool of lacing cord when I purchased all of the wiring supplies, but it was back ordered. Paul Story was good enough to "pillage" (his words' enough for me to do an average panel from someone's work bench. The past couple of days I've been lacing, and carefully conserving my supply, wasting as little as possible. Just as I was almost finishing up, with just a little bit left, UPS showed up - with my spool of cord from Stein! I now have enough to last for several more airplanes....
)3) The VAF forums database is one heck of a resource. It was only just getting started as I was finishing the Val, but now when I have questions like "Hmmm...which wires do I use from the 396 pigtail for audio - the audio pair, or the alarm wire?" I can do a search and bingo - there is the discussion. Beats having to ask again!
4) Panel punches are good for more than just instrument holes. I needed a hole in one of the ribs forward of the sub-panel to pass a connector through - got out the punch, and made a beautiful round hole. I did the same thing in the sub-panel itself. Much easier than trying to hack a hole in that hard-to-reach spot. (Oh, a DB-25 connector is JUST a little too large to fit through a 2-1/4" hole.....gotta go for the 3-1/8" side of the punch)
5) I must say that I appreciate the fact that the original builder stuck with a "normal" light-plane wiring plan. It makes deciphering what is what a whole lot easier as I rip through the old wiring. The trim system was a bit of the norm, but once you get down to the two wires that go to each servo, you have a place to start from. Yeah, I am guilty of doing a few things differently than the average plane - but I never intend for anyone else to have to work on it....(yeah, right!)
6) I have been accomplishing an awful lot each day...but my "to-do" list is longer now than a week ago! I sure am glad that Louise is coming to town to help get this pile of parts airborne again....
The new Mikey will fly again!
Paul
Louise Hose
Well Known Member
The panel went in today!
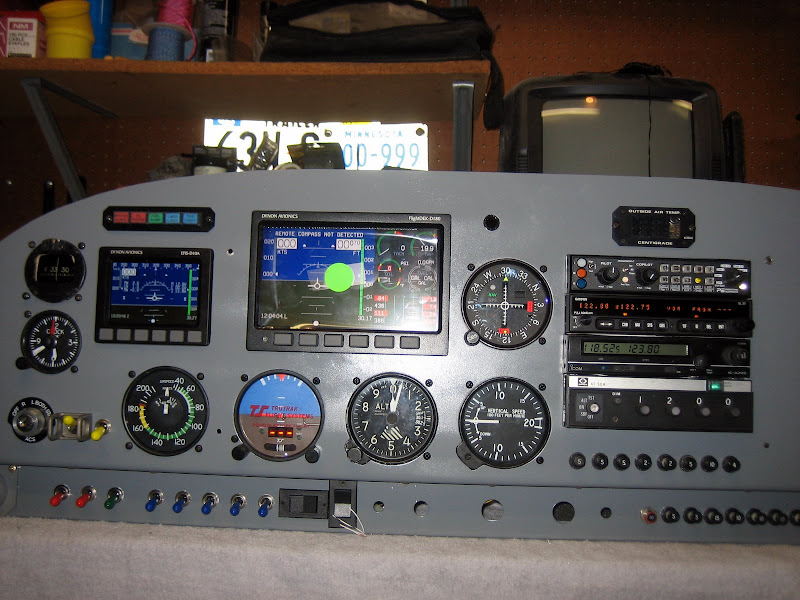
After two long days (and evenings) of work since my arrival in Houston, we put the panel into Mikey today. And, it is beautiful (IMHO). The panel is mounted, the plumbing is done, and the wires have been rudimentarily routed. Tomorrow will be the big hook-up day. There have also been lots of other, little, tasks done to spruce up Mikey. I'm looking forward to actually flying him again!

Staging the panel for insertion.

The interior immediately before inserting and mounting the panel.

Panel "docked" for final(?) time in Mikey.
Best of all? Looking up at the back of the panel now reveals a very clean set of wires and routing. It looks so simple now that even I might stand a chance of understanding which wire go where and what it does. Also, removing that old vertical panel brace sure makes working under the panel delightful in comparison to my past experiences! My strong advice to anyone building a -6 is to dump the old vertical panel brace and keep the area open.
After two long days (and evenings) of work since my arrival in Houston, we put the panel into Mikey today. And, it is beautiful (IMHO). The panel is mounted, the plumbing is done, and the wires have been rudimentarily routed. Tomorrow will be the big hook-up day. There have also been lots of other, little, tasks done to spruce up Mikey. I'm looking forward to actually flying him again!
Staging the panel for insertion.
The interior immediately before inserting and mounting the panel.
Panel "docked" for final(?) time in Mikey.
Best of all? Looking up at the back of the panel now reveals a very clean set of wires and routing. It looks so simple now that even I might stand a chance of understanding which wire go where and what it does. Also, removing that old vertical panel brace sure makes working under the panel delightful in comparison to my past experiences! My strong advice to anyone building a -6 is to dump the old vertical panel brace and keep the area open.
pierre smith
Well Known Member
Sweet
OK Louise....you're deeply indebted now......I'm jealous of the panel.
Good advice, leaving the vertical panel brace out, -7's included.
Kindly write again following first flight with the new goodies.
Regards,
OK Louise....you're deeply indebted now
......I'm jealous of the panel.Good advice, leaving the vertical panel brace out, -7's included.
Kindly write again following first flight with the new goodies.
Regards,
rv7boy
Forum Peruser
A Thought about "Mikey's Panel Project"
I've been keeping up with this thread every 2 or 3 days, and I'm glad to say I met Paul in Houston when I was on business travel back in February. I know he's typical of many RV-ers...smart, experienced pilot, hands-on airplane guy, willing to help others, etc., etc.
And then back in the spring I noticed in these forums that Paul had met this special lady named Louise who owned and flew a special RV-6 (check the history of the N-number), so I thought this is really going to be neat.
Just now as I was looking at the photos of the new panel going into Mikey, I had this thought: "The couple that overhauls an RV-6 panel together, stays together."
I know, it's kinda corny, but a man and a woman working on this kind of project together just have to learn a lot about each other. I love my wife, and we've been together 37+ years, and I know she'll do a few small things to help me with my RV-7 project, but I can't imagine me removing and improving her instrument panel (if she had one). Good grief, what am I saying? She's not even a pilot!
Thanks, Paul for showing us the project. There's more to your message than just a new and improved instrument panel for Mikey!
Merry Christmas!
Don
the_other_dougreeves
Well Known Member
Don't worry, they pay for it in June. And July. And August. And September. And, some years, May and October too. You do get used to it ... after 5 or 6 years. ;-)You know what the only annoying part of reading this thread is ? Seeing Paul working on the panel, with the hangar door open, and in a T-shirt.
I am looking out my office window at 3' of snow, and the temperature is -10C (about 14F).
I envy you guys
Cheers
Me, I grew up there ... never knew any better until I moved to SoCal....
Panel looks great, Paul!
TODR
Michael White
Well Known Member
Now for the big Question.
Will it be Micky or the Valkyrie flying out to Big Bend?
I'd bet on Mikey.
Louise Hose
Well Known Member
Out with the old....
I expect that I will be putting many of the items (at least, the ones that still worked) up for sale once I get settled and in a situation where I could follow through on shipping or such. You'll probably see them announced here.
As for Mikey or the Valkyrie at Big Bend? We are hoping that Mikey will be back in Virginia by that time so I can fly him "at home". But, if he's not, I think it likely that he will make the trip. He's a hardier sort (with higher wheel pants) than the Val.
On the old equippment...there is an excellent condition King ADF that has a freshly overhauled panel unit. The antenna, however has a little problem - it works perfectly as a top mounted unit, but if you mount it on the bottom of the airplane, left/right is reversed. This is perfect if you like to shoot ADF approaches inverted! (Louise spent the day practicing by spending the afternoon upside-down underneath the panel doing lacing cord....)
Paul
(Seriously, we had the antenna checked out, and the problem is indeed an internal Op Amp that tells the unit if it is a top or bottom mount that isn't working....)
Paul
(Seriously, we had the antenna checked out, and the problem is indeed an internal Op Amp that tells the unit if it is a top or bottom mount that isn't working....)
We have a heartbeat!
At about noon today, Mikey powered back up on his own battery, and all functions checked out except for a balky right strobe that didn't want to flash (hey, strobes are supposed to be intermittent...they're only on half the time! Louise didn't' buy that either....)
Still lots of work to be done - engine controls need to be hooked back up, I still have to connect all the antennas, the canopy is still off for frame clean and paint, and the interior is still out. Tomorrow I hope to tidy up a few more wires, connect a couple of missing items (Backup battery, OAT, EGT/CHT sensors, etc...), and hopefully have him back in the air before Christmas.
But it will happen when it happens....
Paul
At about noon today, Mikey powered back up on his own battery, and all functions checked out except for a balky right strobe that didn't want to flash (hey, strobes are supposed to be intermittent...they're only on half the time! Louise didn't' buy that either....
)Still lots of work to be done - engine controls need to be hooked back up, I still have to connect all the antennas, the canopy is still off for frame clean and paint, and the interior is still out. Tomorrow I hope to tidy up a few more wires, connect a couple of missing items (Backup battery, OAT, EGT/CHT sensors, etc...), and hopefully have him back in the air before Christmas.
But it will happen when it happens....
Paul
pierre smith
Well Known Member
Paul, I've measured..
........to see how much ribbon you're gonna need for a Christmas bow...it's 12 feet around the fattest part of the fuse....and, say...around 6 feet more for a bow...18-20 feet of ribbon will work.
Merry Christmas,
and hopefully have him back in the air before Christmas.
But it will happen when it happens....
Paul
........to see how much ribbon you're gonna need for a Christmas bow
...it's 12 feet around the fattest part of the fuse....and, say...around 6 feet more for a bow...18-20 feet of ribbon will work.Merry Christmas,
Mikey
Active Member
I finally got to fly today!
Louise and Paul buttoned me up and felt ready for the third "first flight" in my lifetime. As with any such adventure, they had a couple of trial runs with adjustments before the real thing. Paul served as PIC on the flight and I felt great! I’ve really been getting antsy after spending a month in Paul’s hanger. Paul and Louise didn’t identify any serious issues, although they told me that they’ll address an easily fixed weeping fuel fitting before I get to fly again. Of course, like any surgery, there will be mandatory follow-up and therapy. Their list includes about a dozen things to do and, maybe, six or eight squawks. They promised to come back to the airport tomorrow morning and I'm hoping to fly again by afternoon. I have so many new toys to play with!
In the process of working on my panel, Paul and Louise have also been sprucing up my interior (and gave me a new Bell tailwheel). A new coating of paint now mostly hids my nearly 18 years of scrapes and bruises. I feel so fresh and young. Louise told me that Cleaveland Tools called today and said that my new interior was ready to ship. What a great Christmas present! It's going to take some time to get used to my new self!
Louise and Paul buttoned me up and felt ready for the third "first flight" in my lifetime. As with any such adventure, they had a couple of trial runs with adjustments before the real thing. Paul served as PIC on the flight and I felt great! I’ve really been getting antsy after spending a month in Paul’s hanger. Paul and Louise didn’t identify any serious issues, although they told me that they’ll address an easily fixed weeping fuel fitting before I get to fly again. Of course, like any surgery, there will be mandatory follow-up and therapy. Their list includes about a dozen things to do and, maybe, six or eight squawks. They promised to come back to the airport tomorrow morning and I'm hoping to fly again by afternoon. I have so many new toys to play with!
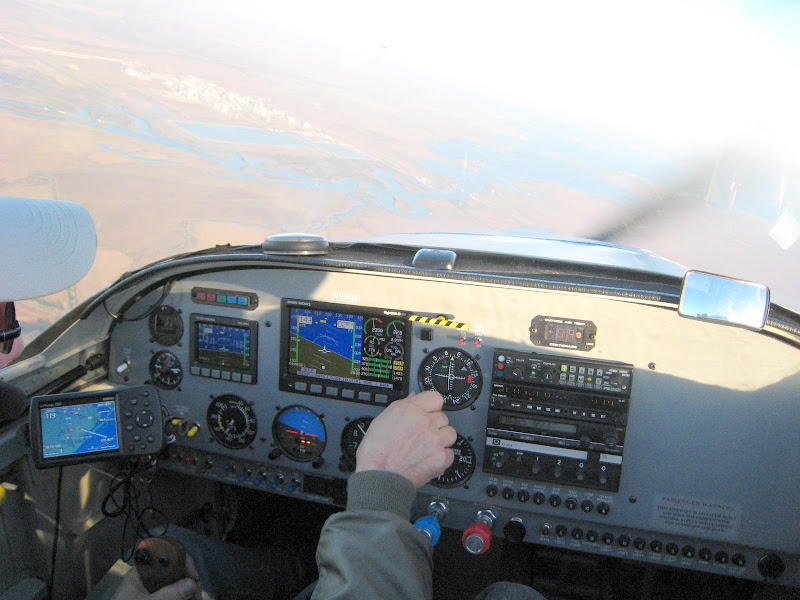
Paul fiddles with the VOR indicator during Mikey's "first" flight south of Houston.
In the process of working on my panel, Paul and Louise have also been sprucing up my interior (and gave me a new Bell tailwheel). A new coating of paint now mostly hids my nearly 18 years of scrapes and bruises. I feel so fresh and young. Louise told me that Cleaveland Tools called today and said that my new interior was ready to ship. What a great Christmas present! It's going to take some time to get used to my new self!
Last edited:
kaceyd9plus
Member
D10
Paul,
What is up with the D10 attitude in the picture? It doesn't agree with the D180 or the AP.
Paul,
What is up with the D10 attitude in the picture? It doesn't agree with the D180 or the AP.
Paul fiddles with the VOR indicator during Mikey's "first" flight south of Houston.
pierre smith
Well Known Member
Fast, too...
.......and, er, Mikey, I notice that the airspeed is close to the yellow.....you go guy!
Love these high speed brothers
.......and, er, Mikey, I notice that the airspeed is close to the yellow.....you go guy!
Love these high speed brothers
D10A
I'll answer for Mikey here since he's sleeping and Louise is getting ready to do most of the flying today....I am guessing that this is a good example of what happens to the Dynon without airspeed information - it wasn't showing airspeed or altitude yesterday (one of the the squawks we have to work off today - probably a connection problem), and I noticed some significant lag in the D10 attitude. I noticed pitch variations of 10-15 degrees at one time, and then at other times it agreed perfectly. This is a known good unit that was flying in the old panel, so I suspect an installer error.
More testing today after some squawk work!
Paul,
What is up with the D10 attitude in the picture? It doesn't agree with the D180 or the AP.
I'll answer for Mikey here since he's sleeping and Louise is getting ready to do most of the flying today....I am guessing that this is a good example of what happens to the Dynon without airspeed information - it wasn't showing airspeed or altitude yesterday (one of the the squawks we have to work off today - probably a connection problem), and I noticed some significant lag in the D10 attitude. I noticed pitch variations of 10-15 degrees at one time, and then at other times it agreed perfectly. This is a known good unit that was flying in the old panel, so I suspect an installer error.
More testing today after some squawk work!
kentb
Well Known Member
What's going on here.
Sense Mikey is Louise's plane, then the vanity mirror on the right side must be for paul.
Kent
Paul fiddles with the VOR indicator during Mikey's "first" flight south of Houston.
Sense Mikey is Louise's plane, then the vanity mirror on the right side must be for paul.
Kent
Peetie the Pilot
Active Member
Nice Panel!
I like the looks of your panel but am wondering how do you have your Garmin attached to the airframe? Is it coming off the side of the canopy deck?
Thanks Peter
I like the looks of your panel but am wondering how do you have your Garmin attached to the airframe? Is it coming off the side of the canopy deck?
Thanks Peter
KTM520guy
Well Known Member
Sense Mikey is Louise's plane, then the vanity mirror on the right side must be for paul.
Kent
Oh, snap!
Louise Hose
Well Known Member
On a ram mount
The 396 is on a ram mount attached to longeron. The original mount was done by someone else and used for a Garmin 195 (so to be up for sale!) when I bought Mikey. I liked the 396 in that position and haven't seen a panel mount that appealed to me, so we kept that exactly as I had it before.
I like the looks of your panel but am wondering how do you have your Garmin attached to the airframe? Is it coming off the side of the canopy deck?
Thanks Peter
The 396 is on a ram mount attached to longeron. The original mount was done by someone else and used for a Garmin 195 (so to be up for sale!) when I bought Mikey. I liked the 396 in that position and haven't seen a panel mount that appealed to me, so we kept that exactly as I had it before.
Louise Hose
Well Known Member
Put in the plane after Oshkosh 2006
I put mirrors on the glareshield to watch for Avengers sneaking up from behind. I get the second one in on the pilot's side once we settle things a bit more. Afterall, I have more hair to keep styled than Paul!
Sense Mikey is Louise's plane, then the vanity mirror on the right side must be for paul.
Kent
I put mirrors on the glareshield to watch for Avengers sneaking up from behind. I get the second one in on the pilot's side once we settle things a bit more. Afterall, I have more hair to keep styled than Paul!
Squishing Squawks....
While Louise answers questions and Mikey rests up, I'll just add that today saw another hour in the air with Louise at the controls after a few hours of working down the squawk list. We had a slight fuel smell that was easily fixed with a new flair. The Dynon airspeed and altitude was a snafu in the pitot/static connections I'll attribute to working upside-down (and the fact that they are in a different relative position on the D180 and the D10A!). Autopilot servos were backward, but the harness I built was prepared for that with a simple-to-cut jumper and some switchable leads. Panel close-outs, work on the vent hoses, cleaning up a few wires, etc. took the rest of the afternoon, and we're just about out of things to do! Next up will be bringing both Dynons up to the latest software version, but that was aborted today because we didn't have the drivers for Louise's vista machine.
Hope the weather is good this weekend for a little traveling!
Paul
Louise Hose
Well Known Member
Relapse!
Well, Mikey had a relapse today and we had to perform emergency surgery on him. However, the prognosis is good. The D180 came with old software and, after 1.5 hours of confirming the unit worked in flight, I installed the newest software in both Dynons. No problem with the D10A. No problem....I thought...with the D180. All bars completed. A message came up indicating that the new software was successfully installed. Then, the screen went into a loop....blue intro screen, 2/3 blue and 1/3 black (blank) screen, then all black screen. Arggggggg.
We consulted with the specialist at Dynon and Eric diagnosed the affliction as a failed display board. Dynon is making an overnight, lifeflight delivery of a new transplant D180. Paul and I removed the necrosised organ from Mikey in preparation for tomorrow's re-installation. Mikey is resting comfortably tonight but too weak to make his own posts.

