What's new
Van's Air Force

Don't miss anything! Register now for full access to the definitive RV support community.

Torqueing AN818 nuts for vent and fuel lines?

spaceflightmeow

Active Member
I'm working on installing the vent tube in the RV-7 fuel tank but I'm puzzled on how to torque the AN818 nut.

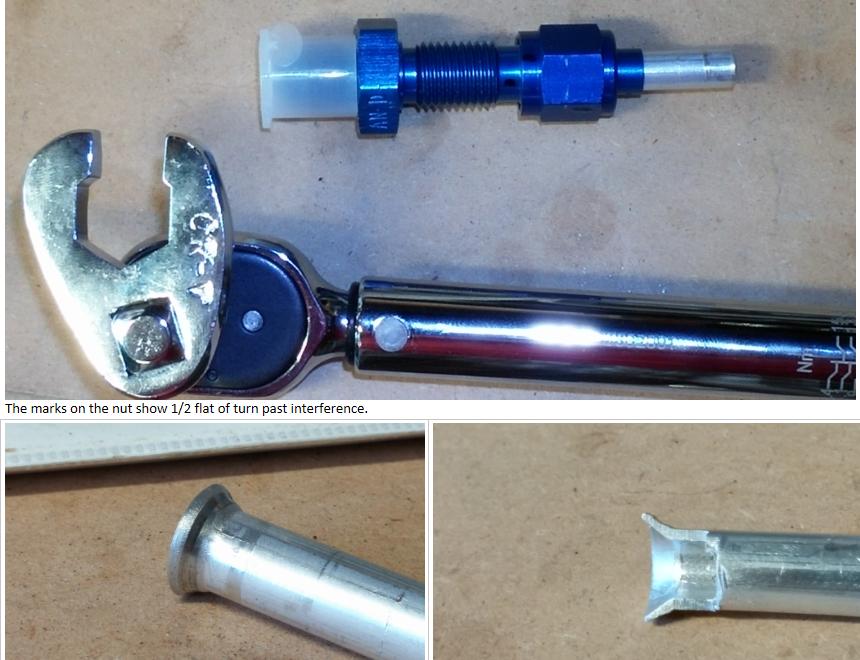
The tank vent tube is 1/4" 3003 AL and takes a AN818-4D nut. AC43.13 says to torque the nut to 40-65 in-lbs. I have a 1/4" drive torque wrench (20-150 in-lbs). I need a 9/16" crowfoot in a 1/4" drive, which I cannot find. It seems most crowfoot wrenches are 3/8" drive, but virtually all 3/8" drive torque wrenches can barely get down 65 in-lbs (5.4 ft-lbs).

Also I've seen people tighten the nut so many flats. How many turns is needed for a AN818-4D nut on a 3003 tube?
 
3/8 - 1/4 adapter

Why can't you use a 3/8 to 1/4 adapter for the crowsfoot? Extensions do not change the torque. Just turn the crowsfoot 90? to the Tq wrench.
 
I'd just "tighten" it... but if you wish to torque it simply use your 9/16" open/box combo wrench and measure the distance from the nut CL to the center of the box. Do the math and hang the requisite weight from the box end.

For example, if your combo wrench had a 12" arm you'd hang a 4# weight from the box end and Bob's your Uncle.
 
I got a 3/8 to 1/4 adapter and a 3/8 crows foot set, installed the crowfoot at 90 deg to the torque wrench and torqued a couple of test fittings to 65 in-lbs. Here's the first one after I torqued it, removed it, torqued again, then sectioned.

QASs2wz.jpg


I turned the nut until it just started to interfere, marked with a sharpie, then torqued. Both times, the wrench clicked at 1/2 flat of additional turn. Again, this is with 3003 1/4" tubing provided by Vans for the tank vent lines.
 
Good Research Work

You did your homework. Tested and verified. I did the same thing. Keep it up and you will have a well built plane.
 
I measured my crowsfoot wrenches and made a spreadsheet with the corrected values. I think the calculation is in AC43.13. I know a lot of people do the 90 degree thing but I don't think its technically correct. It may be close and good enough though.
 
Check on Amazon. I was able to find a set of 1/4" drive crow's foot. If I recall, the set wasn't that expensive.
 
Just in case anyone misinterprets... This photo does *not* show the crows foot at 90 degrees to the wrench.

I'm embarassed to admit that I thought the orientation shown in the picture is 90 degrees. Then again I didn't look too closely, since there was a bit of wobble to the wrench thanks to the 1/4" to 3/8" adapter.
 
Raised "vein" on backside of flare

On an unrelated note, the photo shows a slightly raised "vein" on the back side of the flare, caused by the tube extruding into the gap between the two halves of the dies in the Rolo Flair tool. This looked bad, but I torqued the flare as-is and the sleeve seems to crush that vein down into place with no problem.

The pre-made fuel pickup tube supplied by Vans also has a "vein" on the back side of the flare. I figured if it's good enough for them, it's good enough for me.
 
I know a lot of people do the 90 degree thing but I don't think its technically correct.

Leonardo (the helicopter mfr. formerly known as Agusta), Airbus (the helicopter mfr. formerly known as Eurocopter), Bell, MD Helicopters, and Sikorsky all show the 90* method in their Standard Practices Manuals, as well as the formula for when you can't make 90*.

For those who like apps, there is a free iOS app called The Norbar Torque Wrench Extension Calculator (I think Norbar has an Android version as well) that I was "blessed" by our QA Dept. to use when I worked at Sikorsky. We did several calculations manually and checked the answers against the app's answers, and they were always the same.
 
Back
Top