What's new
Van's Air Force

Don't miss anything! Register now for full access to the definitive RV support community.

Fuel line frustration

DaleB

Well Known Member
When I feel tempted to chuck a tool or part across the garage, I know it's time to quit for the day.

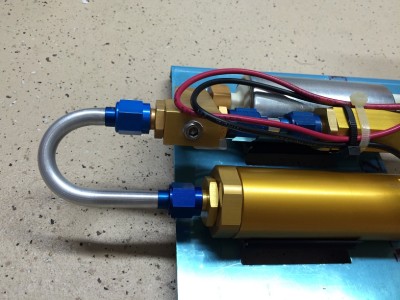
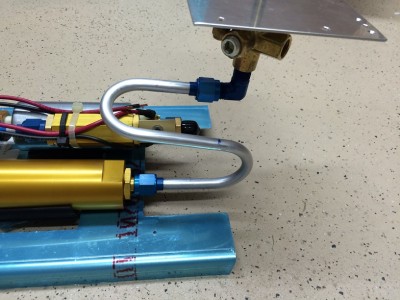
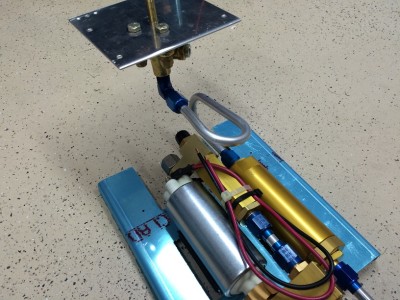
I spent a couple of hours this afternoon trying to plumb the fuel filter and fuel pump (the new style AFP FI boost pump & filter package). All I managed to do was create a few more feet of scrap aluminum tubing for the trash can. My bends are OK, my flares are OK, but getting the right length is proving to be a real challenge. Is there a secret to measuring so these things come out the right length? Or do I just keep trying until I luck into it?

I also wonder about the layout. I see the Van's diagram for the old style pump has the supply line running from the selector valve underneath the pump & filter, into the forward end of the filter. From there they show a run from the aft end of the filter to the forward end of the pump assembly, and from the aft end of the pump down underneath again to run forward toward the firewall. With the new style pump it seems like it would be a lot easier and use a lot less tubing to just put the output of the filter and the input of the pump on the same end, connected with a short tube with two 90 degree bends (or a big 180) instead of a foot long piece with two 180 bends. A guy could even just use a short L-shaped tube from the fuel selector to the filter input. Does that make sense, or would it be likely to cause a problem with cracking due to vibration and stress? I haven't seen anything showing the routing of fuel lines with the new style boost pump that doesn't need all of the extra plumbing.
 
It has been a few years since I did my fuel pump installation but bending the lines was all pretty straight forward with mine. The thing to do is make them long and trim to fit after bending. The only one that gave me problems was the line running to the bulkhead fitting on the firewall. I did not want any tension or pressure on the line. I made so many I ran out of tubing and had to order more.
 
Try forming the shape using the wire from a wire clothes hangar or something of similar gauge, then match that with the tubing once you have it how you want it. The other method is to throw money at it and order some flexible fuel line tubing and associated fittings which are pretty easy to put together. I went for the latter but to each his own.

Erich
 
When I feel tempted to chuck a tool or part across the garage, I know it's time to quit for the day.

One of the several indicators saying quit for the day.

On the bending - I just worried a piece until it was close, then fastened both ends and bent it until it cleared everything. Then took it off and re-bent until it could be assembled. Then I made a pretty duplicate and pitched the ugly one.

So, for longer pieces, make it too long, then progressively make it rechecking as you go. Short pieces - technique as above.

You will develop the skills and it will look marvelous when you are done.

Be sure you leak check the assembly before installing in the plane. - Mark it done, and then you are sure it won't leak. I pressures to 30 psi air pressure and allow a leak down overnight.
 
Back off and take a deep breath and take your time. I had twice as much tubing as I needed and I wound up using it all before I got them finished.
 
Make a master template first. Mark a straight line every 1/4", then bend one end 90* and the other 45*. You'll then be able to tell where the bends end up with respect to 'length'. Oh yeah, before bending, make sure the fittings are installed...the perfect line without the fittings is quite frustrating too. -Jim
 
Mark a line every 1/8 inch so when you bend (as noted in post 6) you can see how much tubing a bend will use. Make up a few 90's and 45's with flairs on two of them. Now you have a flared piece with marks that let you know how long that piece is. cut those pieces 1/2 inch longer than the marks.

Get some wooden dowel rod the same dia as the tubing..... and also some clear aquarium tubing with an ID of the dowel rod. ACE Hardware....

Install the flared piece with nut a collar, cut a piece of clear tubing and slide it on the alum tubing. Cut dowel for long run. Slip on clear sleeve at the end... and then the flared end goes on..... The dowel gets cut short, and the clear tubing is cut long so you can slide it to a perfect fit.

Now, remove the fitted assembly and measure. The marks that you first placed on the tubing will tell you what you need for the bend and the flair. The flair does not consume any measurable length. Just measure between the lines and add them up.
 
I like the ideas for getting the measurements. I measured an inch and a half for a 90 degree bend, 3" for a 180. Gasman, I love the idea of a "Tinker Toy" kit for making a mock-up of measurable pieces.

I decided to take another crack at it this evening, starting from scratch and ignoring the diagrams of the aluminum sheepshank used with the old style pump/filter package. There are ways that seem to make sense to put this thing together, and some that just don't seem to make sense. What I came up with will, I think, work with minimal hassle and not a lot of excess tubing.

IMG_0681-400x300.jpg


IMG_0682-400x300.jpg


IMG_0684-400x300.jpg


I think I could get rid of the 90-degree 'S' tube by using a 45 degree AN to NPT fitting and a single bend, but it would be really, really tight. This way gives me some room for adjustment. I'll have to re-make that one to clean it up and shift the whole thing forward an inch, but I think it will work.
 
Last edited:
Yet another option...

I leave about 4 inches extra on the long end. I finish the shortest end completely, flare and all, since it's usually impossible to flare after it's bent. Then, do all the bends, once I know where the other end needs to be I cut it off, INSTALL THE NUT (yeah, I've flared without it, perfect fit naturally) and then finish the end. I ended up with a little pile of 2 or 3 inch pieces.
 
Dale----I'd change the fitting on the bottom of the valve to a straight, and plumb it that way. The 180* bend between the filter and the pump is the way we do it.
YES---it takes practice! ( my frustration is with rivet squeezers, but I really try not to throw them. A certain F1 Rocket in the hangar that I might hit!)
Take some of your scrap and make some test bends, and then compare them to what you need. If they are good, then you can duplicated them.
Tom
 
Dale----I'd change the fitting on the bottom of the valve to a straight, and plumb it that way.
I'd rather do that to avoid the extra 90 elbow, but it would interfere with the pump output line. Things are pretty tight in there. I'm going to see if I can get tubing bent short enough to work with a 45 on the valve and eliminate the 'S' tube.
 
I think I could get rid of the 90-degree 'S' tube by using a 45 degree AN to NPT fitting and a single bend, but it would be really, really tight. This way gives me some room for adjustment. I'll have to re-make that one to clean it up and shift the whole thing forward an inch, but I think it will work.

Not sure why you could not have your 90degree AN fitting turned 180degrees
to face in the opposite direction and fabricate a gentle 180degree piece of tubing connecting to the pump inlet?
This will give you plenty of room to accommodate large radius bend rather than those tight S turns.
 
Tubing cutter trick -

It took a few years but one day I realized that the 'groove' in the tubing cutter wheel was there to allow a flare to be removed with only a minimal bit of tubing cut off. If you make the part a little long on the end, (or 'forgot' to put on the nut or sleeve), its possible to salvage the nearly perfect part by trimming off the flare, correcting the problem, and re-doing a new flare.

I've recently saved a few pieces that way, in fact, left the sleeve off 3 times before I got it right, but the final length of the flare was spot-on as a result of trimming.

Use the smallest tubing cutter that is necessary to fit into a tight space when trimming, too.

Or maybe I'm the only one on the planet who learned this the hard way.
:cool:
 
After some playing around with things, I believe I have a solution. The simple 180 degree bend tube shown in my earlier post works well for the forward end, connecting the filter outlet to the pump inlet. On the aft end, it turns out that a 45 degree NPT to AN6 elbow makes things dead simple. It allows the use of a short length of tubing with a single, 90 degree bend to connect the fuel valve to the filter inlet, avoiding the line from the pump outlet that makes a 180 to run forward.

I decided to hold off making that tube until I have it in the fuselage, so i can do it with everything in its final position and get it right the first time for a change.

The last time I ordered parts from ACS I added a few feet of extra 3/8" tubing, because I figured I'd probably mess some up learning to bend & flare. As it turns out, that extra that I ordered was close to exactly what went into the trash in short pieces. Funny how that worked out.
 
Back
Top