What's new
Van's Air Force

Don't miss anything! Register now for full access to the definitive RV support community.

Best solvent to clean inside fuel tank?

Kevin Horton

Well Known Member
I've just removed the right fuel tank to address a small fuel weep at the lower inboard corner. I plan to remove the access cover on the root rib, clean things up inside then apply a bunch more Proseal in that corner.

I'm looking for advice on the best thing to use to clean inside the tank before applying new Proseal. I've searched the archives, but haven't found any mention of what other people have used for this task.

Should I try to roughen up the old Proseal a bit with sandpaper, or just leave it alone?

Any other advice before I start the leak repair?

Thanks,
 
I fixed a leak several months ago. MEK was my choice of cleaning solvent. I didn't remove Proseal inside the tank. Sanded it, degreased and applied fresh sealant over old bead.
 
I fixed a leak several months ago. MEK was my choice of cleaning solvent. I didn't remove Proseal inside the tank. Sanded it, degreased and applied fresh sealant over old bead.

I just posted something about MEK and proseal on another thread. I would be very reluctant to touch proseal with MEK as it is reported to cause leaks.

In my case, the leaks showed up a year after it was painted, three years after it was flying, and then only in the section I had cleaned with MEK.

No streaking was visible, no liquid, just paint blisters.
 
I just finished fixing a leak on the rear baffle of a QB tank. I exchanged some emails with Vans on the process. They recommended to first clean the existing Proseal with Coleman fluid to remove any gasoline residue.

I used a clean cloth, soaked in Coleman fluid, to wipe down the seam. Before the Coleman fluid dried I used a second dry clean cloth to wipe it clean. Area was scuffed with Scotchbrite and cleaned again. Proseal was then applied.

Tank will be installed this weekend.
 
I've just removed the right fuel tank to address a small fuel weep at the lower inboard corner. I plan to remove the access cover on the root rib, clean things up inside then apply a bunch more Proseal in that corner.

I'm looking for advice on the best thing to use to clean inside the tank before applying new Proseal. I've searched the archives, but haven't found any mention of what other people have used for this task.

Should I try to roughen up the old Proseal a bit with sandpaper, or just leave it alone?

Any other advice before I start the leak repair?

Thanks,

You should use an adhesion promoter where fresh sealant will be applied over aged fuel soaked sealant. Here is one I have used from SkyGeek...PR-148.

http://www.skygeek.com/prc-desoto-pr-148-aerospace-sealant-adhesion-promoter.html
 
Per Flamemaster's Application Document, Rev.III, 01/15/07:

Cleaning Solvents
1. Isopropyl Alcohol TT-I-735 E
2. Methyl Ethyl Ketone (MEK) ASTM D740 E
3. Naphtha TT-N-95 E
4. Solvent Cleaning Compound MIL-C-38736 E


Per AIR4069a, revised 05/98:

A solvent mixture consisting of (by weight)

Aromatic naphtha (containing 30 parts toluene) 50%
Ethyl acetate 20%
Methyl ethyl ketone 20%
Isopropyl alcohol 10%


or (non-photochemically reactive mixture)

Toluene 18.5%
Ethyl acetate 35.5%
Methyl ethyl ketone 36.0%
Isopropyl alcohol 10.0%


or "other solvents used successfully"

a) ASTM D 740 Methyl ethyl ketone (MEK), technical grade
b) Naphtha, aliphatic
c) Naphtha, aromatic
d) Toluene, technical grade
e) Dry cleaning solvent, high flash


Both documents are very specific about cleaning method. Solvent is applied and scrubbed while maintaining a fully wet surface, then the wet solvent, with its suspended contaminants, is removed by wiping dry with a separate, new, clean cloth. Repeat until the second cloth remains clean.

It's the old two-handed scrub. Personally, I like a roll of blue paper shop towels.

AIR4069a has this to say about repair:

12.4.2.4 Fillet Seals:
The repair of a fillet seal involves the following steps:
a. Remove the defective sealant using nonmetallic tools. Steel knives or scrapers must not be
used.
b. Cut the remaining ends of fillets, tapering them to approximately a 30o. At least 0.5 in
(12.7 mm) on each fillet end should be abraded.
c. Clean the surface (see Section 5).
d. Repair the corrosion-protective coating with an epoxy-based primer, such as a coating that
meets the engineering requirements of MIL-P-23377 (see Section 4).
e. Apply adhesion promoter (allow approximately 30 min, maximum, for activation). At this
point, there are two methods for proceeding; both methods are acceptable.

Method I - Apply a brushcoat of Class A polysulfide or polythioether sealant at a sufficient width
along the seam or joint such that, after the fillet is applied and tooled, the Class A material
extends 0.100 in (2.54 mm) wider on each side of the fillet.
Apply the Class B extrudable fillet sealant and tool it. In those companies which use this
technique, the Class B sealant is applied any time after the Class A material becomes tack free.
If more than 4 h passes without applying Class B material, the Class A surface must be cleaned
and abraded.)

Method 2 - Apply Class B extrudable polysulfide or polythioether sealant directly to freshly
applied adhesion promoter. The Class B fillet must be applied after at least 30 min of adhesion
promoter application, and not greater than 4 h after application of adhesion promoter. Tool, or
fair, the fillet.
 
Last edited:
Thanks guys. I've got enough info now so I know what I need to buy, and the process I will use once I have all the materials.
 
Tools I use

Should I try to roughen up the old Proseal a bit with sandpaper, or just leave it alone?
Any other advice before I start the leak repair?
Thanks,


Before you remove the access cover, make sure you have the leak exit point nailed down to the exact point. It is not uncommon to open the tank and apply sealant to the point on the inside where you think it would be coming out and later after you find it is still leaking, open it back up, use blowback, and find it was actually 6 inches outboard and was ?running? under a fillet or seam to the exit point.

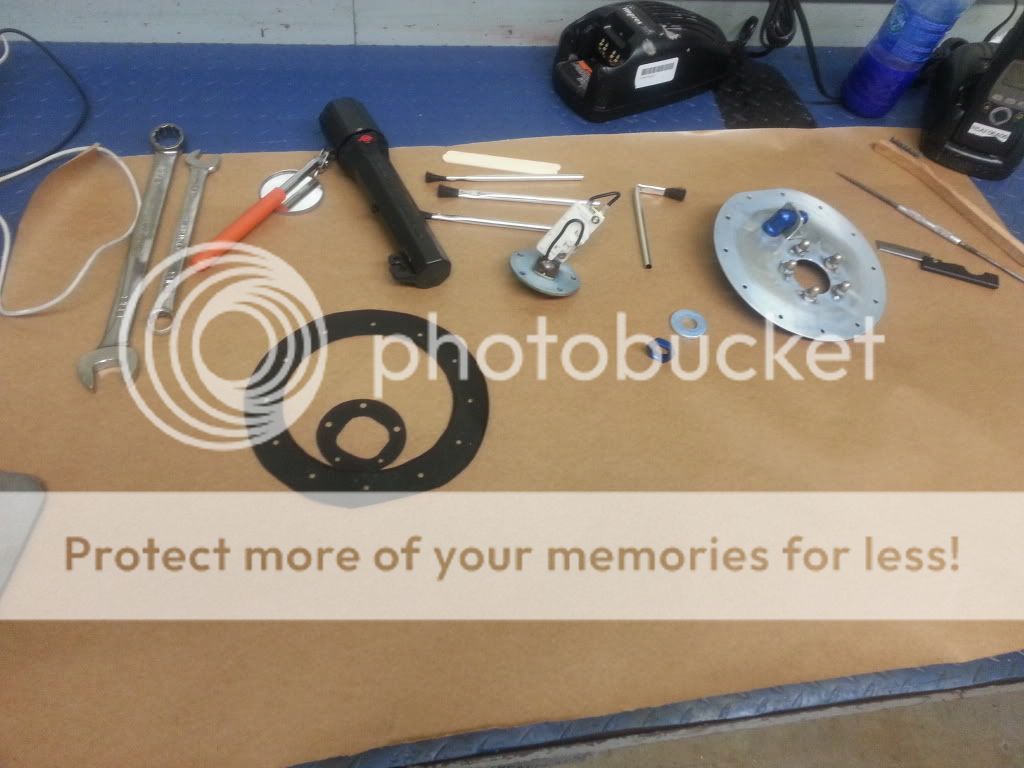
Once you have the exit point, open the tank and apply a water/dish soap mixture (similar to what tire shops use to find leaks in your car tires) to the inside of the tank in the area where you think the leak is originating from. Then using compressed air, I use 20-60 psi progressively until it is found, blow back at the exit point until you see the bubbles form on the inside of the tank from the water/soap solution. Then remove the sealant in that area and clean it with MEK. I strongly believe in removing the sealant instead of topcaoating due to many times the sealant in the origination point has failed to adhere causing the leak anyway. Why lay good sealant over bad, what might the end result be? Once area is cleaned with MEK, do as others said and rough up the sealant near where you are applying the new (I use a metal bristle brush as seen in the pic), clean it again, and lay a thin coat of adhesion promoter (PR-148, The blue stuff in the top right corner of the picture) where the new sealant will be and anywhere you will overlap the old with the new in the area. Let that dry out for 30 minutes and apply sealant with a smooth overlap. I love using acid brushes (4 seen in the pic) to apply sealant. They are easily bent to reach around into hard to get corners and are only 15 cents at a local hardware store.
 
Is anyone aware of a source for PPG PR-148 Adhesion Promoter (or equivalent) in Canada, or with reasonable shipping costs to Canada? SkyGeek is happy to sell it to me, but the shipping is $155 for a $32 item.
 
Back
Top