What's new
Van's Air Force

Don't miss anything! Register now for full access to the definitive RV support community.

Accidentally dimpled bottom of rear wing spar

coopGT

Member
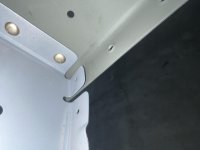
Moving right along in my-9 build.. after riveting the wing ribs to the rear spar, i noticed the bottom rib flange was not dimpled and the bottom of the rear spar (w-907-a)IS dimpled(not supposed be - I don’t think??). When i dimpled the tops, i went ahead and did the bottom to save time (this one bit me).

Question is…

Are they supposed to be dimpled or not?

If not, should i drill out every single rib/rear spar rivet just to un dimple? Should i order a new rear spar to be delivered with my Fuse next month?

or should i somehow dimple the spar flange to fit the rear spar dimples?

I’m so stumped, sad, and confused over this simple but major mess up and set back tonight.
 
I can’t be certain but fairly sure both top and bottom are all flush rivets, which means you are ok unless they needed to be matched drilled first.
The 6,7,8, 14 are all flush rivet.
 
I'm not sure I'm following what you're saying without a picture, but if you're asking if both the top and bottom flanges on the rear spar should be dimpled, then yes, they should be.
 
I have attached a picture. Sorry for the confusion - I don’t see where it states to dimple the bottom rear spar, just the top. I questioned it when the 2 didn’t set flush due to the dimple. I may be over thinking this.. its Monday.. :p

I do know and see on the plans they are flush rivets.

Fellow builder told me I would be able to still dimple the rib with it attached to the spar, if this were correct.
 

Attachments

  • D967648D-D2B4-49B9-ADBC-4C30154104FD.jpg
    D967648D-D2B4-49B9-ADBC-4C30154104FD.jpg
    226.8 KB · Views: 210
Just my 0.02

My comment has nothing to do with your spar, but your last sentence..."Stumped, sad and confused"......We have ALL been there.

If you think you can make it through a build without a mistake, I'm sorry, but you are just plain wrong. An occasional mistake is just part of doing business.
All you can hope for is that mistakes come less frequently, and when you do make one, it's not on a big, expensive part.


I suggest the following....

...Double/triple check your plans. If you are not exactly SURE what to do, don't do it. Go to VAF and search the blogs. Hopefully you will find the info you need, and if you are really lucky, a picture.

...See if you can locate someone in your area with a similar build who is ahead of you. Establish a relationship, and ask for permission to occasionally call them for advice. Someone who has "done it" already can be a great resource.

...Never do critical work when you are physically or mentally exhausted.

...If you get stumped, go on to a different, simpler task that you KNOW you can do. That way, you don't waste any time, and the answer to the "stumper" will probably be forthcoming soon...then go back to it.

...Don't give up. This is a PROCESS. You can't think of it as one big job (build an airplane)..you need to think of it as 20 thousand little jobs (rivet part A to part B)....and sooner or later, you WILL have an airplane.

My best to you and ALL builders that are working hard on their projects.
 
Last edited:
If I understand this location it calls for a AN426AD3-4. The skin, spar and rib will need to be dimpled.

See this section of the construction manual Page 7-9

WING SKIN PREPARATION AND ASSEMBLY

Dimple the 0.040 rear spar and “ream out” the dimpled holes slightly with a sharp deburring bit or microstop
countersink. This “reaming” operation removes just a small amount of metal to make the skin dimple fit better and
is not critical, so it can be done by eye. The usual tendency is to remove too much metal, so use a light touch.

Section 5 in the manual is you friend here as well.
 
I have attached a picture. Sorry for the confusion - I don’t see where it states to dimple the bottom rear spar, just the top. I questioned it when the 2 didn’t set flush due to the dimple. I may be over thinking this.. its Monday.. :p

I do know and see on the plans they are flush rivets.

Fellow builder told me I would be able to still dimple the rib with it attached to the spar, if this were correct.

The instructions get less and less descriptive as you go. Whereas with the tail they would tell you exactly what to do step by step, in the wings they begin to give more generic steps and expect you to fill in the gaps. I just started the fuselage, and it’s even moreso that way. It can get a little unsettling at times for sure, but that’s when I just pull up VAF or other builder blogs and poke around until I’ve got a good picture in mind for how things go together.

And yes, you can easily dimple the rib flange tab with the spar flange. I’ve had to do that a number of times when I stumbled on a hole I forgot to dimple but already had parts partially assembled.
 
I just looked at mine and I dimpled that tab on the rib. Get a pop rivet dimpler and dimple the rib and spar together, it will dimple well enough so that tab on the rib will sit flush against the spar.
 
Don’t risk damage by unriveting all of the ribs.
No need for pop rivet dimple dies. Just use regular dies and a squeezer (pneumatic if you have one) and dimple as best you can.
The dimple won’t be as crisp but it will be fine
 
Back
Top