What's new
Van's Air Force

Don't miss anything! Register now for full access to the definitive RV support community.

Fuselage Stand?

Kyle Boatright

Well Known Member
My -6 has the cracks in/around the gear sockets that seem to happen as the hours pile up. I've ordered the reinforcing gussets from Van's and plan to pull the mount and have it repaired in the next few weeks.

For those of you who have been there/done that, how'd you support the aircraft while the gear was off? Jacks or blocks under bolts in the tie-down points? A sturdy platform under the fuselage?

Thanks in advance.
 
When I pulled the motor mount on the RV-4, I got pallets from the grocery and put them under each wing with a tire on top.
 
Our sequence

This is how we have carried it out locally on 3 aircraft.
Two hydraulic engine cranes were used.
Sequence
1. Use one crane and remove engine from engine mount. The engine is now left stored on this crane with extra support tied to an overhead rafter in case of hydraulic leak. We use an appropriate sized cargo strap for this.
2. Use second crane to lift fuse using engine mount as a lifting point high enough to remove legs from engine mount.
3. Lower fuse down onto wooden blocks under tie down points. (Make sure high enough for the aerials to clear the ground and with flaps retracted).
4. With the aircraft supported by the tail wheel and the tie down points gently climb in to get access to remove the engine mount bolts and remove engine mount.

Carry out the reverse to reassemble. Be sure to check the leg fit into the mount before fitting the mount back on as it is easier at this point of the process than struggling to fit the legs in with the fuse suspended in the air.

Rob

This describes the process I envisioned.

Thank you!
 
We've just completed this task for a second time and similar to the post above, instead of placing the aircraft down on the floor we used the remains of the old Fuselage Jig to support the aircraft. For those of you not fortunate enough to have ever built a fuselage on a jig like we did in "the olde days", essentially this is just a cradle about 6 foot long with 6 legs and the horizontal cross members that support the fuselage are located at the Firewall, Main Spar, Rear spar and Fuse/Tailcone intersection. The total weight of the assembled aircraft is spread over a larger area and you can have the cradle sitting at about knee high so you don't have to worry about the flaps and antennas etc.
 
I spent Saturday evening and a few hours this morning (probably 5-6 hours total) doing all the prep work to ready the airplane for pulling the engine, gear, and mount. A buddy dropped by the airport this afternoon and we had the everything off in a couple of hours.

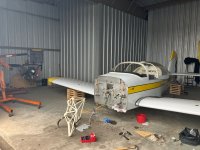
The airplane is sitting on three 16" high platforms made of 2x4's. I put carriage bolts in the tie down rings, and those are resting on scraps of plywood on the platforms. The scraps of plywood are to give a better bearing surface for the carriage bolts and the carriage bolt's were picked because they have a larger head than normal hex bolts. This arrangement (with the fuselage level) helped keep the belly antenna clear of the ground and also made it easier to use carriage bolts and platforms since the wings are in a level attitude.

So now, I have an engineless RV-6 without any wheels. Up on blocks. Hmm...


RV6 No Gear.jpg
 
Last edited:
Nice and sturdy supports. Well done. As a job it's not difficult to complete however its definitely a mind-hurdle that needs to be gotten over first.

Looking at the engine mount it seems you don't have the gussets that were added by Vans around the late 1990's or early 2000's so no surpise it has cracks. Could you please post a couple of photos of the areas you now need to repair? I'd be interested to compare your mount to one we did a couple of months ago. Also interested to see the mount once you've had it repaired.

You'll be back in the air in no time.


Cheers,
 
Looking at the engine mount it seems you don't have the gussets that were added by Vans around the late 1990's or early 2000's so no surprise it has cracks. Could you please post a couple of photos of the areas you now need to repair? I'd be interested to compare your mount to one we did a couple of months ago. Also interested to see the mount once you've had it repaired.

My mount dates from the late 90's and didn't have the gussets. I cleaned it up this afternoon and made some pictures.

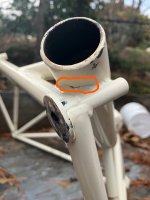
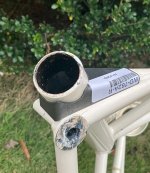
Here's a picture of the crack on the left side - it is the rust line. The right side is cracked too, but the crack is half the size of the one on the left. It is much easier to see the crack if you click to expand the photo. I figure this crack went 15-20% of the way around the gear socket.

Cracked Mount.jpg

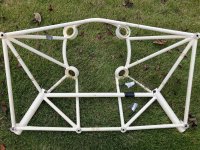
Here's an overview of the mount. It is in excellent shape after 20 years. Surprisingly, you can see where all of the adel clamps were mounted, but the zipties left no marks at all.

Overview.jpg

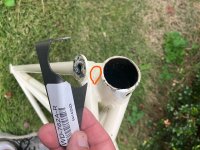
Here's a photo that shows the gusset Van's provides. This photo also shows the smaller crack on the right side of the weldment.

Mount & Gusset.jpg

And this one shows the gusset in place. It fits well "out of the box".

Mount w gusset.jpg
 
Last edited:
Thanks for sharing those photos, Kyle.

The cracks are as I envisioned. You seem to have gotten off lightly though. The RV-6 we repaired recently had first cracked adjacent to the welds at the top of the gear leg cluster, then a few years later cracked at the lower end. The last round of repairs required welds at two locations on the lower cluster as well as the addition of doublers.

Are most of your landings on seal? And I suppose are 3-pointers rather than wheelers?


Cheers,

Yes, 99% of my landings are on paved runways. I almost exclusively make 3 pointers. Some of them not as smooth as I like. ;-)
 
Back
Top