What's new
Van's Air Force

Don't miss anything! Register now for full access to the definitive RV support community.

Show us the status of your 7/7A project!

don't know

roee said:
Cool pic!

One question though: did Van's change the type of primer they use on the QB kits, or did the colors just come out funky in the picture? Looks like gray primer inside and maybe alodined outside. Used to be greenish primer (Sherwin Williams P60G2) inside and nothing outside. Just curious.

To be honest, I have no idea. I was so giddy being there, I forgot to ask all the questions I had, can't recall what I saw or imagined I saw. It was a real treat, I should go back!!!!! We spent over 1.5hrs with Daryl, talking Vans, talking Builds(he's building a -9A) and drooling alot.

Oh yeah, primer....I didn't care, I'm doing minimal rattlecan. ;)
 
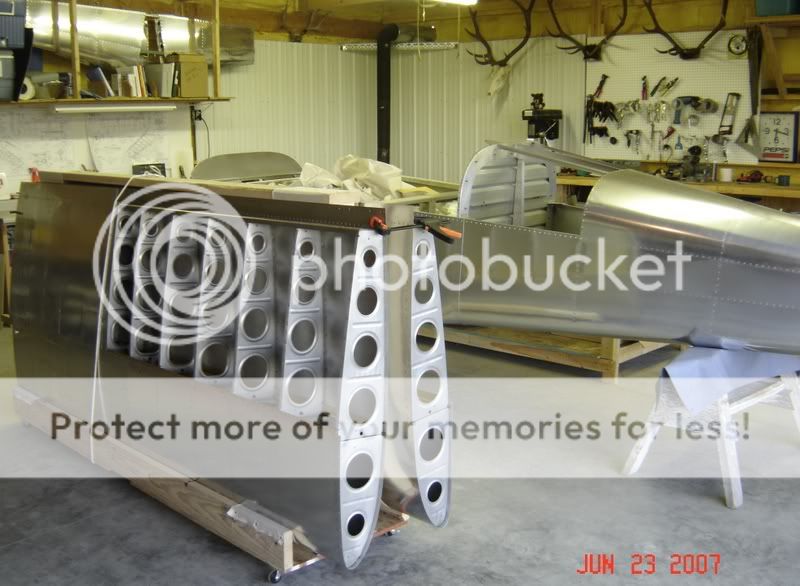
Finally making some more progress. Here is a photo from 5:30 this afternoon...

fuse1-june2007.jpg


and here is one from 8:15 this evening...

fuse2-june2007.jpg


Now we get to do the fun job of deburring, countersinking, prep and priming. Next time we put it together for real.
 
Cabin lights done

I made my own LED lights (don't ask me why), and they're working:

5.jpg


Red and white, of course:

9.jpg
 
Martin,

That is a SWEET idea! I think you'll have several people copy that one...including me!! :cool: :cool:
 
Disco ball is on order

R.P.Ping said:
So are they synced up with music? :)

Hey, that's an inspiring idea! I should install some blue, yellow, and green LEDs in addition to the red and white ones I have. Then I could hang a disco ball from the canopy. Then I connect the LEDs to the iPod so that they pulse in sync with the music, as you suggest.

Then, I connect the autopilot to the iPod so that the airplane gyrates in sync with the music.

We have discovered a new art form!
 
Very green here!

This past weekend I just picked up my tool kit, purchased a nice air compressor and a few other misc things I'll need, and ordered the empennage kit.

This coming weekend I plan to build work benches and clean out the work area.
 
Here's my status:
2732__empennage_done.jpg

DaX said:
Very green here!
Matt, Welcome, you've got a lot of fun ahead of you. If you haven't already, search the forums for "dimple-8" and learn how to take care of that now... Hopefully yours will be in inconspicuous location(s). I've got one on the top of my HS :mad: drives me nutz everytime I see it.
 
Like the saying, measure twice, cut once (or insert appropriate adage)

Notice anything funny?

i737921_EndRibOops.jpg


Duh! Not like I haven't done this before. Here's a clue I missed. Marked "drill later" because I couldn't find the hole. Wonder where it went?

i737922_OopsClue.jpg


It's a short term memory thing. Could have done both wings at the same time, but that would have interfered with winter hibernation. Waiting for replacement T-703's.

My wife doesn't think anyone will get this. I told her she doesn't really know how RV builders think, even though she's married to one.
 
I got it, but it took awhile

CFI1513840 said:
Notice anything funny?
The T-703's (R&L) are reversed. I noticed the flange is facing "in" on the first photo.

Mark
 
Last edited:
Yes, but...

Jeff,

Yes, strangely alike. The clamps are from either Home Depot or Sears, but were probably made in the same factory in China. The important difference is your T-703 ribs are installed correctly.
 
Happiness is-

All solid rivets in a QB-7 tail.


Can't say yet what these are for, but they look nice installed:


Center Console Is Done!

Finally, I can sit in my cockpit and flick switches while making airplane noises.

2.jpg


Lots of expensive switches, expensive FrontPanelExpress pieces, and cute little UMA gauges.

3.jpg


4.jpg


5.jpg


Cheers,
Martin
 
Really nice work.

Could you tell me how you did the decal work for the switches...? Especially interested in the text with lines around switches etc..

Thanks a lot.

Hugh.
 
Engravings, not decals

hughfi said:
Could you tell me how you did the decal work for the switches...? Especially interested in the text with lines around switches etc..
The panels are engraved aluminum, not decals. The black color is anodized, and the engraved letters are painted. I had them done by www.FrontPanelExpress.com. It's a really cool service:

- You download their cumbersome (but free) computer-aided design app.
- You design the panel, with cutouts, holes, engraved lines and text, etc.
- It gives you a real-time quote for the cost of your panel.
- You click "send," enter your credit card number and shipping details,
- And they deliver in a week or two (faster if you pay more.)

Here's a screenshot of their a
p:

Cheers,
Martin

http://www.bashingaluminum.com/Electrical%20panel.jpg
 
Last edited by a moderator:
Reasonable cost

Brantel said:
Thats cool..... I like it! Is it priced reasonable?

Yes, I think so, but keep in mind I didn't shop around. Once I found that they can do what I want and that I can afford it, I gave them all my business. The panel shown above costs $58.77.

To "test" them, I had them make a cheap little panel with a couple of holes and text engravings for $25 apiece. Then I was sold, so started designing a bunch of other panels. My RV-7 project has eight, so far.
 
1 Year 522 Hours

Heres my status after 1 year and 522 hours. The shop is in desperate need of some cleaning and rearrangement.
Empannage is complete.
RT wing in stand.
Tank baffle needs completed.

Thanks for the great input on this website.

 
Looking good Bruce!

That looks real good for 522 hours. I see you have the empenage painted already! The yellow looks great.

Mark
 
Thanks Mark

I will just keep plugging along and I hope to finish
in my 5 year plan.

See everyone at OSH.
Driving with the brother and rest of
the family.

Pick everyone up on fingers or winchester.
 
Yahoo!

Just finished sealing up both tanks tonight by installing the covers and fuel senders!!Whopee! I am not a proseal kind of guy :) I manage to get sticky stuff on everything. Plus my wings are ready to rivet the top skins on, then we're building a stand. The fuse kit will be here in aboout 3-4 weeks, right on schedule :)

http://imageshack.us/
http://img488.imageshack.us/img488/485/p1010012dx6.jpg
Shot with C200Z,D510Z. at 1969-12-31

http://imageshack.us/
http://img115.imageshack.us/img115/3668/p1010011wz9.jpg
Shot with C200Z,D510Z. at 1969-12-31

http://img505.imageshack.us/img505/2294/p1010010ru6.jpg
http://imageshack.us/
Shot with C200Z,D510Z. at 1969-12-31

http://imageshack.us/
http://img505.imageshack.us/img505/7690/p1010009lq2.jpg
Shot with C200Z,D510Z. at 1969-12-31
 
Last edited by a moderator:
Wings on !

Hi all,

Some significant visual progress ....although I am not sure about my Prop. choice....or how I will get it out of the "hanger" :eek:


and my Pr?fer (examiner / inspector and RV 6 builder) was here this morning and didn't look either too shocked or amused which I took to be a good sign. :)

Have a good weekend everyone.
 
Finally

it's been a bit of a waiting game for the next installment, but this view was well worth it

RV7114.jpg


inventory time!
 
Last edited:
Recieved my custom engine mount.

FP25062007A0000J.jpg


Custom Components (out of Tacoma, WA) built this powder coated engine mount for me so that I can convert to a taildragger without pulling the motor. It will start as a 7A. I already modified the tail for a future tail spring.

I guess I could go with floats too..... I live in the desert.... Hmmm :)

- Ron Olmstead
 
Last edited:
rlo1 said:
FP25062007A0000J.jpg


Custom Components (out of Tacoma, WA) built this powder coated engine mount for me so that I can convert to a taildragger without pulling the motor. It will start as a 7A. I already modified the tail for a future tail spring.

I guess I could go with floats too..... I live in the desert.... Hmmm :)

- Ron Olmstead

Ron - Just curious what the additional weight will be? It's a neat idea for someone that's on the fence!
 
I do not have a 7A mount to compare it to. I weighed it this morning on my digital bathroom scale and it was exactly 20.0 lbs. My bathroom scale has been known to be in error..... If you know what I mean. :)

I would like to know what a stock 7A mount weighs if anyone can take the time to weigh theirs???

-Ron Olmstead
 
bushing for drilling elevator horns

Here's a solution to drill those elevator horns through the bearing.
First, a plastic expandable wall anchor that's 1/4" o.d.

Next, shorten as necessary.

Clamp and drill piece of 2x4 to 1/4"

Insert wall anchor and drill through with pilot drill.

Put assembly into bearing and drill horns.
 
rlo1 said:
Custom Components (out of Tacoma, WA) built this powder coated engine mount for me so that I can convert to a taildragger without pulling the motor. It will start as a 7A. I already modified the tail for a future tail spring.
Ron:

That's a neat idea. I toyed with the idea but in the end decided that I would have enough difficulty just finishing the plane per plans. So I'm assuming you are planning to make a fairing over the gear leg weldments protruding out of the bottom of the fuselage?

Very cool. That's what homebuilding is really about -- building the airplane that you want and brushing off comments from all the doubters. :cool:
 
Jamie, you are correct. Yes, I am planning on some type of fairings for each protrusion.

Thanks for your kind words.

-Ron
 
N622JP First Engine Start

This has to be the best day of the project next to the first flight.

engine_start.jpg


Special thanks to Mike "Kahuna" Stewart for coming out and helping me get the engine started and to all the others that came out to share the big moment.

Unfortunately I can't brag that she kicked over on the second blade...she was a little hesitant but she was purring before too long. Heck, she sounded a little like an old radial trying to get started.

Squawks:
* RPM was reading 2x normal. Easily changed in EMS.
* Fuel pressure is reading low -- 12 psi. Simple calibration needed. I probably have the wrong sensor type selected in the EMS or something.
* Need to adjust idle setting. This, along with the engine being slightly flooded, was why it didn't fire the first time. This is also why the engine shut down. I wasn't planning on shutting down yet but when I pulled the throttle to idle that's exactly what happened. No big deal though..just a simple adjustment. We'll try again soon.

Video and verbose write-up can be seen here:
http://rv.jpainter.org/?view=entry&date=2007-06-26

Thanks to forum contributor and Lancair Legacy builder Alan Adamson for the video.
 
Last edited:
IT ISNT SO BAD

Brantel said:
Started at 1:30pm and by 7pm three buddies of mine and I had the bottom skins on the left wing. I have no clue how some of you have done this by yourself! :confused: :confused: :confused: :confused:
DUCT TAPE AND ROLLS OF PAPER TOWELS
 
We've flipped!

Finally flipped the canoe today. I need to get a rotissorie built now. Here is a photo of my son Luke and the flipped canoe.

flipped.jpg
 
Happy Day

Last Wedensday the FedExGnome visited my house while I was at work and delivered George's and my wings!!What can I say? I have to admit that the whole thing finally feels real and that we just might pull this crazy dream off.I was more than a little emotional(sniff).George and I weren't able to dig in until Saturday morning for the inventory 'cause of some late work days on my part.!!!!!!----- THERE IS SUPPOSED TO BE A LARGE PIC OF GEORGE AND I SMILING OUR ASSES OFF RIGHT HERE BUT COMCAST DROPS MY CONNECTION EVERYTIME I TRY TO UPLOAD TO IMAGESHACK-----!!!!!!When we did get to it we were pleasantly surprised by how absolutely complete the kit was.Not even 1 backordered part or missing piece.Totally complete and accounted for after about 4 or 5 hours of work.We both marveled at the prospect of trying to do this with only one guy/gal though,it would really be tough . This is an amazing process...thanks George...and Van...and Doug.
 
Last edited:
congrads

Exciting to move along with the wings.. .. I hope mine is done this year.. fixing to do my weight and balance and see how it came out.. light, heavy , but I am ready for it to be done.. still need a little fiberglass on the cowling.. 1/4 turn stuff.. building alone is a lonely job.. very very glad I had all these great people on here to share the experence with .. couldln't find another sucker to partner with :) kidding..only kidding.. feelings of acomplishment is huge..


I like the friend of bill w statement.. me too.. oct 3rd 1988
 
Not nearly as cool as some of you guys' posts, but this is the first time I've seen anything that looks like an airplane part!

n12804481_32330978_8911.jpg
 
Congratulations!

Wow! I remember just last fall when I had my first airplane "part". It's exciting. Keep going, it only gets better from here..... :)
 
Engine Hung

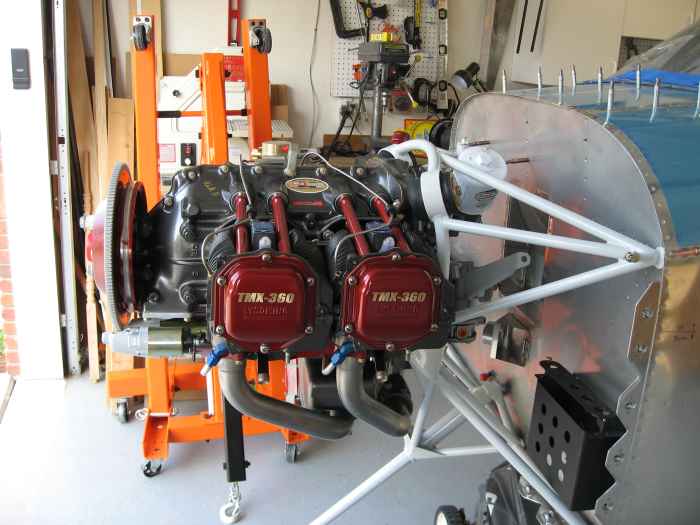
This past weekend I hit another milestone in the building process, the engine was hung!

fwf_41.jpg


Even though the engine will most likely be coming off (note the engine hoist in the background) once I decide where I will mount certain items on the firewall, this was a very satisfying day. The engine is a Mattituck MTX-IOF 360 (180 hp) Constant Speed, Roller Tappets, and forward facing sump. It is equipped with an Aerosance FADEC system.

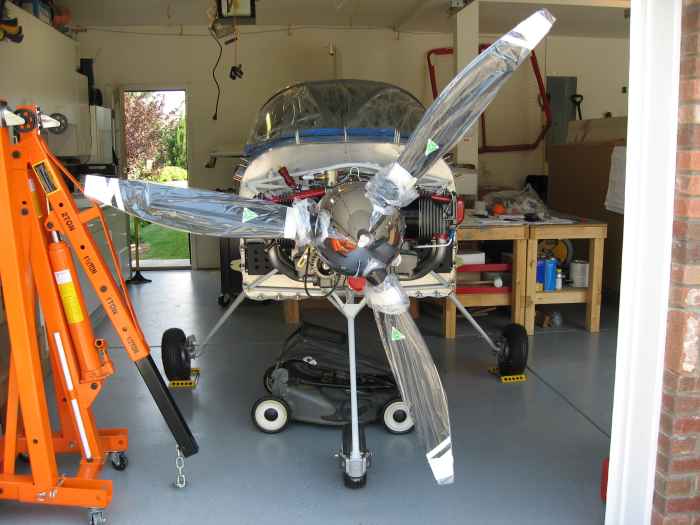
I also installed my MT prop. I just had to see what is looked like.

fwf_42.jpg


Jason Rouault
Fort Collins, Colorado
http://www.rouault.us
RV-7A
 
Last edited:
With ya

Hi Mat,

Born in Macon, every one in the family is rambling wreck, except a couple that went to the "other school". We are maybe two steps ahead of where you are and said the same thing yesterday. "IT LOOKS LIKE AN AIRPLANE PART". Yeah !

Derrick
 
So while I actually have the VS and HS finished (working on the rudder), this is a picture of me and the VS a while ago. If you look close, you'll see the primed HS frame in the background. And excuse the bloodshot eyes, I think this was at around 3am:

n12804450_32035531_2290.jpg


Actually, heres one of me and the HS recently (yeah, I'm already making airplane noises):

wings_sm.jpg
 
Last edited:
Fuel Tanks

Well my fuel tanks are finally done for the most part. I'm going to let them air out for awhile before closing up the end cover plates and pressure testing them. They were a big job, like everyone says, and it feels great to have them done. :D

tanks1.jpg

tanks2.jpg
 
Canopy frame status

I have heard it said that 99% of the things we worry about never come to pass. Therefore we can prove worrying works. (author unknown).

This has come true for me. I have been worrying about the canopy frame hinge bolt location. I finally situated almost everything and marked the initial spot. It looks almost perfect. I still need to close the gap between the two skins ~.020 inches. After that, I am thinking it will be perfectly centered.

I am glad I worried myself to death about this.

FP15072007A00016.jpg
 
The 1000 hour mark

1000hourspb8.jpg


Happened to hit the 1000 hours of construction mark as I drilled the canopy to the frame sides. Its only taken 5 1/2 years to get here. Almost time for the big ticket orders.

Ernie Billing
RV7 #418
Flying 1/2 1976 Cessna 177RG and 1/7 of a 1949 Aeronca Champ
San Luis Obispo, CA
 
HS Complete!

Not quite as stunning as these neat fuselage shots, but my first milestone!

n12804481_32464102_5517.jpg
 
Last edited:
Back
Top