What's new
Van's Air Force

Don't miss anything! Register now for full access to the definitive RV support community.

How to fix wing skin crack?

kcameron

Well Known Member
I was thinking that my RV-4 is within a couple of weeks or so of being ready to fly after its makeover. Unfortunately, I've hit a snag that could delay me. After 13 months without a flying airplane this smarts a bit.

I found this wing crack on my top right wing skin just behind the tank:
00008_cropped.jpg


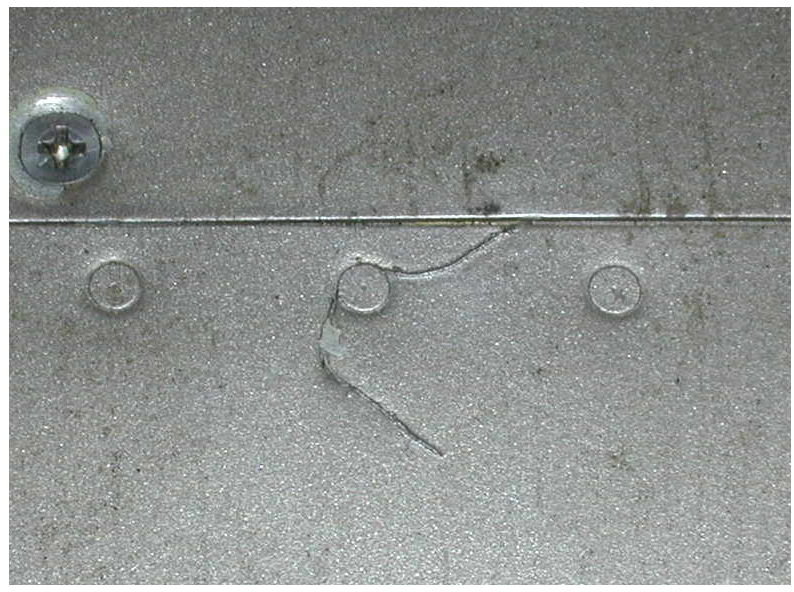
Anyone seen a crack like this on an RV before? I'm guessing I'll need to add a doubler plate but it's the details that are stumping me. What thickness? How big? Do I drill out the existing rivets into the spar and re-rivet the doubler through those holes? There's no backside access so I guess I'll need to use pulled rivets; but which ones? And so on...

Thanks in advance.

Kev
 
The plane has about 800 hours of Hobbs time.

I thought about just stop-drilling the crack but I don't know what kind of stress it sees. I guess it would only be an issue during negative-g loads?

I had been thinking of just adding an external patch. Do I really need to cut out the bad spot to have an effective repair?
 
Kev

Firstly I would check with Van's.
I can't see any reason other than looks that you couldn't put a patch over the top. Material of the same thickness and large enough to take in the rivets either side of the crack. I've done and seen this enough times before on Cessna's etc.

Peter
 
I could be absolutely wrong here, but is that a crack? It looks like a fine thread/hair caught under the rivet, before painting.

/Fredrik
 
I could be absolutely wrong here, but is that a crack? It looks like a fine thread/hair caught under the rivet, before painting.

/Fredrik

Yeah, sorta looks like a fiber from a scotchbright pad to me as well. Get out the magnifier.
 
Now that you...

I'd have agree that it looks like a fiber of some sort under the paint too. Almost looks like it was caught under the rivet head before painting.
 
I had something that looked like this on the right tank of my -4. I thought it was a crack but after I used a scotch bright wheel to knock the paint off I found it was just a paint defect. Luckily it's on the bottom of the wing where no one notices it.
 
Last edited:
I'm pretty sure it's a crack but since you guys have raised the doubt, I'll take a closer look when I get back to the hangar.

Thanks.
 
If it is a crack, leave it alone unless you put a patch over it. In my experience stop-drilling almost never works in stopping a crack from propagating. In this case if it is a crack, you really can't stop drill it without getting into the spar. Since this is on the top skin I wouldn't worry too much, I've seen several older RV's with cracks around the wingwalk area. Most of those cracks are cosmetic from the paint flexing when someone steps in that area.
 
Stop drill it!

If it were mine I would take the paint off that spot and see how far it really goes with a magnifier. Stop drill with a 30 or larger, (spot facer?)ream if possible. Put some sealant under it to dampen vibrations and keep an eye on it. I'm certain it will give you LOT'S of warning before it lets go completely. Good chance that it has relived itself and won't propagate. (look at the direction the crack is taking) How far is the crack from a chordwise line of rivets?
I've been working on aluminum aircraft for 20 years, I think you will be fine.

AWM
 
Cracks often have black traces around them from the metal working and corrosion developing, and since I don't see it, I suspect it is not a crack--but can't be sure. Here are some things you can do:

Put your thumbs on each side of the "crack" and apply pressure on one side, then the other to see if each side moves separately. If they move, you have a crack, if they don't, it's probably not cracked, but that's not 100%.

The ultimate test is if you can find a local shop with an eddy current tester. These things work great at sorting cracks from other indications. The test takes a few seconds once the instrument is turned on.

You can also do a dye penetrant test, but you have to strip the paint first, and stripping is better than sanding for a DP test. You can buy a kit from ACSpruce or a friendly A&P might check it for you.
 
Fiber

If you look at the bottom left side, it appears that the fiber actually is off the surface of the skin, it appears you can see air underneath there. Looks like it might be good news?
 
No - stop drill it....

If it is a crack, leave it alone unless you put a patch over it. In my experience stop-drilling almost never works in stopping a crack from propagating. In this case if it is a crack, you really can't stop drill it without getting into the spar. Since this is on the top skin I wouldn't worry too much, I've seen several older RV's with cracks around the wingwalk area. Most of those cracks are cosmetic from the paint flexing when someone steps in that area.

...the spar flange should only come to 0.5 inch below (as pictured) the edge of the tank. Plenty of room for a stop drill hole....:)

However, make sure it is a real crack first....:D
 
Different Experience

........In my experience stop-drilling almost never works in stopping a crack from propagating.......

Very different experience for me: I have successfully stop-drilled many a crack. Important to use a magnifier to make sure you drill at the very END of the crack. If you let even a wee bit of the crack extend through the hole you drill, you "Missed," and the crack will continue to propagate. Better to drill a slightly too-big hole than one too small, also.

PS: A few cracks I drilled didn't stop, so it isn't a 100% deal.
YMMV
 
Important to use a magnifier to make sure you drill at the very END of the crack. If you let even a wee bit of the crack extend through the hole you drill, you "Missed," and the crack will continue to propagate.

I've had better success drilling just beyond the crack and letting the crack continue into the hole.
 
Back
Top