What's new
Van's Air Force

Don't miss anything! Register now for full access to the definitive RV support community.

Van's New Split Baggage Wall

Rick_A

Well Known Member
Vans came out with a plans revision a couple of weeks ago that includes a split baggage wall. I ordered the Baggage Wall Upgrade kit and installed it last week.

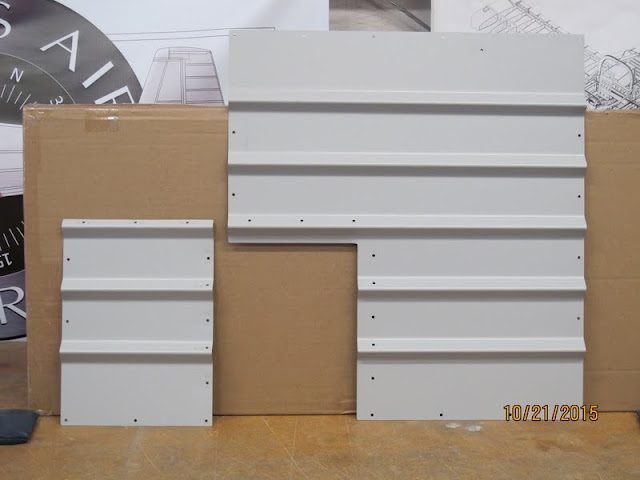
These are the parts prep'd and ready to install. Other than priming, painting and edge finishing, the only other work was to install the 8 nutplates in the small wall section.

New%252520Baggage%252520parts.JPG


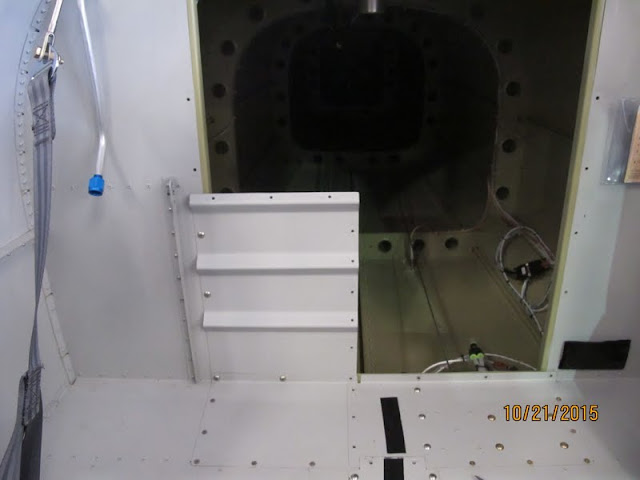
The new "behind the tank" part of the wall installed:


New%252520Rt%252520lower%252520wall%252520installed.JPG


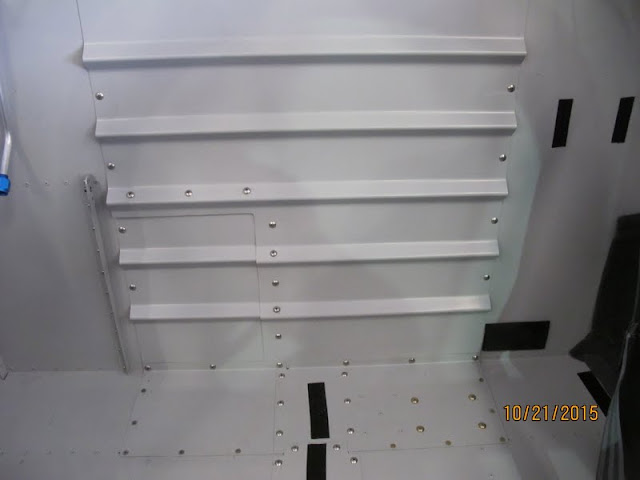
The new split wall completely installed:
New%252520Baggage%252520wall.JPG


Needless to say, the hardest part of the job was the R&R of the fuel tank. So now that there is a Vans engineered split wall, this would be a good project to do during your next annual. Total cost of the parts including shipping was about $50.
 
Hi Rick.
In case I'm not the only person wondering, I'll ask the question: What is the purpose of this mod?
 
Why the mod?

Hi Rick.
In case I'm not the only person wondering, I'll ask the question: What is the purpose of this mod?

Without this mod, the fuel tank must be removed to get behind the baggage wall bulkhead. With the mod, you can just remove partial wall and leave the fuel tank in place. In the, last picture in my post, the fuel tank has not been re-installed. If it was reinstalled, you would not see the small section of the wall.

There are a number of items in the tailcone that may need service or inspection.
 
Saves you 2 hours labor in not having to drain and remove the fuel tank during annual.:D Great job Rick, I just got these parts the other day.
 
Rick,

Could you provide a link to order the parts? Can't seem to find it on the Vans site.

Thanks!:)
 
Rick,

Could you provide a link to order the parts? Can't seem to find it on the Vans site.

Thanks!:)

The real parts are not on the website. The easiest way to order is by phone. Ask for the Baggage Wall Upgrade kit.

If you look at the updated plans section 33, it shows the new part numbers of F-00102 & F-00103. If you go to Vans web store and try to order either of the parts, the result is an orderable zero dollar part ...which I ordered but called Vans to verify the order.

Thanks Rick!!
 
Skis. Fishing poles. Golf clubs. Long, light things that won't fit otherwise.

Please don't misunderstand the purpose of this mod. It is for inspection of the tailcone without removal of the fuel tank.

The complete baggage bulkhead must be in place during flight. It IS a structural member.
 
Saves you 2 hours labor in not having to drain and remove the fuel tank during annual.:D Great job Rick, I just got these parts the other day.

Not necessarily....
There is a finger screen in the outlet of the tank that is still an inspection item. To inspect that screen you still need to drain the tank.
 
I ordered just the F-00103 (small section) and some nutplates. Then modified the original baggage bulkhead to accomodate the F-00103. Saved a little money on parts and shipping. Not part of this thread but I also made the Spar Pin modification - easy to do and should be much more reliable.
 
Last edited:
alternative- modify existing baggage bulkhead

I ignored the tank blocking the bulkhead issue and did not know Vans had modified the bulkhead baggage cover. I did my first few flights without the screws behind the tank. The cover made a lot of noise vibrating in taxi. My fix was to first cut out the notched area. I then drilled out from the rear the nut plates behind the tank, added nut plates to the baggage bulkhead cover so the screws for the panel behind the tank could be installed from the rear. I then flush riveted aluminum strips on the perimeter of the cut out piece, match drilled the remaining cover to the backing strips and added nut plates for the screws. To eliminate any more vibration noise I also added foam/foil adhesive water pipe insulation to rear to dampen any vibration. Came out clean enough that I did not even have to refinish.
 
Methods, with pictures, for modifying the existing rear bulkhead cover are in the sticky MODs thread of the RV12 forum. You must also modify the floor plate under the tank.
 
Inspecting finger screen

Not necessarily....
There is a finger screen in the outlet of the tank that is still an inspection item. To inspect that screen you still need to drain the tank.

I saw this note a few months back about the need to inspect the finger screen inside the fuel tank. Had not specifically done that before - must have missed that step on the annual checklist - but since I did all the tank mods last year I clearly covered that in any case. Nearing my next annual so I'm starting to think about this again.

Scott, is the recommendation/suggestion to use a scope or something to get a look at the screen when the tank is drained. (i.e. short of opening up the tank once again which I really don't want to do, what is the most efficient way to inspect this filter screen during the annual?)
 
The fuel strainer is part of the fitting that screws into the flange on the bottom of the tank. Use a crows foot or deep socket to remove the fitting.
 
Scott, is the recommendation/suggestion to use a scope or something to get a look at the screen when the tank is drained. (i.e. short of opening up the tank once again which I really don't want to do, what is the most efficient way to inspect this filter screen during the annual?)

The procedure is described in the Maint. Manual

As Joe mentioned, the screen is an integral part of the fitting in the bottom of the tank.....

- Drain the tank
- Disconnect the fuel line
- Loosen the fitting from the tank flange and remove (the screen will come out with the fitting).
 
Just "re-read" the MM section on this. Learn something everyday. Great design...should have known. thanks all. Brent.
 
Back
Top