What's new
Van's Air Force

Don't miss anything! Register now for full access to the definitive RV support community.

Tip: DRD2 Dimpler handle mod

mill2978

Well Known Member
I was using my DRD2 dimpler while working on the practice kit and I got very annoyed with the handle.

It is long enough to drop below the level of the work and get in the way. I took an old push broom handle I had, cut it to 9 inches instead of the 12 that came on the dimpler. I decided to make a new handle instead of cutting down the existing so that if it doesn't work out or fails(it is thinner than the steal handle that came with the dimpler) I still have working dimpler.

2011-10-03%25252017.21.54.jpg


2011-10-03%25252017.03.57.jpg


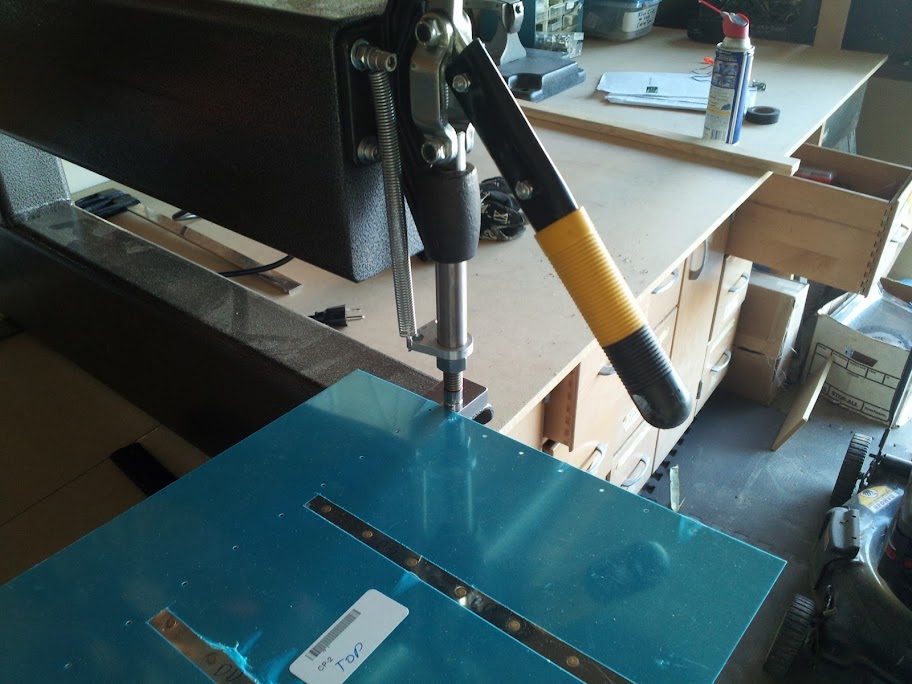
I tried it will a few different thicknesses of AL and the increased effort to achieve the dimple is minimal.
 
When I adjusted it to that level I where my hand cleared the piece it had more play than I wanted, even with the retaining nut snug. I may also need more clearance because of my tall bench height and large hands.
 
check the roll pin

I had the same problem early on while building the empanage. I found that the roll pin that stops the handle on the down swing had buckled. Probably from pushing down too hard or fast. I replaced the roll pin with a solid pin and slowly filed it down to the right length so the handle wouldn't hit the skins. Good as new and I still have the leverage of the longer handle. I also learned to let the flex of the press do the work instead of pressing down too hard on the handle.

Brian
 
Ok, just curious. I haven't used mine for a couple years, and mine might be a little different. I just bought the front end kit, and made the frame.
 
Handle Clearance

I like the DRDT-2 to snap over center. To increase clearance at the handle tip the ram has to be adjusted down and this prevents the over center movement. The handle postion at the over center portion of the stroke is a function of the linkage and frame dimension, not the ram position. I have intended to make a new handle with a bend in it to improve clearance, but have not got around to it. I have been dimpling without going over center to improve handle clearance. Works fine.

The DRDT-2 is worth is weight in gold in my opinion but we could use a different handle.
 
Yeah, but what is with the mower in the garage... that is just weird, do you park a car in there too?

The mower was only out for the cleanup before it goes away for the winter. 1 of 2 cars go in the garage, until I order the wings :)
 
I like the DRDT-2 to snap over center. To increase clearance at the handle tip the ram has to be adjusted down and this prevents the over center movement. The handle postion at the over center portion of the stroke is a function of the linkage and frame dimension, not the ram position. I have intended to make a new handle with a bend in it to improve clearance, but have not got around to it. I have been dimpling without going over center to improve handle clearance. Works fine.

The DRDT-2 is worth is weight in gold in my opinion but we could use a different handle.

I was thinking about a Z shaped handle and sketched one out, then I went way too far down the rabbit hole thinking about foot pedal so I could have both hands free.
 
DRDT-2 handle length

I designed, manufacture and sell the DRDT-2.

I typically don't chime in on DRDT-2 discussions except where appropriate.

With regard to the DRDT-2 handle length.

The DRDT-2 is designed such that the handle doesn't extend beyond the level of the material being dimpled. Variations in the stop pin position will vary the final position on the handle. Some of the early DRDT-2's had a slightly longer handle but for the past 6 or so years the handle length has been approximately 11" without the grip.

The grip in the photo is not the grip supplied with the DRDT-2 and appears to extend beyond the actual handle length. If this is one of the early handles it can be cut down to 11" and should provide proper clearance. If per chance the stop pin was removed, then the handle might interfere as shown. However it was designed to have the stop pin place to prevent the clamp from going over center.

If you bend the stop pin you are indeed applying much more force then needed to properly dimple. All this extra force just fatigues your arm.

I hope this information helps.
 
DRDT-2 Experience

I designed, manufacture and sell the DRDT-2.

With regard to the DRDT-2 handle length, the DRDT-2 is designed such that the handle doesn't extend beyond the level of the material being dimpled. [snip]

My experience with the DRDT-2 is exactly as Paul said. I have used it throughout my build, and handle interference has never been an issue.
 
I designed, manufacture and sell the DRDT-2.

I typically don't chime in on DRDT-2 discussions except where appropriate.

With regard to the DRDT-2 handle length.

The DRDT-2 is designed such that the handle doesn't extend beyond the level of the material being dimpled. Variations in the stop pin position will vary the final position on the handle. Some of the early DRDT-2's had a slightly longer handle but for the past 6 or so years the handle length has been approximately 11" without the grip.

The grip in the photo is not the grip supplied with the DRDT-2 and appears to extend beyond the actual handle length. If this is one of the early handles it can be cut down to 11" and should provide proper clearance. If per chance the stop pin was removed, then the handle might interfere as shown. However it was designed to have the stop pin place to prevent the clamp from going over center.

If you bend the stop pin you are indeed applying much more force then needed to properly dimple. All this extra force just fatigues your arm.

I hope this information helps.

Thanks for the information, it's great to get it straight from the source!

My dimpler came with my tool kit and I assumed it should be a newer one. I went out to the shop and measured my handle it was 12+ inches long with the grip. I tried to pull the grip off and it wouldn't budge, but I squeezed the end with some pliers and realized that the grip was not on all the way. I basically had to stand on it to get the grip to fit tight and now it is 11 1/4 inches long.

I placed it back on the dimpler to try it out. To adjust the tool to the point that I "feel" like it is working best I threaded die holder in far enough that there is a small gap between the dies when the handle is all the way down. With the handle down I adjust the dies so they are touching, raise the handle and give the die holder a 1/2 turn out. This way when I pull the handle I have almost no force on the way down until near the end where it hits a break over point that takes more effort(one fingers pressure is more than enough) to get it to the final seated position. I have a good dimple, I can't take the tool too far and over dimple, and it takes minimal pressure to achieve the task.

In this configuration the handle still drops below the work by ~1/2 inch. Does my procedure sound correct?

Aaron
 
Aaron,

It sounds like your set up and preload are spot on. You mention being able to push the handle down until it breaks over. Do you mean it is going past center and locks in the down position? It shouldn't be able to go past center. Looking at the pictures it appears the arm is past center. Check the stop pin to see if it is bent or crushed, eben if just a little bit. A new pin may be in order.

Brian
 
Back
Top