
Van's Air Force
You are using an out of date browser. It may not display this or other websites correctly.
You should upgrade or use an alternative browser.
You should upgrade or use an alternative browser.
Scott's RV14A: N52XL
- Thread starter rockitdoc
- Start date


Panel Painting
So, wiring the panel requires lots of wires going to switches and PFD/MFD, and center stack. This means the panel itself needs to be finished so all that wiring doesn't have to come back apart again. So....that means painting the panel and labelling everything.
Painting requires first scuffing the AL, cleaning it off and setting up a place to apply the primer and paint so the pieces don't touch each other

Then, etch priming

then urethane priming

waiting 6 hours for urethane to cure, sanding any nibs or orange peel and painting
This will be this afternoon at 5.
So, wiring the panel requires lots of wires going to switches and PFD/MFD, and center stack. This means the panel itself needs to be finished so all that wiring doesn't have to come back apart again. So....that means painting the panel and labelling everything.
Painting requires first scuffing the AL, cleaning it off and setting up a place to apply the primer and paint so the pieces don't touch each other
Then, etch priming
then urethane priming
waiting 6 hours for urethane to cure, sanding any nibs or orange peel and painting
This will be this afternoon at 5.
Wiring Continues
Began the process of finding homes for all the wires going to switches on the port side panel a few days ago. The process was completed today with connections for all the switches, ie, Master, Ignition, Mags, Fans, Strobes, Position, Taxi, Landing, and WigWag. I also ran wires to the Pitot Heat switch on the starboard panel. I will get wires to the flaps switch, fuel pump and A/P disconnect tomorrow.


I know it looks messy, cuz, it is. But, once all the wires are all in the port cubicle I will tie them together in neat bundles and secure.
Began the process of finding homes for all the wires going to switches on the port side panel a few days ago. The process was completed today with connections for all the switches, ie, Master, Ignition, Mags, Fans, Strobes, Position, Taxi, Landing, and WigWag. I also ran wires to the Pitot Heat switch on the starboard panel. I will get wires to the flaps switch, fuel pump and A/P disconnect tomorrow.
I know it looks messy, cuz, it is. But, once all the wires are all in the port cubicle I will tie them together in neat bundles and secure.
Wiring Getting There-EMS Wired
Got the EMS wired and 19 circuits on the port side energized in the past two months, but I took off for Canada in the MGB for two weeks, so it hasn't really taken 8 weeks, more like 6.
It has been a real process of finding homes for everything, but it's getting there...one circuit at a time.
There are currently 25 grounds at the FOT on the starboard side. I hope I don't need more than 7 more. The FOT only has 32 positions.
I also decided to add a fan switch and a light to indicate the main alternator is offline.


The remaining wiring requires all the Dynon stuff to get hooked up. This should be fairly straightforward as they provide quite a bit of info. Also, I purchased their harnesses for the PFD, MFD and Intercom which will speed things up.
Trying to get all the wiring done so I can paint before winter closes in.
Got the EMS wired and 19 circuits on the port side energized in the past two months, but I took off for Canada in the MGB for two weeks, so it hasn't really taken 8 weeks, more like 6.
It has been a real process of finding homes for everything, but it's getting there...one circuit at a time.
There are currently 25 grounds at the FOT on the starboard side. I hope I don't need more than 7 more. The FOT only has 32 positions.
I also decided to add a fan switch and a light to indicate the main alternator is offline.
The remaining wiring requires all the Dynon stuff to get hooked up. This should be fairly straightforward as they provide quite a bit of info. Also, I purchased their harnesses for the PFD, MFD and Intercom which will speed things up.
Trying to get all the wiring done so I can paint before winter closes in.
Last edited:
Panel Painted and Lettered
I painted the panel and lettered it using dry rub transfers. This was actually harder than I thought it would be. The letters are so small they don't always transfer straight, so lots of trial and error. But, after a few glitches....all done, almost.
I decided to add a light above the master switch to indicate the main alternator is offline.
Attachments
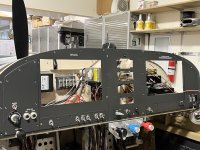
Panel is WIRED!
Yeah baby! This has been a real challenge, but I think it's ready to apply power and see if it doesn't smoke too much.
I know it's been a month since I last reported progress, but the wiring takes a lot of planning and wiring, and de-wiring, and zip-tying, and zip tie cutting and removal and I still think it could be tidier. But, compared to the spaghetti bowl I started with, this is pretty neat.
Twenty eight circuits. A forest of tabs that is nearly full. I should have invested in whoever makes zip ties cuz I must have used 10,000.
I drew wiring diagrams of every electrical device in the ship. That took about a week alone.


Painting Continues
Got the horizontal stab and elevators painted.
Prepping these is really time consuming. First, the aluminum has to be scuffed enough to remove all traces of gloss. I did this by hand with maroon Scotchbrite.
Then, the wash primer goes on. Wait at least 1 hour before urethane primer goes on.
Apply urethane primer. Wait 4-6 hours before painting, or, as I did, wait until the next day. If waiting over 16 hours, the next day, scuffing with 220-320 grit is needed. I found this is needed anyway, since when painting outdoors, boogers and insects invariably get into the primer.
I scuff with 220 by hand. But, I have to find a faster method or the wings and fuse will take forever to complete. I am looking into machines to help.
The paint is acceptable when done, but by cutting and buffing the surface could be made mirror-like. Not sure I am going that route. It would take forever on these large surfaces.
Repainting Horiz Stab and Right Elevator
I wasn't happy with the way the paint turned out on the Horizontal Stab and Right Elevator, so I sanded the surface down to smooth and will repaint when weather permits.


I primed the lower cowl the day before yesterday and started sanding with P220 today to get it ready for paint. Quite a bit of sanding is required on these fiberglass pieces to get rid of the honeycomb from the molding process that otherwise would show through.

I wasn't happy with the way the paint turned out on the Horizontal Stab and Right Elevator, so I sanded the surface down to smooth and will repaint when weather permits.
I primed the lower cowl the day before yesterday and started sanding with P220 today to get it ready for paint. Quite a bit of sanding is required on these fiberglass pieces to get rid of the honeycomb from the molding process that otherwise would show through.
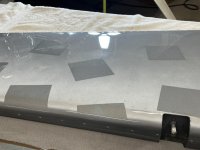
Lower Cowl Primer Sanding
I finished sanding the primer down on the lower cowl this morning. As you can see I put in quite a bit of orange peel in the primer. This was because I had the air pressure set too low at my gun. Thinking I was an expert (at auto paints and primers), I should have read the instructions for SW aircraft primers and paints. These primers (and paints) are considerably higher viscosity than auto. Typically, I use 18 psi at my gun for auto paints and primers. The SW primers and paints require 50-60 psi! When I realized this and upped the pressure, the peel magically disappeared. I'll read next time. Always something to learn with this project!
In the first photo the 'grid' created in the molding process for the fiberglass is clearly visible. If this isn't removed it will appear in the final product after paint. I sanded this to rough up the gel coat first, but decided not to completely remove the grid so as not to remove too much glass. Instead, the primer serves to fill in the low spots and after sanding the 'grid' will be invisible.


Pinholes in glass and primer need filling to disappear.


I finished sanding the primer down on the lower cowl this morning. As you can see I put in quite a bit of orange peel in the primer. This was because I had the air pressure set too low at my gun. Thinking I was an expert (at auto paints and primers), I should have read the instructions for SW aircraft primers and paints. These primers (and paints) are considerably higher viscosity than auto. Typically, I use 18 psi at my gun for auto paints and primers. The SW primers and paints require 50-60 psi! When I realized this and upped the pressure, the peel magically disappeared. I'll read next time. Always something to learn with this project!
In the first photo the 'grid' created in the molding process for the fiberglass is clearly visible. If this isn't removed it will appear in the final product after paint. I sanded this to rough up the gel coat first, but decided not to completely remove the grid so as not to remove too much glass. Instead, the primer serves to fill in the low spots and after sanding the 'grid' will be invisible.
Pinholes in glass and primer need filling to disappear.
Last edited:
More Primer and Repainting
I got the lower cowl all sanded and ready for paint. I will do this tomorrow since it looks like favorable painting weather.

Then, I sanded the upper cowl to prep for primer and primed it.

Then, since I had time and weather permitted I repainted the horizontal stabilizer and starboard elevator. I wasn't pleased with the way the first painting came out due to a maladjusted spray gun. I upped the pressure at the gun to 45 psi and got significantly better atomization and consequently, paint flow. Much improved finish.


I got the lower cowl all sanded and ready for paint. I will do this tomorrow since it looks like favorable painting weather.
Then, I sanded the upper cowl to prep for primer and primed it.
Then, since I had time and weather permitted I repainted the horizontal stabilizer and starboard elevator. I wasn't pleased with the way the first painting came out due to a maladjusted spray gun. I upped the pressure at the gun to 45 psi and got significantly better atomization and consequently, paint flow. Much improved finish.
More Priming and Paint
Primed the vertical stabilizer and rudder today.

Then, painted the lower cowl

I will paint the vert stab, rudder and vert stab faring tomorrow since it looks like weather is going to be favorable. These get painted silver, so one more step to paint them because of the clear.
If this gets done, the only remaining painting is the wings, fuse and canopy.
Primed the vertical stabilizer and rudder today.
Then, painted the lower cowl
I will paint the vert stab, rudder and vert stab faring tomorrow since it looks like weather is going to be favorable. These get painted silver, so one more step to paint them because of the clear.
If this gets done, the only remaining painting is the wings, fuse and canopy.
Last edited:

Are you painting inside, outside, homemade paint booth, or what? What paint system?
Outside, mostly. Under a porch, mostly. SW paint. AcryFlow. Anst Iwata guns and 10hp IngersolRand compressor.
Checkerboard Tail
I am painting a checkerboard tail and rudder with the checkerboard flying off at the stern and fading away.
I masked it yesterday and today and will paint it tomorrow. I'll paint it white at the forward edge of the vertical stabilizer and gradually fade it to the rear. This will give the impression of a solid checkerboard at the forward edge and gradually fading the silver squares into the solid silver stern. I hope.
Last edited:
BravoAlphaRomeo
Active Member
PM’d you with a quick question about lower cowl.
PM’d you with a quick question about lower cowl.
PM'd back at you.
BravoAlphaRomeo
Active Member
Thanks for reply. I wasn’t trying to be cryptic here, I was just wondering how those exhaust fairings got onto the lower cowl. Apparently they’re part of the cowl when you order an EXP 119 engine. I have the non-EXP I/O 390 with the duel Vetterman exhaust. It looks like these exhaust fairings would work perfect. When I cut the slots in my cowl for the exhaust, I cut them too big because I didn’t take into account the change in profile where they exit. I saved the parts I cut out and I’m gonna have to glass a little bit back in. Anyway, that was the question.
Checkerboard Painted
I got the checkerboard painted today and removed the masks. I will wait to clear coat it after it has dried completely so I can lightly sand the white to silver transitions. This will reduce some of the ridges which develop since the white lies on top of the previous clear coat, so there is some slight relief between the white and silver.

I got the checkerboard painted today and removed the masks. I will wait to clear coat it after it has dried completely so I can lightly sand the white to silver transitions. This will reduce some of the ridges which develop since the white lies on top of the previous clear coat, so there is some slight relief between the white and silver.
Fantastic! Can you wet sand to help with the edges of the blocks before the clear coat? Agree you need to have a light touch on those, but they are a problem. Might even want to paint some scrap sheets and see what looks best before doing it on the real parts.
Actually, I have done this before on two Austin Healey race cars we built. The the white boxes get sanded with P400 to knock down any orange peel and at the same time reduce the relief between the white and the silver. It doesn't need to have perfectly equal elevations because the clear going over the top will cover it. Block sanding the clear down further reduces weight and provides a nice surface to buff out.

Last edited:
Homage to the race car. Very cool!
Carry on……
Shop Reorganized for Painting
Winter is closing in on Colorado. I had planned to have the whole plane painted by now. But, you know.....best laid plans. So, I decided to convert the south wing of my shop into a paint booth. This meant moving all the painted parts that were hanging in the south wing to the north wing of my shop. This allowed for more aircraft hanging art.

The 'paint booth' is just my two car garage on the south end of my other two car garage shop. But, it will be large enough to paint the wings. The fuse might be a challenge I'll have to figure out later. But, for now, I can finish painting the vert stab and rudder and faring. I'll do this tomorrow.

Winter is closing in on Colorado. I had planned to have the whole plane painted by now. But, you know.....best laid plans. So, I decided to convert the south wing of my shop into a paint booth. This meant moving all the painted parts that were hanging in the south wing to the north wing of my shop. This allowed for more aircraft hanging art.
The 'paint booth' is just my two car garage on the south end of my other two car garage shop. But, it will be large enough to paint the wings. The fuse might be a challenge I'll have to figure out later. But, for now, I can finish painting the vert stab and rudder and faring. I'll do this tomorrow.
Painted Tail
I added a little more silver to the aft edge of the rudder because I wanted the last vestiges of the checkerboard flying off the back to seem to disappear.


Then, I clear coated everything. When I paint the wings and fuse, I will wear a full suit and goggles.

There is a LOT of fog. And, even with my hair-challenged condition, it gets a bit sticky.

I added a little more silver to the aft edge of the rudder because I wanted the last vestiges of the checkerboard flying off the back to seem to disappear.
Then, I clear coated everything. When I paint the wings and fuse, I will wear a full suit and goggles.
There is a LOT of fog. And, even with my hair-challenged condition, it gets a bit sticky.
Cut and Buff Tail
I cut and buffed the tail today. Started with P800 to get rid of boogers and some orange peel. Then, I machine sanded with P1500 and P3000. Rubbing compound, polishing compound and ultrafine polishing compound completed the task.
Here is the paper I used for cutting:

Here is the surface after the P800:

The rubbing compound gets rid of the P3000 scratches

The polishing compound gets rid of swirl marks left by the rubbing compound:

And, the ultra fine completes the job:

A closeup after the ultra fine shows that this will indeed be a slippery aircraft

I may do a quartz coating, too.
I cut and buffed the tail today. Started with P800 to get rid of boogers and some orange peel. Then, I machine sanded with P1500 and P3000. Rubbing compound, polishing compound and ultrafine polishing compound completed the task.
Here is the paper I used for cutting:
Here is the surface after the P800:
The rubbing compound gets rid of the P3000 scratches
The polishing compound gets rid of swirl marks left by the rubbing compound:
And, the ultra fine completes the job:
A closeup after the ultra fine shows that this will indeed be a slippery aircraft
I may do a quartz coating, too.
Rudder to be Repainted
When I clear coated the rudder, I got a bunch of boogers in it. I thought I could color sand them out, and tried. But, there were so many it would have taken two days to cut and buff. So, I sanded them all out with P320 today in preparation for repainting the clear tomorrow. I think the boogers came from the tack rag I used, so no more tack rags, at least not that kind. Since the tail fairing came out so nice this week, I know I can make the rudder just as nice. So, worth the work.
When I clear coated the rudder, I got a bunch of boogers in it. I thought I could color sand them out, and tried. But, there were so many it would have taken two days to cut and buff. So, I sanded them all out with P320 today in preparation for repainting the clear tomorrow. I think the boogers came from the tack rag I used, so no more tack rags, at least not that kind. Since the tail fairing came out so nice this week, I know I can make the rudder just as nice. So, worth the work.
Rudder Repainted and Polished
I repainted the clear on the rudder yesterday and color sanded and buffed one side today. IT took a little longer than usual because I managed to get some runs in the clear along the leading edge on both sides. Part of the risk of avoiding orange peel. Too little paint-orange peel. Too much-runs. But runs are actually easier to remove than serious peel. I first sand with P180 to get flat. Then P400, P800 and P1500. Buffing takes out the P1500 scratches.
Here's the run:

Run sanded with P180:

Further sanding gets the run flat to surrounding clear:

Then, P400, P800 and P1500 gets the big scratches out:

Polishing gets it shiny:

This is what it looks like before any cutting and buffing. Not bad, but not a mirror due to minor peel and smallish boogers.

I repainted the clear on the rudder yesterday and color sanded and buffed one side today. IT took a little longer than usual because I managed to get some runs in the clear along the leading edge on both sides. Part of the risk of avoiding orange peel. Too little paint-orange peel. Too much-runs. But runs are actually easier to remove than serious peel. I first sand with P180 to get flat. Then P400, P800 and P1500. Buffing takes out the P1500 scratches.
Here's the run:
Run sanded with P180:
Further sanding gets the run flat to surrounding clear:
Then, P400, P800 and P1500 gets the big scratches out:
Polishing gets it shiny:
This is what it looks like before any cutting and buffing. Not bad, but not a mirror due to minor peel and smallish boogers.
Attachments
Painting, Cutting and Buffing Finalized Process
Over the last week I have been cutting and buffing the HS and elevators. I finally came up with a process that gets me to the flattest, clearest surface. This comparison (with 3M Perfect-It and Meguiar's) is in the 'Building Techniques' section of VAF. In summary, this is what I have come up with:
After paint/clear has cured 12+ hrs
1) Cut with P1500 wet by hand in rectangular pattern to rid surface of boogers and peel
2) 3M Trizact 3000 wet on 3M orbital DA
3) 3M Trizact 5000 wet on 3M orbital DA
4) Meguirar's 100 rubbing compound using Porter Cable soft-start polisher and white 3M 8" foam pad
5) Meguirar's 205 polishing compound same PC polisher and black 3M 8" foam pad
6) Meguirar's 305 ultra polish same PC polisher and blue 3M 8" foam pad
7) Gtechniq Crystal Serum Light
8) Gtechniq EXO
This is a LOT of work. But, the results are as close to show plane perfect as this amateur has been able to get.
My HS and elevators are painted with the single stage Sherwin Williams AcryGlow White. Polishing these to perfection was difficult, I think partially, because of the pigment in single stage paints. With clear coat two stage paints the results should be better. When I paint the top of my fuse it will be in silver metallic two stage and the dark gray and tan accents are also two stage, so stay tuned re the results.
Here is the reflection of my LED shop light in the HS after the Meguirar's rubbing compound:
Last edited:
Baggage Compartment Finishing
I am upholstering the baggage compartment using the kit from Classic Aero Designs. So, before I install the kit, I needed to fabricate a housing for my baggage light and switch. I'm using an LED that is dimmable.
I took some scrap aluminum and bent it to match the rollbar support. Clearance for the dimmer switch required the housing be 3/4" lower than the support. So, some use of a brake allowed me to get pretty good right angle bends in the 24" long housing. The housing didn't need to be this long, but it hides the wiring for the light and switch nicely, and looks like factory installed it this way. I riveted some nut plates to the rollbar support so the housing could be attached.
I will paint this tomorrow.
The messy Sikaflex is left over from installing the rear window. This will be covered by the Aero Designs interior.
Last edited:
Painting the Rollbar and Baggage Area
Before I can install my Aero Designs interior, I needed to paint the areas that will show after the interior install.
I had painted the interior and rollbar before I assembled these bits. But, I chose the wrong color. Didn't match the interior very well. Duh.
Tip. Pick your paint color based on the available interior colors. Interior colors are limited, but paint colors are almost limitless. Lesson learned.
Painting the interior bits before assembling them is very desirable, because painting these items later requires significant prep and masking, which I HATE. The following photos show the masking required for painting the rollbar and the baggage area when they are different colors...my case:
Aero Designs Baggage Area Completed
I installed the Aero Designs baggage compartment trims and carpet pieces today. Easy with their good instructions. I also fitted my baggage light and dimmer switch assembly. It looks pretty good and should be a cozy place for the luggage.


I installed the Aero Designs baggage compartment trims and carpet pieces today. Easy with their good instructions. I also fitted my baggage light and dimmer switch assembly. It looks pretty good and should be a cozy place for the luggage.
Looks great! Would that area now be considered "complete"?
Not quite. The triangular area below the window gets covered and there is a trim piece between the window and the triangle. Aero thinks they will have this to me by Jan ‘24
Priming the Canopy
I put the wash primer on the aluminum rails of the canopy yesterday, then urethane primered the whole thing. Waited overnight for the urethane to cure, then sanded the first coat of urethane with P400 to smooth out spots not finished during the bodywork. I will apply the second coat of urethane primer today, then P400 that tomorrow and apply the base coat and clear.

I put the wash primer on the aluminum rails of the canopy yesterday, then urethane primered the whole thing. Waited overnight for the urethane to cure, then sanded the first coat of urethane with P400 to smooth out spots not finished during the bodywork. I will apply the second coat of urethane primer today, then P400 that tomorrow and apply the base coat and clear.
Second Coat Primer on Canopy
I just put the second coat of urethane primer on the canopy. Although it looks pretty good, there are a couple of spots that require sanding again. So, tomorrow I will sand it down again with P400 and apply the third coat of urethane primer, the base and clear coats. My goal was to make sure there was a nice smooth transition between the body work on the forward section of the cowl and the canopy plexi. It should look nice when done. I hope.

I just put the second coat of urethane primer on the canopy. Although it looks pretty good, there are a couple of spots that require sanding again. So, tomorrow I will sand it down again with P400 and apply the third coat of urethane primer, the base and clear coats. My goal was to make sure there was a nice smooth transition between the body work on the forward section of the cowl and the canopy plexi. It should look nice when done. I hope.
Canopy Painted...First Time
So, I applied a third coat of urethane primer on yesterday, sanded it down with P400 this morning and painted it. But, I'm not very satisfied with the uniformity of the silver. I used my trim gun, which is nice and small, but the pattern wasn't even across the fan and I can see some irregularity in the color (typical with silvers if the gun isn't set up right). So, I think I will scuff this tomorrow and reapply the silver using one of my larger guns that I know will be more even. Might as well do it now. I won't be satisfied, otherwise.


So, I applied a third coat of urethane primer on yesterday, sanded it down with P400 this morning and painted it. But, I'm not very satisfied with the uniformity of the silver. I used my trim gun, which is nice and small, but the pattern wasn't even across the fan and I can see some irregularity in the color (typical with silvers if the gun isn't set up right). So, I think I will scuff this tomorrow and reapply the silver using one of my larger guns that I know will be more even. Might as well do it now. I won't be satisfied, otherwise.
Canopy Interior Repaint
I painted my canopy parts before I assembled it. The idea was that painting it after the plexiglass was installed would create a lot of masking issues. I also kind of liked the idea of the rivets showing a contrasting color to the color of the frame.
Problem is....when doing it this way the riveting causes enough vibration and various other violence that the paint can't hold on and chips away in places. This is unacceptable from an aesthetic point of view. At least for me.
So, I bead blasted all the loose paint off and will now reprime and repaint. So much for best laid plans!
If you decide to paint after assembling the canopy. Buy 1000 shares of 3M. This process takes a lot of taping. Ugh!

Canopy Paint Completed
I painted the dark gray edge of the canopy interior today. This makes the area of the canopy interior that abuts the panel match the dark gray color of the panel.
I also painted the aft edge of the canopy plexiglass on the inside black to match the color of the Sikaflex. Now the aft most hoop will appear black to match the rollbar.
Tomorrow, I will sand out any scratches left in the canopy and polish them. This will complete the canopy assembly. Yeah, baby!


I painted the plexiglass on the inside black. This makes it match the black Sikaflex showing through. Once installed on the airplane, the hoop formed by the canopy and the rear window will appear as a black targa-like hoop.

I painted the dark gray edge of the canopy interior today. This makes the area of the canopy interior that abuts the panel match the dark gray color of the panel.
I also painted the aft edge of the canopy plexiglass on the inside black to match the color of the Sikaflex. Now the aft most hoop will appear black to match the rollbar.
Tomorrow, I will sand out any scratches left in the canopy and polish them. This will complete the canopy assembly. Yeah, baby!
I painted the plexiglass on the inside black. This makes it match the black Sikaflex showing through. Once installed on the airplane, the hoop formed by the canopy and the rear window will appear as a black targa-like hoop.
Last edited:
Impressive results! I’m curious how you painted the inside of the canopy for the targa strip. I’m trying to clean up my sika line by adding a targa like strip of paint. Type of paint, brush or spray and what tape did you use for a crisp line?
I am using PPG auto paint for the black. Shop Line quality. Sprayed on with my small Iwata trim gun. I made it matte finish with the addition of some matting compound added to the gloss black. Experimented until I got the matte I wanted. Used this on the glare shield, also. I used 3M 471 tape for all the edges. Nice and crisp. But, I have found that Frog tape from Ace Hardware works almost as well if the 471 isn't available. Only problem with the Frog tape, it doesn't do curves all that well.
Canopy Scratched!
I scratched my canopy. It probably was the 200 lbs of scrap iron I stored on top of it. No really, I was super careful....but, not careful enough. Anyway, I used P2000 to remove the scratches which is what the photo below shows. P3000 is next, then Novus. They will be invisible when done.

I scratched my canopy. It probably was the 200 lbs of scrap iron I stored on top of it. No really, I was super careful....but, not careful enough. Anyway, I used P2000 to remove the scratches which is what the photo below shows. P3000 is next, then Novus. They will be invisible when done.
I painted the dark gray edge of the canopy interior today. This makes the area of the canopy interior that abuts the panel match the dark gray color of the panel.
I also painted the aft edge of the canopy plexiglass on the inside black to match the color of the Sikaflex. Now the aft most hoop will appear black to match the rollbar.
Tomorrow, I will sand out any scratches left in the canopy and polish them. This will complete the canopy assembly. Yeah, baby!
View attachment 52129
View attachment 52125
View attachment 52128
I painted the plexiglass on the inside black. This makes it match the black Sikaflex showing through. Once installed on the airplane, the hoop formed by the canopy and the rear window will appear as a black targa-like hoop.
View attachment 52126
Good Lord! What a work of art! Your canopy looks gorgeous! I love the looks of it without the dozens of screws. Too bad I finished my traditional way 5 weeks ago....
You really rocked it doc!
Good Lord! What a work of art! Your canopy looks gorgeous! I love the looks of it without the dozens of screws. Too bad I finished my traditional way 5 weeks ago....
You really rocked it doc!
Thanks. That’s quite a complement, and I appreciate it very much. Thank you.
S
Fixing Scratched Canopy
I scratched my canopy. Surprise!
I started removing the scratches using P1500, P3000 wet or dry by hand at first. Then Novus to finish it. This works fine, but there's an even better/faster way.
Today, I tried using P3000 wet Trizact on my 3M DA polisher, then P5000 wet Trizact over the P3000 Trizact. This works even better.
Take a look. It's hard to capture in photos, but if you look through the canopy to the workbench on the other side you can get an idea of the differences.


The only thing to be careful with when using the DA is to not go fast and use lots of water. Otherwise you can heat op the plexiglas and burn it. This makes for damage that could be difficult to repair.
I scratched my canopy. Surprise!
I started removing the scratches using P1500, P3000 wet or dry by hand at first. Then Novus to finish it. This works fine, but there's an even better/faster way.
Today, I tried using P3000 wet Trizact on my 3M DA polisher, then P5000 wet Trizact over the P3000 Trizact. This works even better.
Take a look. It's hard to capture in photos, but if you look through the canopy to the workbench on the other side you can get an idea of the differences.
The only thing to be careful with when using the DA is to not go fast and use lots of water. Otherwise you can heat op the plexiglas and burn it. This makes for damage that could be difficult to repair.
Canopy Is DONE!
I polished out the scratches in the canopy the last couple of days, and then started the cutting and buffing process. Finishing that.....The canopy is completed! It took about a year with some time out for wiring the panel.
The cutting and buffing turned out pretty nice.
I use buffing pads from 3" (shown here) up to 8". This one is the second step with the McGuire's 201.

The side view of the canopy port rail at the aft end near the lift handle

Canopy ready for removal of masking tape protecting the clear plexiglass from sanding and buffing operations

I polished out the scratches in the canopy the last couple of days, and then started the cutting and buffing process. Finishing that.....The canopy is completed! It took about a year with some time out for wiring the panel.
The cutting and buffing turned out pretty nice.
I use buffing pads from 3" (shown here) up to 8". This one is the second step with the McGuire's 201.
The side view of the canopy port rail at the aft end near the lift handle
Canopy ready for removal of masking tape protecting the clear plexiglass from sanding and buffing operations


