Hi, I have my final inspection for my 14 next week and I need to placard the operation of the tip up canopy latch. Any photos or suggestions would be greatly appreciated.
Thanks Jim
Thanks Jim


Uh? Where is this requirement coming from? I’ve not enjoyed having a plane with door opening instructions.

Yes, it’s for the Canadian requirements. Lots of placards required in the “Land of the taxed”.
Jim
Hi Glenn,
They are scattered across several documents. Amateur build warning can go the instrument panel, must be bilingual. My final inspection is next week so just trying make sure all the boxes are ticked.
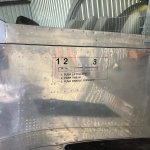
MDRA C20 MANUAL of PROCEDURES for INSPECTION of METAL, TUBE, and COMPOSITE, IMPORTED AMATEUR-BUILT AIRCRAFT, INSPECTION AND TECHNICAL INFORMATION RECORD
5. Are the following placards installed,
Fireproof Aircraft Identification Plate_ (Per CAR 201.01)
Aerobatics prohibited
Amateur built warning (Must be Bilingual)
Compass deviation card
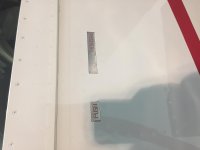
Canopy/door release - Exterior and Interior
CAR’s
549.15 Placards
Unless otherwise required in the applicable section, all aircraft shall have the following placards:
(a) On the side of the fuselage, in a position that is readily visible to persons entering the aircraft, in letters at least 10 mm (3/8 in.) high and of a colour contrasting with the background:
(1)
NOTICE:
THIS AIRCRAFT IS OPERATING WITH A SPECIAL CERTIFICATE
OF AIRWORTHINESS FOR AMATEUR-BUILT AIRCRAFT.
AVIS:
CET AÉRONEF VOLE AVEC UN CERTIFICAT DE NAVIGABILITÉ
SPÉCIAL POUR AÉRONEFS DE CONSTRUCTION AMATEUR.
(2) For aircraft with passenger seats, during the period when the applicable initial operating restrictions apply:
"PASSENGERS PROHIBITED"
"PASSAGERS INTERDITS".
(b) In any area of an aircraft designated for the carriage of passengers, other than an area beside the pilot, a placard shall be displayed showing the maximum permissible load in such compartment or area:
"MAXIMUM PASSENGER AND/OR BAGGAGE LOAD: KG ( LB)",
"CHARGE MAXIMALE, PASSAGERS/BAGAGES: KG ( LB)".
The load values to be used on this placard shall be obtained from the Aircraft Weight and Balance Report.
549.117] Placards
In addition to the placards specified in 549.15, the following are required in the cockpit or cabin in full view of the pilot:
(a)
"Aerobatics Prohibited"
or
"Acrobaties aériennes interdites"
unless the "aerobatics prohibited" restriction has been removed from the aeroplane's special certificate of airworthiness for amateur-built aircraft.
(b) [For aerobatic aeroplanes that obtained the restriction removed by using the simplified one-off aerobatic demonstration procedure: (refer to AMA 549.101A, paragraph 5(e)), the placards specified in 549.117 (a) may be replaced by the following:
"The Following Aerobatic Manoeuvers, and Combinations
Thereof, May Be Performed in this Aeroplane":
[ 1. .............
[ 2. ..........
[ 3. .................
or
"Les manoeuvres d'acrobaties aérienne suivantes et toute combinaison
de celles-ci peuvent être exécutées au moyen de cet avion"
[ 1. .............
[ 2. ..........
[ 3. .................
[(c)] For high performance aeroplanes:
"This Aeroplane is a High PerformanceAmateur-Built Aeroplane.
Operation Requires a Pilot Licence With a High Performance
Type Rating";
or
"Cet avion est un avion à hautes performance de construction amateur.
Son utilisation requiert une licence de pilote à hautes performances".
")
"Exit" is all you need for your latch.
I did not see a requirement for stepwise or progressive instructions.
You could label the white T-handle on the panel: "to exit, pull below 10 feet and 50 kts "
Warning passengers about "this aircraft does not comply..." .
The placard needs to be either in clear view of the passenger in the cockpit or
outside on the fuselage to be visible before clambering in. That's how I interpreted it.
Do not forget the "cargo net" in the baggage compartment.
The inspector also wanted to see the contents of my medical kit.
Any means to secure luggage in the baggage area.
Straps, bungee, whatever.
I used a square of old fishing net and 6 carabiners secured to the fuselage.