What's new
Van's Air Force

Don't miss anything! Register now for full access to the definitive RV support community.

Tailspring Change Problem

YellerDaisy

Well Known Member
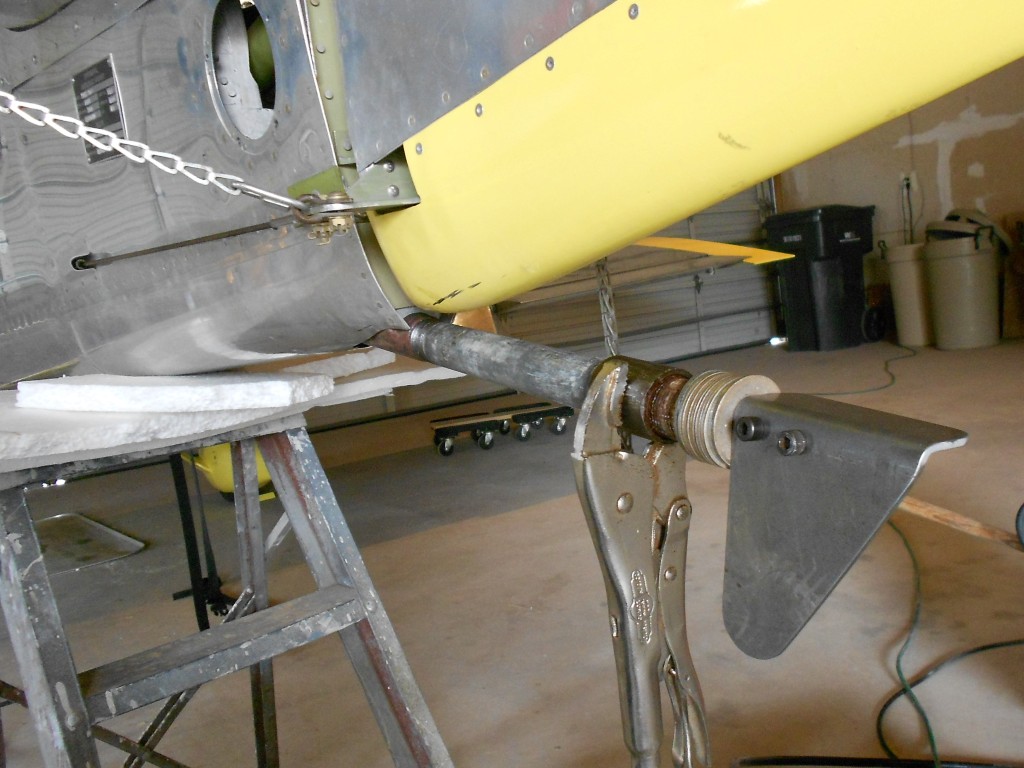
I am attempting to swap out my original tailspring (note the forum - RV-3).

The problem is that the original/existing spring refuses to come out. Yes, I have removed the bolt. ;) I am able to rotate the spring about 30 degrees (very hard) and it has moved aft about 1/16" (just so I can't reinstall the bolt and call it a battle for another day). I am soaking the assembly with penetrating fluid as I type (fingers crossed).

First question: Does anyone know if WD-309 (the tailspring mount assembly) will come out thru the inspection hole?? How about WITH the tailspring attached?? (ok, two questions for the price of one, sorry)

I suspect that it will not so am hesitant to go to all the work of removing the bolts just to find it wasted effort.

Second question: Does anyone have a magic formula for removing a tailspring? I suspect maybe a magical combination of heat and cold but I don't have the equipment for such things (but would round them up if this is a known solution).

Thanks!
 
JD,

I don't have the plans with me, but I am 99% sure there is no way you are going to get the spring mount out of the plane without a lot of disassembly. It is riveted to two bulkheads (fore and aft). The inspection hole is pretty much up to the builder, but in general, I haven't seen one big enough to get that weldment out.
 
How I Did It

I built a "puller" that grasp the spring and pushed against the base of the socket that it goes in. With a good bit of pull applied by 2 threaded rods and a hearty tap with a hammer at the end of the spring I was able to remove the broken spring.
 
Put the tailwheel weldment back on (if you have removed it) and using an appropriately sized bar shoved into the weldment hit the bar with a rivet gun. Pointed aft of course. The whole thing will buzz right out.
 
JD,

I don't have the plans with me, but I am 99% sure there is no way you are going to get the spring mount out of the plane without a lot of disassembly. It is riveted to two bulkheads (fore and aft). The inspection hole is pretty much up to the builder, but in general, I haven't seen one big enough to get that weldment out.

Hi Paul - m weldment is definately bolted to the bulkheads - no rivets. That said, I'm not sure that it would come out with the bolts removed.
 
Heat the weldment with a heat gun.

Thanks Russ. Tried this today - after soaking in penetrant all night. No luck. I can force the spring to turn slightly but it is putting a lot of stress on things. Typically, when I continue such adventures, I end breaking something and creating ten times more work for myself. Would really like NOT to do that this time around.

I'm trying to track down someone with a cold shot of something (nitrogen). Thinking maybe a heated weldment and cooled spring would be just enough to pull it out.
 
Put the tailwheel weldment back on (if you have removed it) and using an appropriately sized bar shoved into the weldment hit the bar with a rivet gun. Pointed aft of course. The whole thing will buzz right out.

RocketBob,

Hmmm, interesting idea. I'm not sure I get get far enough back into the fuselage to get at the forward end of the spring. Have you done this on an assembled RV-3?
 
No I'm saying you bolt the tailwheel weldment back on without the fork. Then put a rod in where the fork shaft goes, and hit that with a rivet gun so you don't damage the weldment. All done on the outside.
 
No I'm saying you bolt the tailwheel weldment back on without the fork. Then put a rod in where the fork shaft goes, and hit that with a rivet gun so you don't damage the weldment. All done on the outside.

Ahh, I'm with you now Bob. Since this is an "oem" RV-3 tailspring, there is no fork. So, you're saying cut the tailspring forward of the bend and then drive it into the fuselage with the rivet gun. Interesting....
 
No I'm saying you bolt the tailwheel weldment back on without the fork. Then put a rod in where the fork shaft goes, and hit that with a rivet gun so you don't damage the weldment. All done on the outside.

I used something like this and it worked well.
 
JD, I had a problem replacing a 3 tailspring once as well - I ended up bolting a gearleg jackpoint to the spring and drove it out with a rivet gun just as Bob suggested - it popped right out..Mike
 
Ahh, I'm with you now Bob. Since this is an "oem" RV-3 tailspring, there is no fork. So, you're saying cut the tailspring forward of the bend and then drive it into the fuselage with the rivet gun. Interesting....

No don’t do that, what he is saying is the same as just putting the rivet gun against the bent part of the spring and driving to the rear. Out the back.
 
No don?t do that, what he is saying is the same as just putting the rivet gun against the bent part of the spring and driving to the rear. Out the back.

Yep. In this case just wrap the spring with a piece of aluminum then tighten up a set of vise-grip pliers over the aluminum, and use the rivet gun on the vise-grips.
 
drilling it for bolt?

I can see I will have to change my spring at some point. How has anyone drilled the verticle bolt hole and made it line up correctly?

Cm
 
I would bolt something to the tailspring rod about 8 to 10 inches aft to where
it goes into fuselage to give a place to apply force from rivet gun or air hammer. Maybe some bar stock with three small muffler clamps or large cable clamps. I would also have someone inside using heat gun to warm up
weldment as the rearward force is applied.

Jim Miller
 
Thanks to everyone for the ideas. I tried most everything (rivet gun, slide hammers, etc...) but had no success. David's suggestion on the "puller" was what finally got 'er done.

With the help of some friends, we "invented" an extraction tool using a piece of threaded steel pipe with a coupler screwed onto it.

RV3TailSpringExtractor.jpg


The process required two holes to be drilled perpendicular into the spring, near the aft end. The "extraction tool" went over the existing spring and butted against the weldment in the fuselage. A steel angle was bolted onto the spring using the two holes. A bunch of large washers added between the "extraction tool" and steel angle to take up the slop. The steel tube and coupler were then unscrewed (increasing their length) which put a "pulling" force on the spring and pulled it out of the weldment. This was repeated half a dozen times adding a few more washers each time.

Of course, it was more work than that. I broke two sets of AN-3 bolts (on the steel angle) before moving up to 1/4" high strength bolts.

This puppy (spring) was REALLY held in tight. The good news is that the weldment was not buggered up. The new spring went in fine and I test flew it this morning.

On a really positive note. Neither of the two times that I cracked my head on the elevator required stitches!!

The full saga and some additional photos are on my blog:
http://jdfinley.com/tale-of-the-tail-wheel-replacement/
 
Back
Top