What's new
Van's Air Force

Don't miss anything! Register now for full access to the definitive RV support community.

Fuel Tank Rib Tooling Hole Issue

Nihon_Ni

Well Known Member
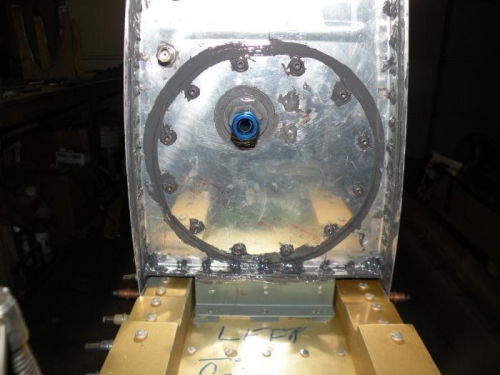
I'm stumped by what to do with the tooling hole in my inboard T-703 rib of the fuel tank, in the area where the T-708 access plate is mounted. The tooling hole at the aft end of the rib extends beyond the T-407 cork gasket and stiffener by a tiny amount, but it's just enough to see daylight through it. The drawing shows this hole as barely under the gasket, as they appear to touch on the outboard edge. My access panel is a fraction forward of where the drawing has it located, and has just uncovered the edge of the tooling hole.

I haven't been able to find anything in the plans to address this hole. Even if it was covered by the cork gasket, there doesn't seem to be enough overlap to seal the hole, since the T-407 stiffener isn't prosealed to the inside of the tank.

Is proseal enough to take care of this if I apply it on both sides? It seems like this a problem in waiting and the hold should be filled with a rivet, but I can't figure out how to get one in there.

What have other builders done to address this tooling hole?

gallery_11575_1360_31243.jpg


gallery_11575_1360_54692.jpg


gallery_11575_1360_27802.jpg


gallery_11575_1360_68663.jpg


Thanks,
Rob
 
Couple comments / suggestions...

It doesn't look like the dimples in the rib are fully formed.
If you have a C-frame tool, re-dimple one hole with a good whack in the c-frame and see if you can tell the difference.

Ditch the cork gasket (Install it with tank sealant instead). I know it comes with the kit, but using it guarantees that it will eventually leak (sooner or later...usually sooner).

The gap at the tooling hole is small enough to deal with a generous buildup of tank sealant on the inside (there are other locations about the same size on the tank, that will get sealed in the same way).

Thanks for the help. I noticed there's larger gaps in the leading edge and in the corners of the ribs too -- I just didn't see anything addressing this hole. In fact, the plans specifically say you don't have to use proseal on T-407.

Thanks for the tip about using sealant instead of the cork. Do you know how difficult it is to take the access plate off if it's put on with sealant instead of the cork.

I put the rib through the C-frame and the results are much better. Thanks for pointing that out.

gallery_11575_1360_529963.jpg


Rob
 
Most builders just cut a piece of scrap aluminum about 1" square and proseal it over the tooling hole on the inside.

As for the gasket, yes toss the cork, it will start to leak in 5 or 6 years. I actually had to reopen my access plates after going on direct with proseal, it was a job but it was doable. I used one of those 6" stainless steel rulers to get up under the edge and jammed it through and sawed it back and forth to get about half of the proseal cut, then a flatblade screwdriver popped it off.
 
That sounds like a good idea for the outboard rib, but I'm not sure how to do that on the inboard rib. How can you put a 1" aluminum patch inside without it interfering with the plate nuts on the T-407 stiffener?
 
Just put a dab of proseal on it from the inside. Having just completed my tanks about 10 minutes ago (!), one thing I learned through this process is that a blob of it will patch a hole just fine- you'll have bigger gaps to fill in the corners of the rib/baffle joint later on.

I didn't have a big as a gap as you did on my tanks, but I just left them bare, then prosealed vs the gasket.

Good luck!
 
The size of the patch (or even the presence of the patch itself) is not relevant - you just have to plug the hole SOMEHOW and cover the fuel-wetted surfaces with Proseal. This is where the "experimental" nature of our hobby really comes in. There are about a hunnert-dozen ways to plug that hole - the only thing that is REQUIRED is that the hole becomes effectively plugged. Proseal and aluminum are both effective fuel barriers to use in the process of sealing that hole.
 
+1 for just adding a dollop of sealant on the inside to cover the edge of the tooling hole. This hole is much smaller than the holes at the aft corners of the end ribs where they meet the baffle that you're going to seal in a similar manner. (Some folks add a little square of aluminum to the corners to back up the sealant, but many don't.)

One other thing I noticed: Unless I'm missing something, I think you're going to need to enlarge the big hole in the rib to the same diameter as the inside of the stiffening ring so as to remove the remnants of the stamped ring in rib. Otherwise your cover plate isn't going to mate properly with the outside of the rib web.
 
One other thing I noticed: Unless I'm missing something, I think you're going to need to enlarge the big hole in the rib to the same diameter as the inside of the stiffening ring so as to remove the remnants of the stamped ring in rib. Otherwise your cover plate isn't going to mate properly with the outside of the rib web.

Thanks for the tip. I had it assembled to drill the holes, but didn't notice that. I'm away from home at the moment, but I'll look at it when I get back. I measured the hole on the plans and used that diameter to determine my cut location, but you bring up an interesting point. Hmmm...
 
Miles,

Thanks for the tip. I checked the fit of my components tonight, and you were right. Thanks everyone for all the assistance.

gallery_11575_1360_266944.jpeg
 
What type of nut plates are you using ? The standard K1000 or the type which are sealed ? I do not have the number handy .. but the back end of the "screw hole" is closed off ..(capped) ..
 
What type of nut plates are you using ? The standard K1000 or the type which are sealed ? I do not have the number handy .. but the back end of the "screw hole" is closed off ..(capped) ..

I looked into those, but they're very pricey - $100 - $125 for enough for both plates. I just installed the cover plate with sealant on the rib, the cover, and the screws. I used torx head screws in case I should ever need to remove them. It's at least passed the leakdown test...
FP02102012A00053.jpg
 
Back
Top