
Van's Air Force
You are using an out of date browser. It may not display this or other websites correctly.
You should upgrade or use an alternative browser.
You should upgrade or use an alternative browser.
Cracking on steps
- Thread starter Fred.Stucklen
- Start date

Totally agree. I fully expect to find myself hitting the ground at some point if I let it go too long. It has sure trained me to make sure the I'm fully supporting myself with the rollbar and top skin while boardingScott (and others)
A friend of mine had a cracked step on his RV9A. We noticed it and monitored the crack. There was no "apparent" progression of the crack, BUT!!
One day while at my hangar for some avionics work, as I stepped on it, the step just "bent and broke". The crack was on the bottom.
Fortunately, I caught myself. I knew there was a crack and was careful stepping on it.
The point of the message is that the step can give way at any moment.
We replaced it with far less trouble than initially envisioned. Should have done it earlier.
Your mileage may vary.
James
") .
.Pulling My Step For Repair
Hi Gang,
My RH step cracked a few months ago and I am finally starting the process of pulling it for repair. Would it be acceptable to cut a hole in the floor over the mounting block to access the retaining bolt instead of pulling the entire floor? My plan would be to cut about a 4"x4" square opening, install nut plates, and fabricate a panel to cover it. I am not that concerned that it is perfectly flush because the floor is carpeted. Appreciate any input.
lorne green
Well Known Member
Hi Gang,
My RH step cracked a few months ago and I am finally starting the process of pulling it for repair. Would it be acceptable to cut a hole in the floor over the mounting block to access the retaining bolt instead of pulling the entire floor? My plan would be to cut about a 4"x4" square opening, install nut plates, and fabricate a panel to cover it. I am not that concerned that it is perfectly flush because the floor is carpeted. Appreciate any input.
Even if you pull-riveted the floor, it would be faster to drill and re-install
the floor than to cut, fab and secure your two access panels. IMHO
PerfTech
Well Known Member
Hi Gang,
My RH step cracked a few months ago and I am finally starting the process of pulling it for repair. Would it be acceptable to cut a hole in the floor over the mounting block to access the retaining bolt instead of pulling the entire floor? My plan would be to cut about a 4"x4" square opening, install nut plates, and fabricate a panel to cover it. I am not that concerned that it is perfectly flush because the floor is carpeted. Appreciate any input.
Yes! Perfectly acceptable and it offers access later if desired. This is exactly what I did on my 9-A. I went to home depot aircraft parts a purchased a pair of stick on plastic circles intended to go on a wall to protect from door knobs. Worked great. Thanks, Allan..
Walt
Well Known Member
Obviously the floor is non structural, considering the rivets aren't.
I would suggest you ask Van's that question, my guess is the floors would be considered secondary structure and if you are going to modify them you need to treat them as such.
The RV12 is almost totally build with the same rivet so they are indeed being used in a "structural" application.
Last edited:
grayforge
Well Known Member
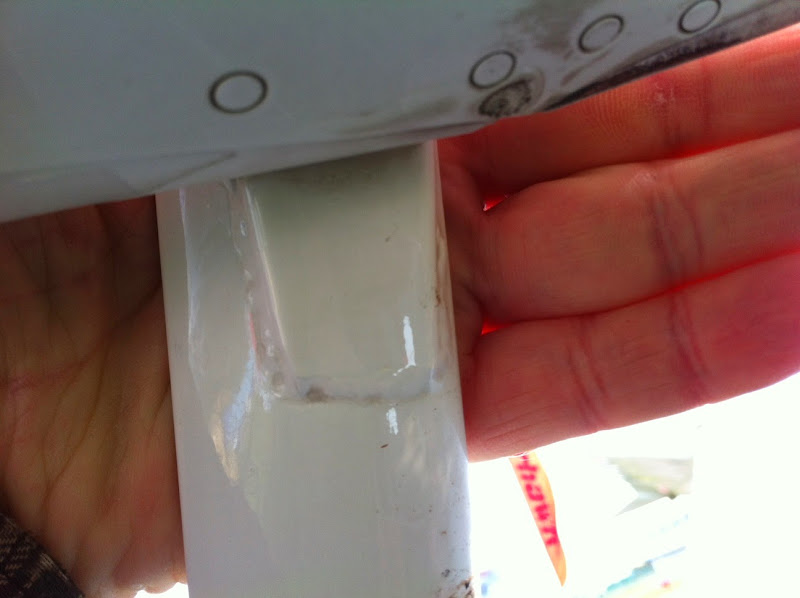
I was at Vans a month ago and took this pict of their step repair.
My steps will not fail but you may need this.
Bill, what did you do to ensure your steps won't fail?
Thanks,
Russ
Sam Buchanan
been here awhile
Thanks Allan. Maybe I'll try those! Obviously the floor is non structural, considering the rivets aren't. My floor has lots of flush rivets at the back bulkhead and the center tunnel, don't really want to drill them.
I consider the baggage floor in my RV-6 to be structural and an extension of the spar bulkhead structure. Just as Vans prohibits flight without the baggage bulkhead installed, I suspect they would feel the same about the baggage floor being compromised.
I wouldn't have any issues with adding an access port in the floor in my plane, but I would make it structural just as is a wing inspection port. But as has been stated, drilling out the pulled rivets is no big deal. I did it when I added a passenger step.
BillL
Well Known Member
Bill, what did you do to ensure your steps won't fail?
Thanks,
Russ
I am building a taildragger. I am sure that the A model steps could use a reinforcement like Vans and never fail.
I have been listening to a lot of talk about these steps for years and when I got the chance for a tour, I took the photo. Apparently they don't break now. Good luck in your reinforcement project.
NYTOM
Well Known Member
Bill I just found you post. Do you notice if the Vans repair had a second gusset on the front of the step also or just the one on the back side in the photo?I am building a taildragger. I am sure that the A model steps could use a reinforcement like Vans and never fail.
I have been listening to a lot of talk about these steps for years and when I got the chance for a tour, I took the photo. Apparently they don't break now. Good luck in your reinforcement project.
BillL
Well Known Member
Bill I just found you post. Do you notice if the Vans repair had a second gusset on the front of the step also or just the one on the back side in the photo?
I took this with my iPhone and the lighting was bad to get from the other direction, notice I used my had to ensure even contrast. Yes, the leading and trailing edge seemed to be blended back to the plate the same I don't know what they had on inside.
We had Sterling as the tour host. He answered every question we had with candor. I bet if you called him he could tell you, or would find out, if they did something on the inside (of the fuse) as well to reinforce that step. They have a TIG welding operation there on site for some of their weldments so I bet they did the welding there at the factory. Please post your findings as it has been painful watching all this talk for so long without a solution. I just hate to see such a simple thing not fixed.
NYTOM
Well Known Member
Thanks Bill, I will post any info I get. I want to be proactive on this continuing problem. Can't imagine finding a crack on a freshly painted plane then having to repair weld in place or have to drill out all those rivets.
Hoping maybe the gussets along with the damping sand will alleviate the problem for good.
Hoping maybe the gussets along with the damping sand will alleviate the problem for good.
A new wobble - joined the cracked step club
We discovered a crack yesterday in our adopted 9A's right step (about 350 hours on the airframe) - it was fine when getting into the airplane and wobbly when getting out after the flight.
Given the photos, thoughts on which of the following to do?
1. find someone to do a repair in place and then add sand a la Allan
2. remove, weld a repair, add sand, and reinstall
3. remove and replace with a new step, adding sand before install (looking at an earlier post, it looks like the step mounting flange doesn't come drilled. Besides drilling, would I have to shape the flange somehow?)
Another question - have any of these cracked steps fallen off in flight? We're planning a trip this coming weekend, and we won't be able to get much done before then. We'd plan not to use the step for the time being and just monitor the crack...and then it's condition inspection time in a couple weeks.
- Doug
step update
My 10-year-old 9A developed a crack in the right step about a year or two ago. I've just been keeping an eye on it. I rarely fly with a passenger, and don't think this could have been caused by anything except vibration.
Last weekend, I drilled a hole on the inner side about 8" up and put in a good handful of lead shot.
The difference is amazing. Before, when you "thumped" the step, it sounded like plucking a bass guitar string. Now, nothing. No vibration at all.
I went flying and a strange rattling sound I'd been trying to locate for the last year was gone as well. I'm assuming now it must have been the step vibrating.
I'm going to "drill and fill" the left side too. Hopefully it will never fail.
I'd consider this a mandatory fix for all new construction. Maybe using an epoxy slurry of shot to keep everything in place would be a good idea too.
David Paule
Well Known Member
Mode of Failure
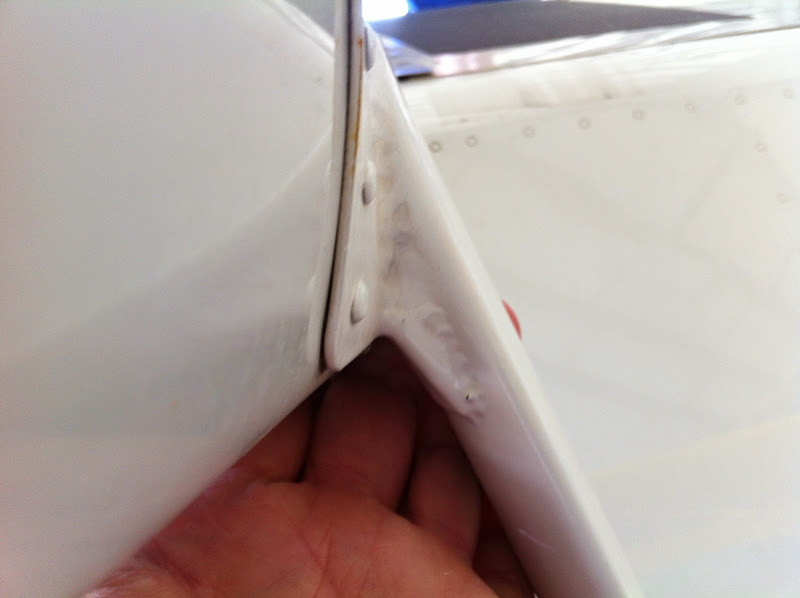
I'm pretty sure that the cracks are starting at that weld on the inside of the strut. That's a stiff spot. When the step is being used, the strut flexes inward there due to the bending moment. The section of strut shown above the finger here is much more flexible in bending than at the weld.
Since the strut as a whole is flexing inward, and the welded part resists that, the wall of the tube is highly stressed in local bending. That's what's causing the cracking. The stiff area is shown in this photo, and the flexing is in the skin immediately adjacent to the weld, as the strut bends inward:
While there are certainly several ways to solve this problem, my Cessna 180 suggests one approach. If the strut came out of the bottom of the fuselage instead of the side, the attachment fitting could be welded more across the cross-section. That would eliminate the local bending of the strut tube wall, as shown in the next photo where the attachment plate shown doesn't allow the sort of local bending that's causing this issue here.

For this one, the strut continues into the fuselage and is tied to other structure at the floor.
Caveat - I haven't analyzed or modeled the RV step that's cracking. I don't have one available.
Dave
I'm pretty sure that the cracks are starting at that weld on the inside of the strut. That's a stiff spot. When the step is being used, the strut flexes inward there due to the bending moment. The section of strut shown above the finger here is much more flexible in bending than at the weld.
Since the strut as a whole is flexing inward, and the welded part resists that, the wall of the tube is highly stressed in local bending. That's what's causing the cracking. The stiff area is shown in this photo, and the flexing is in the skin immediately adjacent to the weld, as the strut bends inward:
While there are certainly several ways to solve this problem, my Cessna 180 suggests one approach. If the strut came out of the bottom of the fuselage instead of the side, the attachment fitting could be welded more across the cross-section. That would eliminate the local bending of the strut tube wall, as shown in the next photo where the attachment plate shown doesn't allow the sort of local bending that's causing this issue here.
For this one, the strut continues into the fuselage and is tied to other structure at the floor.
Caveat - I haven't analyzed or modeled the RV step that's cracking. I don't have one available.
Dave
Last edited:
I've had a couple other folks agree with Taildrgr's recommendation to break off the step until a good fix or replacement can be made. One very good additional suggestion was to take several photos before breaking it off so that the welder understands the geometry (assuming we try to go the repair route, rather than the replace route).
But I'll take a night cooling off period before committing to this course of action...
- Doug
But I'll take a night cooling off period before committing to this course of action...
- Doug
BillL
Well Known Member
I've had a couple other folks agree with Taildrgr's recommendation to break off the step until a good fix or replacement can be made. One very good additional suggestion was to take several photos before breaking it off so that the welder understands the geometry (assuming we try to go the repair route, rather than the replace route).
But I'll take a night cooling off period before committing to this course of action...
- Doug
There is a picture earlier (BillL post) of how Vans fixed their step. I took some more Monday at OSH. I will send to you if you want. I did hear, but did not confirm, that Vans is now offering a reinforcement patch from the factory for this purpose. Maybe bad timing for you, with a large part of the Vans crew being gone, but a call could not hurt. It is just not that fancy, so with the earlier picture and a little 4130 sheet, you should be good with your welder. Please post your fix for others.
I just now called Van's, and I asked about the reinforcement patch. They checked, and it's not available for sale. Thanks for the suggestion, though - it was indeed worth asking.
This morning, I went out to the airplane to see if I could readily remove the step. I pretty much just lifted up on the step and wiggled it slightly - it came off in no more than 10 seconds. I'm glad I took it off before it came off. Just to repeat from my first post, the step felt completely normal until the last time a passenger (a light passenger) deplaned, when she reported it moving under her weight. So the crack on the inside, which had been there for an unknown time, propagated rapidly when it went.
Here are a couple photos:
rightrudder
Well Known Member
Yes! Perfectly acceptable and it offers access later if desired. This is exactly what I did on my 9-A. I went to home depot aircraft parts a purchased a pair of stick on plastic circles intended to go on a wall to protect from door knobs. Worked great. Thanks, Allan..
Hey Allan,
If Van's doesn't make one, I think there would be a market for a pre-cut, pre-formed step gusset. Each step is a little different, so of course a little fitting would be required.
CanadianAce
Member
It's more than just one thing. Why the steps fail.
Hi All,
I've been lurking around the forum for a while and have been reading a lot about this particular issue. Some very well informed people have made some interesting observations and comments. It's my opinion that the issue may not be any one culprit, but a cumulation of several issues with the materials and construction, geometry, and use. Here are my thoughts:
1. The steel connection has two things working against it; residual tensile stresses, and thermal hardening from the welding process. Welding creates stresses in the material as a result of the heating and cooling process. These residual stresses result in a zone of internal compression and tension in the welded element. The residual tension stresses occur at the weld - this is an important factor in compression fatigue failures. The thermal hardening causes the material to gain strength but lose ductility. The result is failure is brittle and occurs more suddenly.
2. Geometry is an issue as the location of the failure is in a notch, formed by the mounting plate and step strut; this is a stress riser. The welds interface angle to the tube also can create a notch stress riser here exasperating the problem.
3. The steps hang down so you can put your weight on them while getting in or out. And hanging down in the prop wash means they are subject to those forces. Both these action would cause oscillation of the step. The former creates a high load - low frequency movement, the latter a low load - high frequency one. I believe this is why some fail before startup, and others after hundreds of hours of service. Since people weigh different amounts, and step (or jump) on the steps differently, the high load scenario can have forces that vary significantly resulting in different failure rates. Both scenarios oscillate the step and lead to fatigue.
This is a fatigue failure. Compression fatigue cracks like these breed in residual tension zones, with high compressive stresses (amplified by notches), and oscillating motions. The brittle (non-ductile) material makes things worst by not yielding, increasing the crack propagation rate (the material strength is higher, but does not exceed the stresses).
There are three ways to fix any structural problem: change the material, the geometry, or the loads. Since the steps are steps and carry people loads on them, and steel is a good material choice, the geometry is the best thing to change. We see this in the Van's demo plane, with the addition of a bracket to support the connection (it also eliminates the notch). This needs to extend down the step strut far enough that the forces induced under load are less than the failure stress.
Well that's my 2-cents on this issue. I am surprised Vans has not come out with an official fix or improved part. They appear to have employed one on their demo plane - why not spread the love? I want a RV-7 anyways, so no need for steps - they just slow you down!
Cheers,
CanadianAce
(Lurker now - Builder later)
BillL
Well Known Member
New Picture from OSH - Now - -you guys order some 4130 strip from Spruce for a few bucks, take your step, 4130 strip, and these pictures to a local welder and get those steps fixed! Or do it yourself.
****update: it was reported that Vans made the reinforcement piece from 4130 channel. This would be easier if it was available.****
****update: it was reported that Vans made the reinforcement piece from 4130 channel. This would be easier if it was available.****
Last edited:
bkilby
Well Known Member
Thickness and width of 4130 material for step repair?
Can anyone tell me what thickness and width of the 4130 to order? My right step has cracked as well after about 150 hours and need to get it repaired.
New Picture from OSH - Now - -you guys order some 4130 strip from Spruce for a few bucks, take your step, 4130 strip, and these pictures to a local welder and get those steps fixed! Or do it yourself.
Can anyone tell me what thickness and width of the 4130 to order? My right step has cracked as well after about 150 hours and need to get it repaired.
rightrudder
Well Known Member
Here's a pic of what I had done to mine. The gusset is a bit longer/wider than the Van's version, and there's a triangular void that I filled with scrap aluminum and JB Weld for cosmetic purposes, but I think it'll do the trick. I really don't want to do the steps a second time!


BillL
Well Known Member
Here's a pic of what I had done to mine. The gusset is a bit longer/wider than the Van's version, and there's a triangular void that I filled with scrap aluminum and JB Weld for cosmetic purposes, but I think it'll do the trick. I really don't want to do the steps a second time!
Doug, beautiful work, up to a point. Why not just make the triangle from 4130 and weld it in there to finish a fully steel part? Then thousands of A owners will copy your design.
rightrudder
Well Known Member
Yeah, it's a little unfortunate that the gusset didn't extend into the void. I made a rough template from cardboard that I supplied to the welder and figured he'd finesse the rest of it. Oh well, I should've been more explicit. If I could weld myself, I'd definitely put in another piece of chrome moly.
I agree that someone should make/sell a preformed gusset. Had they existed, I would have gladly paid $20 or $30 for a pair.
I agree that someone should make/sell a preformed gusset. Had they existed, I would have gladly paid $20 or $30 for a pair.
Last edited:
bkilby
Well Known Member
My Fix...
Here's a pic of my crack after only 150 hrs or so on the passenger side.
 [/URL][/IMG]
I bought a 2" wide strip of .050 4130 from Aircraft Spruce. We cut an end off of the strip, so the strap we welded on the back of the step is 2" long and slightly smaller than the width of the step. I took a hammer and tapped the strap to make it fit the curvature of the step. The welder repaired the crack.. then ground it down and welded the strap to the back. Haven't painted yet and took this pic right after the work. When he ground the paint off, we found the crack and started around the front side of the step.
 [/URL][/IMG]
Here's a pic of my crack after only 150 hrs or so on the passenger side.
I bought a 2" wide strip of .050 4130 from Aircraft Spruce. We cut an end off of the strip, so the strap we welded on the back of the step is 2" long and slightly smaller than the width of the step. I took a hammer and tapped the strap to make it fit the curvature of the step. The welder repaired the crack.. then ground it down and welded the strap to the back. Haven't painted yet and took this pic right after the work. When he ground the paint off, we found the crack and started around the front side of the step.
Last edited:
bkilby
Well Known Member
Did he weld the step while it was still attached to the plane?
Yes he did. I kept a wet rag handy to cool down the fuselage in case it was needed but it really wasn't. That's the only thing I was worried about was the fuselage being so close but it turned out fine.
Ottertrack
Member
step stool
Could you 7A owners measure how many inches from the ground to the wing? I've been debating with myself for a long time about not installing steps on my 7A and just use a folding step stool. Could a 5' 10" guy just take a rather large step up on the wing? I'm at the point in my center section assembly where I must make a decision, step or step stool. Also, I wonder if a step could be designed using the same steel as the landing gear. I doubt that would crack.
Could you 7A owners measure how many inches from the ground to the wing? I've been debating with myself for a long time about not installing steps on my 7A and just use a folding step stool. Could a 5' 10" guy just take a rather large step up on the wing? I'm at the point in my center section assembly where I must make a decision, step or step stool. Also, I wonder if a step could be designed using the same steel as the landing gear. I doubt that would crack.
Could you 7A owners measure how many inches from the ground to the wing? I've been debating with myself for a long time about not installing steps on my 7A and just use a folding step stool. Could a 5' 10" guy just take a rather large step up on the wing? I'm at the point in my center section assembly where I must make a decision, step or step stool. Also, I wonder if a step could be designed using the same steel as the landing gear. I doubt that would crack.
5'10" here...left out the steps. No problem getting up on the wing in my 7A. I use a small, collapsible stepstool (Rhino) for passengers.
I didn't like the looks of the steps, didn't want the drag, and certainly didn't want the hassle of dealing with cracked steps.
one step...
A single step may be a good compromise. Half the weight and drag penalty. Works for many of the certified low wings. Prevents the problem of smacking the tail into the ramp if both pilots step on the steps at the same time.
Based on data observed here, it appears that the step fatigue issue is related to resonance with the roll frequency of the engine. Filling the bottom tube half full of loose sand adds damping and prevents the fatigue. No conclusive data yet.
When I was younger I could mount the wing w/o a step, as the knees get older I am glad for the step, especially after long flights.
Mine too.
I noticed when I stepped down from the RV-10 yesterday that the weld is cracked around the top. I'm beginning to think I had a beginner welder on my airplane. I weigh less than 200 pounds and have been the primary person to use it.
Vic
I noticed when I stepped down from the RV-10 yesterday that the weld is cracked around the top. I'm beginning to think I had a beginner welder on my airplane. I weigh less than 200 pounds and have been the primary person to use it.
Vic
RV10inOz
Well Known Member
Vic, you and I are chasing each other around the maintenance world
About a year ago I ordered a new RHS step and two stall switch kits to make a hatch out of in the baggage area.
We did the install, and when I removed what appeared to be a crack around the weld, we did a dye test. No crack. I hate that!!
So about 8 moths later (June) we found a crack underneath. Repainted the old step and put it back in.
I have not done a dye test on the second step but the visual inspection is looking far more convincing.
The funny thing is like you I use the step on the LHS a lot, as you know we do a lot of flying. But it is fine, it is the RHS that cracks. Or the powder coat/paint cracks. Possibly from people bouncing on and off the step, like I see my staff do at times.
In any case one of my -10 friends down here did actually have one break off.
About a year ago I ordered a new RHS step and two stall switch kits to make a hatch out of in the baggage area.
We did the install, and when I removed what appeared to be a crack around the weld, we did a dye test. No crack. I hate that!!
So about 8 moths later (June) we found a crack underneath. Repainted the old step and put it back in.
I have not done a dye test on the second step but the visual inspection is looking far more convincing.
The funny thing is like you I use the step on the LHS a lot, as you know we do a lot of flying. But it is fine, it is the RHS that cracks. Or the powder coat/paint cracks. Possibly from people bouncing on and off the step, like I see my staff do at times.
In any case one of my -10 friends down here did actually have one break off
.Definite crack
Mine was a definite crack almost all the way across the top weld. When you stepped on it it opened up. The right side looks OK. I took off the left side last night, a neigbor TIG weleded it, and I hope to paint it today.
Vic
Mine was a definite crack almost all the way across the top weld. When you stepped on it it opened up. The right side looks OK. I took off the left side last night, a neigbor TIG weleded it, and I hope to paint it today.
Vic
grubbat
Well Known Member
New steps
I have a set of new steps that I didn't install on my build sitting in a box in my basement. Since there appears to be a hormonics issue with VANS original design, I thought about cutting an inch or two off and tig welding them back but never got around to it.
I have a set of new steps that I didn't install on my build sitting in a box in my basement. Since there appears to be a hormonics issue with VANS original design, I thought about cutting an inch or two off and tig welding them back but never got around to it.
wirejock
Well Known Member
Steps
Mine are still in the fuse crate. Several here have posted crack issues on planes under production with no engine running so it can't be harmonic vibration alone. I plan to modify mine before install. How? No idea but Sweetie is 4'-10" and I am 5'-6" so the steps are necessary.
I have a set of new steps that I didn't install on my build sitting in a box in my basement. Since there appears to be a hormonics issue with VANS original design, I thought about cutting an inch or two off and tig welding them back but never got around to it.
Mine are still in the fuse crate. Several here have posted crack issues on planes under production with no engine running so it can't be harmonic vibration alone. I plan to modify mine before install. How? No idea but Sweetie is 4'-10" and I am 5'-6" so the steps are necessary.
The fix to the Vans aircraft for the step was described to me as a cut and fitted piece of SQUARE TUBE, not a 4130 strip... welded in place as noted in the photos from posts 126 & 127. Not too sure if using a cut piece of square tube would make much of a difference as opposed to a strip.
Victor
Victor
BillL
Well Known Member
The fix to the Vans aircraft for the step was described to me as a cut and fitted piece of SQUARE TUBE, not a 4130 strip... welded in place as noted in the photos from posts 126 & 127. Not too sure if using a cut piece of square tube would make much of a difference as opposed to a strip.
Victor
Thanks for that note, I did not know they used a square to begin. I just said strip assuming it would be straight forward to bend it to match the dimensions. I will add this comment to the picture posts to make it easy for people to put the comments together. I have torches, TIG, hammers etc to do fabrication, so it was not considered a hurtle, but square stock would certainly be easier if on hand.
bruceh
Well Known Member
I was under my RV-9A tonight cleaning the belly and lo and behold, the passenger side step has a small crack. This is at 183 hours.
Does anyone have a definitive protocol for getting this fixed. I haven't painted the airplane, so pulling them off and reinstalling them should be fairly easy.
Sounds like someone out there could be making some $$ by offering an aftermarket reinforcement for these steps.
Does anyone have a definitive protocol for getting this fixed. I haven't painted the airplane, so pulling them off and reinstalling them should be fairly easy.
Sounds like someone out there could be making some $$ by offering an aftermarket reinforcement for these steps.
Install a new one
Very common problem. My passenger side cracked after a few hundred hours on my 9A.
I purchased a new one but before I installed the new one I had the local A/P weld a strengthening gusset on the back side of the step where it always cracks.
Eventually the pilot's side step cracked as well and I did the same on that side. I sold the airplane with over 1000 hours on it and the reinforced steps remained intact.
Anyone that is building a 7 or a 9 should weld a reinforcement on the back side of both steps before they install them and they should be good to go.
(L) foot back rather than (R) foot forward?
Perhaps this has been mentioned before but all the 6's & 7's I have seen with cracked passenger steps were on aircraft where passengers routinely faced towards the rear of the aircraft and stepped down when exiting instead of facing forward and backing out by placing their left foot on the step.
Has anyone else observed this correlation?

