What's new
Van's Air Force

Don't miss anything! Register now for full access to the definitive RV support community.

Infinity Grip Install, can't get it closed up!

moespeeds

Well Known Member
Friend
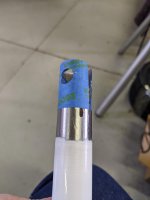
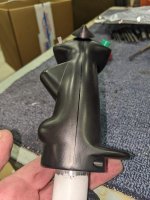
I'm struggling to get this Infinity Grip closed up all the way. I'm 100% sure no wires are pinched. I reduced the bundle size because I removed 2 of the buttons I wasn't using. I also ran all of the wires out of the trigger hole so they were no factor, and same issue. I can get it to close all the way at the bottom, so it must be too fat at the top of the stick? Grip closes up just fine with no stick in there.

All powdercoat/primer has been removed from the stick.

RV8 stick.

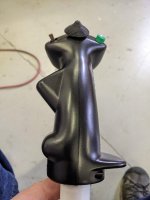
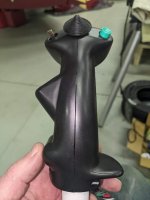
Keep reducing the OD of the stick at the tip, or start cutting away at the inside of the grip?

**EDIT: In the photos it looks like there might be something stuck in there about 2/3 of the way up the stick. That's actually just light shining back through the open trigger "window" as the trigger is not installed in these photos. I am 1000% sure no wires are pinched.
 

Attachments

  • PXL_20220330_000254853.jpg
    PXL_20220330_000254853.jpg
    208.3 KB · Views: 144
  • PXL_20220330_000236388.jpg
    PXL_20220330_000236388.jpg
    306.5 KB · Views: 139
Last edited:
I had exactly the same problem on my RV-6. It bothered me a little at first but I learned to live with it and now I never think about it.
 
A crazy thought but how about removing some of the inside of the Infinity grip. Maybe use some sand paper 60-80 grit.
I used them on my 7A but do not remember having trouble, but that was a while ago.
 
Someone suggested I use grease to figure out where I needed to trim. Took that a step further and wrapped painter's tape over the end, installed the grip tight, then ground on the stick and grip where it was clamping.

Worked perfect. Also hot glued the wires inside so they don't get pinched.
 

Attachments

  • PXL_20220330_204845366.jpg
    PXL_20220330_204845366.jpg
    145.8 KB · Views: 107
  • PXL_20220330_210204508.jpg
    PXL_20220330_210204508.jpg
    174.5 KB · Views: 116
  • PXL_20220330_215350510.jpg
    PXL_20220330_215350510.jpg
    368.3 KB · Views: 113
Last edited:
Moe,

Personally, I really like the Infinity grips. But, they are a tight fit, don't rush. My experience is if one snaps together on the first attempt; you might consider buying a lottery ticket.

The alignment of the two halves needs be exact. Separated there is enough flexibility to get a slight twist that will interfere with mating together. Make sure the tube is lined up with the socket, and there in no twist between the two sides. If the alignment is off the mid point screw lugs will bind in the hole in the tube and prevent complete closure. The bore alignment of the hole in the tube is important as well.

Its very easy to miss a stray wire where they thread into the slot. It can be hard to spot one that is out of place. I just finished mounting a grip where one wire would move out of place as I joined the two halves obscuring view of the wires. It took three or four tries to finally catch it move between the tube and grip socket. Use small zip ties to help keep wires bundled. A 17 wire cable brings a lot of stray cats to the party. They will jump around as you move the halves together.

Also, the switches at the top of the grip can be a problem. The Hanoi hat and PTT only nest. If either moves slightly the halves won't engage completely. I often mate the halves without the trigger lever to reduce the number of pieces that need to be aligned. This also provides some access to use a awl or screw driver to adjust the switch body into the nest. Then open the top front just enough to maneuver the trigger in place. There is a tab at the bottom of the trigger, I suggest inserting it first then opening the grip just enough to wiggle the pivot lugs in place. I use a spring clamp to hold grip socket on the tube and allow for opening the top. If you thread one pivot lug at a time, opening the halves about 1/8" usually works.

Cheers.
 
I hot glued the trim hat and the PTT switch in place, along with the wires at the top to keep them clear while closing. This helped tremendously. Once I used the tape trick, getting it trimmed to close was a piece of cake.

Also, do not clean the stick with any type of solvent! I eliminated the 2 lower switches, then glued plugs into the holes using black RTV. I used 91% rubbing alcohol to clean off some RTV I got on the stick, and it instantly took off whatever finish is on there. It's now a chalky grey stain on the stick. I was really surprised this happened, but the sticks must be painted or something. That was my only real disappointment so far.
 
Back
Top