What's new
Van's Air Force

Don't miss anything! Register now for full access to the definitive RV support community.

Checkoway Flap Hanging Method

Stalldog

Well Known Member
I've looked everywhere here and on the web and can't find this specific method, although I've seen several references to it and a few blogs that used it with good success. One of the links I found is no longer valid, like most of the Checkoway links.

Does anyone have a copy of the method he used for hanging the flaps? I know it involved using temporary oops rivets.

Thanks
 
Maybe I Figured It Out

Well, maybe I've got it. It looks like I use the oops rivets to hold the bottom skin and the flap brace together while locating the flap and drilling the hinge.
 
Temporary rivets

Any rivet will do. Pre squeeze some number 3's until they fit tight in the holes. Insert them from the skin side until they are flush with the bottom of the brace. Takes a few tries to achieve the correct diameter.
 
Pre-squeezed rivets

I'm at the same point. How many of the pre-squeezed are used and are they instead of clekos or in addition?
 
Pre-squeezed rivets

I'm at the same point. How many of the pre-squeezed are used and are they instead of clekos or in addition?

I don't know anything about the "Checkoway method" so I cannot address that method.

When you start the head scratching process associated with mounting the flap it soon becomes apparent that you need to hold the brace and skin together during this operation, lest you goof up. I clecoed the skin and brace together to get correct alignment and then installed pre-squeezed rivets in every third hole, give or take. I used -4 or -5 length rivets, pre-squeezed just so, and installed them until flush with the bottom of the brace. Using longer rivets will allow you to install and remove them with a small pair of Vise Grips or something similar. In other words, you want to be able to get pliers on the factory heads.

There may very well be better methods, this is just what I did and it worked well for me.

On a side note, I think I ran into edge distance issues on the hinge and ordered wider hinge material. You might watch the edge distance on your hinges as you work to achieve trailing edge alignment.
 
Tip

I don't know anything about the "Checkoway method" so I cannot address that method.

When you start the head scratching process associated with mounting the flap it soon becomes apparent that you need to hold the brace and skin together during this operation, lest you goof up. I clecoed the skin and brace together to get correct alignment and then installed pre-squeezed rivets in every third hole, give or take. I used -4 or -5 length rivets, pre-squeezed just so, and installed them until flush with the bottom of the brace. Using longer rivets will allow you to install and remove them with a small pair of Vise Grips or something similar. In other words, you want to be able to get pliers on the factory heads.

There may very well be better methods, this is just what I did and it worked well for me.

On a side note, I think I ran into edge distance issues on the hinge and ordered wider hinge material. You might watch the edge distance on your hinges as you work to achieve trailing edge alignment.

Thanks Robert.
I already squeezed a bunch and it looks like it will work. Hinge material arrives next week. I ordered both standard and wider just in case.
 
Uh Oh!

I dunno, Robert, bucking these rivets for a presqueeze is REALLY HARD unless I use my teeny tiny bucking bar and miniature rivet gun! :D Of course, I could be doing something wrong!!! :rolleyes:

Checkoway method involves drilling some extra holes for oops rivets, so I'll try the "Williams method" first. Thanks.
 
Dan does not seem to play here much anymore but I'm sure we can get the documentation to you if you still need it. :)
 
When you start the head scratching process associated with mounting the flap it soon becomes apparent that you need to hold the brace and skin together during this operation, lest you goof up. I clecoed the skin and brace together to get correct alignment and then installed pre-squeezed rivets in every third hole, give or take. I used -4 or -5 length rivets, pre-squeezed just so, and installed them until flush with the bottom of the brace. Using longer rivets will allow you to install and remove them with a small pair of Vise Grips or something similar. In other words, you want to be able to get pliers on the factory heads.

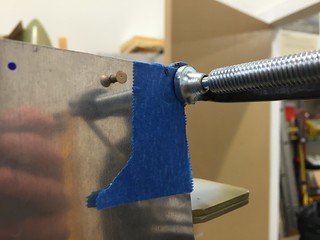
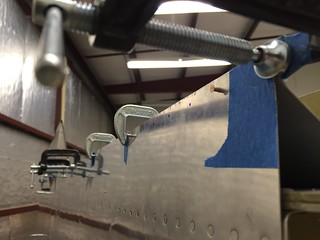
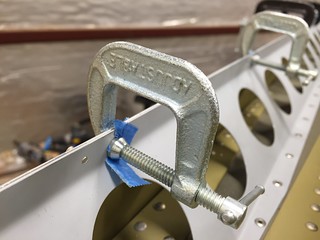
Head scratching is right, hah. I happened to read this thread a couple days ago - so timing was great - and started hanging my left flap tonight. We used this method and did it ever simplify things - thanks!

We started in the middle of the flap hinge, broom handle pushing against the back side of the hinge material to make sure it was flush and to get the first few holes drilled and clecoed, then just let the clecos do their job clamping as we went. One benefit of pre-drilling and lightly-squeezed-rivet-holding is being able to see that hinge material pulled up behind the holes you've already drilled in the skin and brace material, and then just match drilling through the hinge layer. Put in a cleco and move onto the next one. Went quickly and smoothly. Pretty sure I followed the method at least somewhat.

16290561822_a0ef6f084d_n.jpg
15671529023_fe4c397e54_n.jpg
16105544047_6d7b6e5dab_n.jpg
 
Last edited:
For what it's worth, I recently had success hanging my flaps by using proseal instead of temporary rivets to "glue" the flap prace and skin together before drilling the flap hinge. I just cleaned up the two mating surfaces, brushed on a thin coat of proseal and cleaco'ed them together until the proseal set. I was then able then to clamp the flap into place and drill. Worked for me...

And for what it's worth, I also had to buy the next size larger hinge to get adequate edge distance on the wing side. Looking back that was because I installed the flap half of the hinge according to the plans. If I'd had the foresight to set the hinge pin just a smidge farther from the flap skin edge, I'd have had enough room for proper edge distance on the wing side.
 
Back
Top