What's new
Van's Air Force

Don't miss anything! Register now for full access to the definitive RV support community.

Feeling like an idiot, can't seem to get these rivets right!!!

uuacallis

Member
Hello,
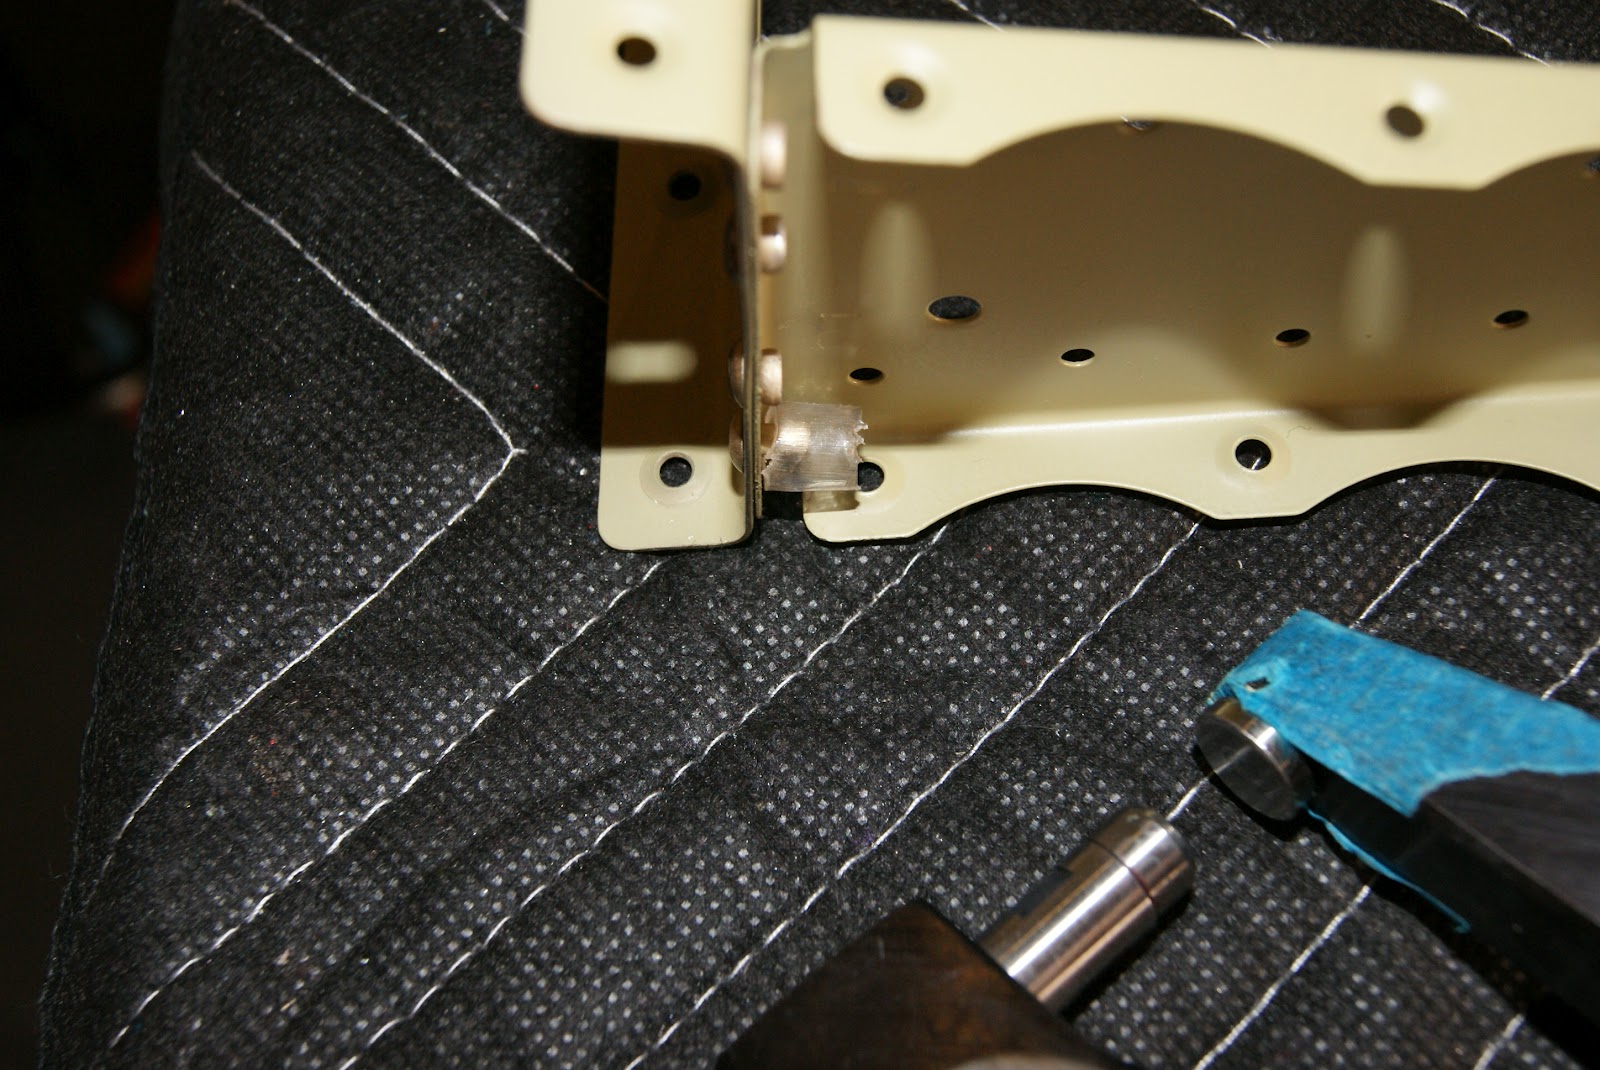
So I am working on the empennage kit, specifically in the tail cone section and trying to get these rivets right and no matter what I do it appears that I am forcing the rivet to expand in between the sheets of metal being riveted.

It isn't more then a 16th of an inch, more like a 32nd. I have tried drilling them out and using a vice grip to hold the metal together without much luck.

Looking for advice as to

1 - Is this normal (I suspect no, but just in case)

2 - Is this acceptable and safe or is this a MUST drill and re-do error?

3 - How to avoid this?

(Note, I have been diligently de-burring and clearing out chips and I always have a cleco on both sides of a hole that I am riveting to hold it in place.

Any help here would be great as I need to get this tail cone done this weekend as the wings are arriving via freight on Monday.

See the attached photos -

Side view:
side_view.jpg


Top View:
top_view.jpg
 
What part #s

Exactly what part numbers and page number in the plans are you on? Are you sure you have the correct rivet? What are you using to squeeze the rivet?
 
I had the same issue visit me at the beginning. When I made a point of always installing the rivets with the manufactured head on the side of the thinnest material, the problem went away.
 
Page 10-02 Step 10

The part numbers are

f1210A-L & R with f1210b & c

On page 10-02 step 10

When I watch the home built help video it shows the manufactured head on the side with thicker metal. Are you guys saying it can be the other way around?

Do you guys think a rivet gun and bucking bar would be easier?
 
That's the f-1210b attached to both f-1210a-l & r, page 10-02 figure 4.

Xoverzero has it right...manufactured head on thinnest part will help a lot.

I fixed my rivet squeezer in a vise so I could stabilize piece being assembled.

A little practice and you will be fine.
 
From a structural standpoint the rivet should be just as strong regardless of which side the shop head is on, so orient them to suit your purpose.
 
Practice

Cleco everything up and adjust rivet squeezer to fit and take your time. Support your work while squeezing.
 
You did not say if you ensured that the parts were firmly pressed together before the riveting. The photos don't give a clear rendering. I have been bitten a couple of times by thinking the clecos had sufficient clamping forces. I have a few of those screw/clamp clecos for additional clamping force. I have a few pair of c-frame vice grips too to help with this.

+1 on advice above.

Happy riveting.
 
Adam,

The method I use to get parts to fit tight is:

Insert rivet

Place a piece of Tygon tubing over the straight section of the rivet about twice as long as the rivet sticking through.

When you squeeze the rivet, the tubing will squeeze the parts tight before the tool starts to set the rivet.

This saves a lot of time when doing thin parts.

Do a search for my pervious posting " Improvements to the Avery Rivet Squeezer "

When you go to the photos, there will be a photo of the tubing in use.

Hope this helps.
 
For the tubing, is that just like air tubing for a fish tank or something I can acquire from Lowes / Home depot?


Adam,

The method I use to get parts to fit tight is:

Insert rivet

Place a piece of Tygon tubing over the straight section of the rivet about twice as long as the rivet sticking through.

When you squeeze the rivet, the tubing will squeeze the parts tight before the tool starts to set the rivet.

This saves a lot of time when doing thin parts.

Do a search for my pervious posting " Improvements to the Avery Rivet Squeezer "

When you go to the photos, there will be a photo of the tubing in use.

Hope this helps.
 
Adam,

RFSchaller is correct in that, structurally the direction of the rivet does not matter.

BUT, John is more on point. Put the manufactured head on the thinner material.

Because, as I understand it:

When the rivet is squeesed or driven, its shaft radially expands to fill the bore of the hole. This radial expansion is rather strong.

The force of the radial expansion for a dash 4 rivet (1/8inch) can easily pucker thinner alumin sheet. This pucker can, and in your case is, separating the parts.

Placing the manufactured head on the thinner sheet reduces the pucker.

Additionally, the pucker can also be reduced by not setting, that is over setting, the rivets so strongly.

Don't ask me how I found this out. I deny ever doing what you have described.

-Dave
 
Last edited:
Strange

Adam, I'm just about through with my wing kit and have never experienced the same problem. Trust me, I'm no expert at riveting, and have had to drill out many over the past two years, but again have never had your problem. Only thing I can figure is maybe your cleco's aren't holding well enough when you rivet plus not putting the manufactured head (and the rivet gun) on the thinnest material. Or, maybe your gun pressure is too high??? Using the squeezer I've driven from both sides of the tool and still not had your problem. Like others have said, clamp tightly, put manufactured head on the thinnest side, and take your time.

I'd be interested in knowing how you manage to stop this, as I'm sure I'll see it sooner or later. :rolleyes: Good luck!
 
Adam,

The tubing is a clear kind of rubbery tubing. I have seen it used in fish tanks. You will need 3/32 id and 1/8 id.

I ordered the Material from McMaster Carr an industrial supplier.

You can order from them and they will ship in a day or two.

The 3/32 material is at: http://www.mcmaster.com/#standard-plastic-and-rubber-tubing/=q3kcql and is Part number 5233K92 A few feet will do.

The 1/8 material is at: http://www.mcmaster.com/#standard-plastic-and-rubber-tubing/=q3kdwu and is part number 5233K52

I was unable to find this small diameter tubing at the local hardware store.

Give me a call at 925-455-9954 tomorrow if you have additional questions.

I can also e-mail you more photos.
 
When I watch the home built help video it shows the manufactured head on the side with thicker metal. Are you guys saying it can be the other way around?

General technique is manufactured head on thinner metal. For one thing, you are more likely to mess up the piece of metal under the manufactured head if you need to remove the rivet and the thinner piece is often the easier and cheaper to replace ( don't ask how I know so much about removing rivets ).

Structurally "the rivet does not know which way it is going."

Van's will tell you when there is a need for a specific directionality for the rivet, else it is builder preference.

So 1) Van's tells you which way. 2) Easy to rivet and remove either way, manufactured head on thinner piece usually. 3) Would be really hard to remove rivet one way, consider manufactured head on side with drill bit access. 4) Only able to rivet one way well then yes.

If you get really good at removing rivets then the stress level goes way down.

If the two pieces are held solidly together (no gaps) and you press firmly down on the manufactured head (use gravity) continuously while squeezing there should not be a gap when you are done.

Jeff, about 11,000 rivets and not counting!
 
Adam,
I could show you a picture of the same parts riveted together with the rivets oriented like yours that had the same problem. :mad:

I tried drilling and redoing, but the rivet holes in the frame pieces were distorted which wouldn't let the pieces come together. My solution was to order all new pieces and, like has been suggested, rivet with the manufactured head on the thin (frame side) material. No more problem. Lesson learned.

Jim
 
Adam,

A photo is worth a thousand words.
DSC02181.JPG


If you place a small piece of vinyl tubing cut slightly longer than the rivet over the shaft of the rivet it compresses the parts tightly while squeezing the rivet and makes for a tight joint. The tubing can be obtained at most any big box or small hardware store.

As others have mentioned, first choice (if possible) is to place the factory head of the rivet on the thinner material being riveted. Unless the plans specifically say otherwise, this is a good practice to follow.

Apply a slight pressure to the head of the rivet while squeezing it to help keep it flush to the surface being riveted as the rivet begins set.

Happy Building,
 
Adam,

Apply a slight pressure to the head of the rivet while squeezing it to help keep it flush to the surface being riveted as the rivet begins set. (Does not allow the rivet to lift and keeps the pieces together).

Happy Building,

I found this to be the key. Never used the poly.
 
Turning rivet around resolved immediate issue

So I went ahead and turned the rivet around (putting the manufactured head on the thinner metal) and it worked perfectly!

I did also acquire some tubing so I can use it as required.

Thanks All!
 
So I went ahead and turned the rivet around (putting the manufactured head on the thinner metal) and it worked perfectly!

I did also acquire some tubing so I can use it as required.

Thanks All!

That's good to hear Adam. One of these days I'm going to drill out the rivets on my.................ahem.............."extra frame" and see if I can salvage it.

Jim
 
Back
Top