BrettShaffer
Member
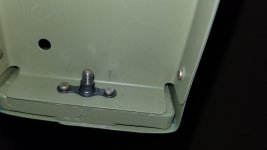
So I'm at the last part of the rudder, section 7-12 step 3. Instructions refer to section 5.16 about nutplates which basically states various ways to accomplish getting a flush rivet in a small nutplate including modifying a dimple die, using a different rivet, etc.
I managed to get the nutplate dimpled for a size 3 flush rivet. But no where does it say to dimple the flange of the skin. I called Vans to confirm and they said to dimple the flange. So I went ahead and dimpled the flange, only to realize that it creates an issue with how the counterweight lays on the flanges. There is no corresponding countersink specified in the aft end of the counterweight. I must be missing something here. Any suggestions?
I managed to get the nutplate dimpled for a size 3 flush rivet. But no where does it say to dimple the flange of the skin. I called Vans to confirm and they said to dimple the flange. So I went ahead and dimpled the flange, only to realize that it creates an issue with how the counterweight lays on the flanges. There is no corresponding countersink specified in the aft end of the counterweight. I must be missing something here. Any suggestions?