I am nearing this task and have been looking at build sites and reading about the process and I think I have a pretty good grasp on the important parts of this process. One thing eludes me though. Is there somewhere in the plans for the 8 that gives the dimensions for the bending form? I understand some of the later models have the dimensions on the plans. If there are no dimensions available, am I on the right track thinking I can fit up the elevator skin to the spar and just take my measurements from there and construct my form from my own measurements?

Van's Air Force
You are using an out of date browser. It may not display this or other websites correctly.
You should upgrade or use an alternative browser.
You should upgrade or use an alternative browser.
Bending the elevator trim tab
- Thread starter xblueh2o
- Start date

N546RV
Well Known Member
I assume when you say "bending form," you're referring to the blocks, correct?
If so, I don't think there's anywhere in the plans that provides dimensions. As I recall, I used the root rib as a guide when I cut my block; that should give a good approximation of the trailing edge angle. And truth be told, it's not critical that the block exactly match the angle of the trailing edge.
And just so you don't make the mistakes I made, I think the two essentials for this operation are using good hardwood for the blocks and good double-sided tape to make sure the thing doesn't move. I used carpet tape from Home Depot. My first attempt at a bend ended up nasty because I tried to use MDF blocks and masking tape. With hardwood and carpet tape, the bends looked much better.
tweiss
Active Member
Notice tkatc went outside of the call out sequence. I went with the call out sequence where Van's wants us to bend the trailing edge first.
The winner of that round goes to tkatc!
Look how nice and open his work area is for bending the ends. Not so nice and leisurely following the plans on this particular item as I did.
Lot's of people who have passed this point on their build recommend ordering two tab skins. I personally would be DAYS ahead if I would have done that. Many hours spend w/ chin in hands, staring........... at the parts. Once I began to drill the first hinge hole and get moving it went pretty fast. Now if I could just do it again, it would be perfect. What I have looks like it will work out OK, but their may be a new skin and hinge in this -8's future.
Tom
I strongly recommend following TKATC's method!!!
My first attempt as per Van's with the blocks and tape ended "OK", but looks like a thousand years old, dented and increased the gray in my hair...
I ordered a new one and can't wait to redo it.
Tony's method looks so easy, it could be outlawed...!!!")
My first attempt as per Van's with the blocks and tape ended "OK", but looks like a thousand years old, dented and increased the gray in my hair...
I ordered a new one and can't wait to redo it.
Tony's method looks so easy, it could be outlawed...!!!
N546RV
Well Known Member
The only thing I wonder about Tony's method is if it makes it tougher to get the trailing edge bend right, since the newly-bent tab ends are going to limit how far you can bend past the desired point to account for springback. (I'm just thinking out loud here...clearly the method worked out just fine in the real world!)
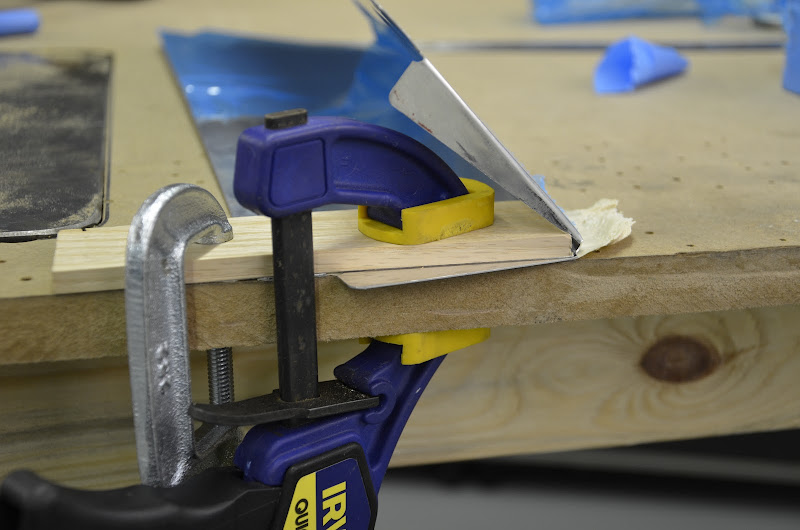
Personally, once I quit trying to be cheap and used good hardwood and carpet tape, I found the bends to be surprisingly easy to get right:


Personally, once I quit trying to be cheap and used good hardwood and carpet tape, I found the bends to be surprisingly easy to get right:
KMinor
Active Member
+1 for Tony
I used Tony's method, then back riveted those hard to reach rivets in the spar, then built a small bending brake and bent the trailing edge with a 3/16" steel dowel taped inside. The bending brake got it started, then I finished it by hand. As long as you have the dowel in there you can't over bend the trailing edge. Just massage it until it matches the elevator and leave enough dowel sticking out to pull it out. After that all you have left is squeezing the top rivets.
I used Tony's method, then back riveted those hard to reach rivets in the spar, then built a small bending brake and bent the trailing edge with a 3/16" steel dowel taped inside. The bending brake got it started, then I finished it by hand. As long as you have the dowel in there you can't over bend the trailing edge. Just massage it until it matches the elevator and leave enough dowel sticking out to pull it out. After that all you have left is squeezing the top rivets.
tkatc
Well Known Member
There are a few things to look out for when using the method I chose. (it was not my idea but I liked the simplicity) When bending you should decided which tab should be on the outside and which one on the inside and make your bend just a but offset so the two tabs do not meet exactly in the middle.
I actually ordered another trim tab so my second attempt will be perfect. I was happy with the bends but the hinge could be better...
I actually ordered another trim tab so my second attempt will be perfect. I was happy with the bends but the hinge could be better...
longranger
Well Known Member
There are a few things to look out for when using the method I chose. (it was not my idea but I liked the simplicity) When bending you should decided which tab should be on the outside and which one on the inside and make your bend just a but offset so the two tabs do not meet exactly in the middle.
I actually ordered another trim tab so my second attempt will be perfect. I was happy with the bends but the hinge could be better...
Tony,
Did you radius your bending block? Also, how did you know how much you were offsetting the second bend after you'd made the first? I tried eyeballing it and ended up with over 1/8" instead of the desired one skin thickness. It's hard to tell in the photo, the gap at the top is more than twice the gap at the bottom.
I also messed up the bends on the elevator side in a different way, and had new parts delivered with the wing and fuselage kits, but haven't yet gotten around to finishing the left elevator.
I made my bending form block this afternoon and will probably get the ends bent this weekend. It looks like the one in the plans and pictured here from Phillip's earlier post.
Miles brings up an interesting point regrading an offset in the two bends. Anybody else succeed and how did you measure it to produce it? Anybody totally blow it off and wish they hadn't?
From continued reading here and build logs I am starting to wonder if I shouldn't have just ordered a second trim tab last week so I had a spare on hand.
mvidalr
Well Known Member
Just in case....
If everything fails....
http://www.vansairforce.com/community/showthread.php?t=93766
If everything fails....
http://www.vansairforce.com/community/showthread.php?t=93766
tkatc
Well Known Member
Miles,
I did not radius the block at all. I havent measured the offset yet for I haven't gotten around to making the second tab. I just thought I'd mention it because after making the first tab bends I noticed it would be better to add a slight offest. I would say to make your bend line with sharpie and add the width of the sharpie line to the opposing bend. "Ultra-Fine" of course.
I did not radius the block at all. I havent measured the offset yet for I haven't gotten around to making the second tab. I just thought I'd mention it because after making the first tab bends I noticed it would be better to add a slight offest. I would say to make your bend line with sharpie and add the width of the sharpie line to the opposing bend. "Ultra-Fine" of course.
KMinor
Active Member
I drew the same line for the top and bottom bends which matched the straight edge of the trim tab ends (used a thin sharpie). I made a forming block out of oak that was shaped to fit into the trailing edge bend. I bent the bottom tab first by aligning the bending block on the inside edge of the sharpie line and clamping it. I then butted a long piece of board against the forming block that I screwed down to the table to keep the bending block from moving back while bending. I started the bend line with an edge with no radius, using a small piece of oak to push on the tab. I switched to a radiused side of the bending block to finish the bend with rivet gun/flush set. I did the same thing for the top line, except that I aligned the bending block on the drawn line to start the bend line.
Phillip's looks like a textbook case of following the plans, but I wanted to bend the trailing edge later so that I could get to those bottom spar rivets easier.
A buddy of mine tried the riblet method, but ended up with a twist in his trim tab that wasn't evident until he put it on the elevator, so he talked me out of that.
Bob Ellis
Well Known Member
When I wrote this log entry I was at the start of the project and immediately suggested that there should be riblets in the kit for this trim tab. Now that I have finished the project and reflect on this part of the build thanks to this recent post I have a different take. Though my supposition could be totally wrong....
Vans is a clever chap and if he wanted to make the build easy he would have supplied riblets. However you achieve the goal of a finished trim tab I think Van would say you have reached a point where you are ready to progress with the rest of the build - those who persevered with the plans and those that thought of another way of achiveing the goal.
Still reckon it was almost the hardest part of the build - apart from tightening the gear tower nuts :-(
Last edited:
Update 05-18-13 4pm
Ordered a new trim tab skin.
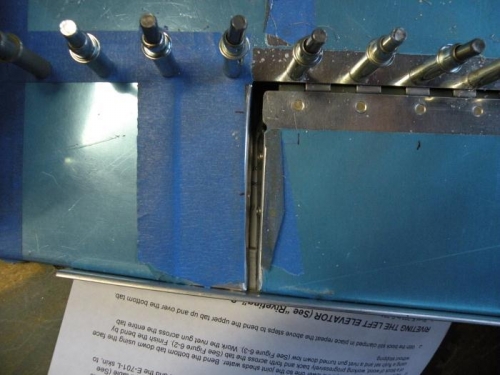
I did the outboard end first and was not displeased with the results although right at the very trailing edge the overlap was so small that there actually was no overlap when I cleco'd in the trim tab spar. I was pleased with the quality of the bend so I switched everything around and bent the inboard end. At the end of the process when I was finishing off with the gun/flush set and looking the bends from a side view (the length of the tab) I was very pleased with the way the bends came out and was going to declare victory until I stood up and looked down at the top of the tab from above. The God's of Building apparently decided that I had not yet made the required alloy sacrifice and deemed I should try again. My bending form had moved in at some point and my final bends were right at the inner limit of the relief holes. Turning the tab over, the radius started right next to one of the tab horn rivet holes. Too close in my opinion. I don't think I had enough horsepower on the C-clamps holding the assembly to the bench. They were tight but I when I pulled them off I didn't think they were as tight as I remember they had been when I did the other end.
Recap. The plans method does indeed work and work well. You just have to try and not shoot yourself in the foot. I will chalk it up to an $18 lesson. Well, $32 actually. I ordered two. I may be dumb but I am not stupid.
Ordered a new trim tab skin.
I did the outboard end first and was not displeased with the results although right at the very trailing edge the overlap was so small that there actually was no overlap when I cleco'd in the trim tab spar. I was pleased with the quality of the bend so I switched everything around and bent the inboard end. At the end of the process when I was finishing off with the gun/flush set and looking the bends from a side view (the length of the tab) I was very pleased with the way the bends came out and was going to declare victory until I stood up and looked down at the top of the tab from above. The God's of Building apparently decided that I had not yet made the required alloy sacrifice and deemed I should try again. My bending form had moved in at some point and my final bends were right at the inner limit of the relief holes. Turning the tab over, the radius started right next to one of the tab horn rivet holes. Too close in my opinion. I don't think I had enough horsepower on the C-clamps holding the assembly to the bench. They were tight but I when I pulled them off I didn't think they were as tight as I remember they had been when I did the other end.
Recap. The plans method does indeed work and work well. You just have to try and not shoot yourself in the foot. I will chalk it up to an $18 lesson. Well, $32 actually. I ordered two. I may be dumb but I am not stupid.
Skykingbob
Well Known Member
Worked great!
Hey Tony,
Used your method to bend the trim tab......worked great! I sanded a slight radius on the piece of hardwood I used.....made it very nice! Thanks for posting your method!
Miles,
I did not radius the block at all. I havent measured the offset yet for I haven't gotten around to making the second tab. I would say to make your bend line with sharpie and add the width of the sharpie line to the opposing bend. "Ultra-Fine" of course.
Hey Tony,
Used your method to bend the trim tab......worked great! I sanded a slight radius on the piece of hardwood I used.....made it very nice! Thanks for posting your method!
rapid_ascent
Well Known Member
Bending these tabs are like a lot of things on this project once your finished you know how it's supposed to be done. It took me two tries but the second one looks reasonable. Make sure to use a hardwood as suggested. Also this may seem obvious but look at the notches at the end of the bend line. I marked the line before clamping it down.
If you mess it up it's not that expensive to buy a new one and give it another shot.
If you mess it up it's not that expensive to buy a new one and give it another shot.
KatieB
Well Known Member
+1 for Old-School
A 2' x 4' sheet of .016 2024 sheet is $19 at Spruce, and they can roll it up and ship it in a tube for cheap. How many trim tabs can I get out of that? Should I just go ahead and order one now?
Thanks for the pictures in this thread, they will really help alot! I'm looking forward to the challenge.
If you mess it up it's not that expensive to buy a new one and give it another shot.
A 2' x 4' sheet of .016 2024 sheet is $19 at Spruce, and they can roll it up and ship it in a tube for cheap. How many trim tabs can I get out of that? Should I just go ahead and order one now?
Thanks for the pictures in this thread, they will really help alot! I'm looking forward to the challenge.

