What's new
Van's Air Force

Don't miss anything! Register now for full access to the definitive RV support community.

Fixing a fuel leak

Scott Hersha

Well Known Member
I’m just about ready to fly my new RV6 for the first time, and yesterday, I found a fuel leak. Fuel has been in my tanks for about two weeks and used for testing with no leaks until yesterday. It’s a very slow leak - evaporates before it can drip to the floor. Just a little blue line around a rivet on the inboard rib flange on the bottom. I didn’t build the wings, or the tanks, but I did remove the tanks when I bought the kit to replace the cork gaskets under the fuel level floats. I re-installed the floats with proseal and pressure tested the tanks with balloons - successfully. I plan to remove the tank for easier access and remove the large access panel to make the repair. The leak is on a rivet in the inboard tank rib where I installed a countersunk plate nut for the wing root fairing. This RV6 didn’t have much of a flange for platenut installation, and the platenuts are sitting close to the web of that inboard rib. The platenut rivets are along the same line as the rivets securing the rib to the tank skin. I suspect that there isn’t much proseal on the inside of that inboard rib to tank skin area, and I plan to clean it up and proseal a fillet along that line on the inside.

My question is about cure time. It’s pretty warm here in Cincinnati, so it should cure fairly quickly. I’ve read online that full cure takes 3 days at 70* F, but how long should I wait before putting fuel in the tank? Also, I’ve read about using chem seal CS 3600 over the poly sulfide (proseal). Anyone have experience with that? Any suggestions are appreciated.

I’m kind of anxious to fly this thing - then this……. My inspection is tomorrow.
 
Scott, I’d find a local supply of B1/2 pro seal. It should be fully cured in a day or so if your hangar gets anywhere near as warm as mine. Do a test coupon to be sure.

Even if you use B2, 3 days is probably plenty in the warm summer months.
 
We feel your pain. My QB tank leaked on receipt in about the same spot as yours. I fixed it. After 10 hours of flying it started leaking from another spot one bay over. Fixed that. Another 10 hours and I have another spot in the next bay.
 
We feel your pain. My QB tank leaked on receipt in about the same spot as yours. I fixed it. After 10 hours of flying it started leaking from another spot one bay over. Fixed that. Another 10 hours and I have another spot in the next bay.

So it’s interesting that your QB tanks are stating to leak like this. I take delivery of my QB wings today for my 10. Just curious what’s does Vans say about these leaks? Do they just tell you go fix ‘‘em your self or do they have any skin in the game once you take delivery? I guess there’s no such thing as warranty on these? Hope their QC has upped their game.

Keith
 
Vans provides specific instruction for testing the QB tanks on receipt. If they leak and you haven’t painted them they will fix them. Trouble is you have to ship them back.
I’m good at taking them off and on. Don’t seem to be as good fixing them completely
 
Both of our tanks (that we built) passed the pressure leak test with flying colors. Once installed and filled with 100LL, the left one syphoned continually via the vent connection (guessing an improper flare) and the right one weeped a tiny bit at the capacitance sender connection, creating a little puddle at the corner of the inside rib/skin/baffle conjunction and pushed along by airflow (I'm guessing) along the bottom wing skin and spar. Pulled both and sealed again on the inside. The left was an easy fix, at least it was after the hassle of prying open the inspection covers.

We'd unfortunately let the right tank leak go so long that the sealant was practically the consistency of yogurt where the leaked 100LL had sat on the exterior of the tank. Put it back on the plane and discovered a week later that the right one still leaked along the baffle because of an incomplete fillet on the inside but it had been masked because of the more obvious blue run from the fuel level connection. After round two of leak "whack-a-mole" (we're getting good at taking them on and off, too!) the tank finally seems to be leak-free.

Just another data point I suppose that you can't get too smug if your tank keeps a balloon inflated and doesn't make little water bubbles.

With temps in the 90's, our ChemSeal was cured to touch to our satisfaction in about 24 hours. My next door neighbor aeromedical helo mechanic says they seal and go in a matter of hours... I would think you would be okay after a day.
 
Last edited:
PR 1422 A1/2

If you use 1422 A1/2 it will flow into all the nooks and cranny's. The "A" designation is for the thickness...A is brushable, B is spatchula. At my day job, we keep the KC10 tankers from being leakers..just sayin, a lot of fuel tank repairs. You can brush a beautiful fillet into that rib, stand it on end and let gravity do its thing. Make a sample on a test card to check later. We put fuel back on that in less than 8 hrs.
 
So it’s interesting that your QB tanks are stating to leak like this. I take delivery of my QB wings today for my 10. Just curious what’s does Vans say about these leaks? Do they just tell you go fix ‘‘em your self or do they have any skin in the game once you take delivery? I guess there’s no such thing as warranty on these? Hope their QC has upped their game.

Keith

Vans denies any responsibility for the poor workmanship of the QB tanks. I called them about mine and they told me that it was to be expected and to put some proseal on the leaking rivets. When we finally repaired the tanks we found a paper sticker on the aluminum INSIDE one tank. I still had to purchase the repair kits from vans to repair the poor workmanship.

For the most part Vans does a great job at making kits, but if you buy QB wings expect leaks and little to no help fixing them.
-Marc
 
Last edited:
Unfortunately it just might be fuel tank leaks on RV’s might just be part of the game. I have seen post after post of savvy, experienced builders that developed leaks on SB and QB tanks after time that they were convinced were leak free to start with.
 
This is a golly Gee Wiz situation for me.
I have an RV-6A that I built new tanks for (I've built tanks before)
Tested them with balloons for a week and no leakers, no soap bubbles, Looked good.
They sat without fuel for two weeks.
Painted and installed, No leaks
I'm happy. Three weeks later I put some black vinyl wrap on the painted tanks and within two weeks see at least half dozen bubbles at the rivets on both tanks. Most on the tops.
Crud !!!!!!
I've got the green Lock-tite to do the job with but haven't got around to it yet
Winter is coming and the fuel isn't going anywhere under the bubbles.
But it just galls me as I thought I had done such a good job.
Seems like nobody is immune from these leaks. Art
 
Mine leaked

QB tanks, just one weeping rivet almost not noticeable. Just a small blue stain. Never made it to the ground. Evoke drained the tank and fixed it. Never talked to Vans..... He is apparently quite experienced doing this, wonder why. :(
 
I should say (OP) that my tanks are not QB tanks. I can’t blame Vans for my leak. My kit was started in 1992 - I’m at least the third builder. I’m not sure they even had QB parts in ‘92. I think the ballon tank test has minimal validity. It seems like there’s a lot of builders that pass the ballon test and still have leaks. There is a certain level of skill and expertise, along with proper preparation and the right materials that ensure a quality finished tank that won’t leak for a long time. On my tanks, I’m guessing that the builder was stingy with the proseal. I won’t be surprised if, after I fix this current leak, I’ll end up with another. If that happens, I’ll remove the tank(s), open up every bay from the aft baffle, and basically fay seal everything. This isn’t something I want to be doing on a regular basis.
 
Hi all:

A little tip is to add a little water to the mixed Pro-Seal: 3-10 drops - not too much.

We used to spit into the glob of pooky on the mixing plate before loading it into tubes -
but we were young & gross A&Ps...

Use K-Y Jelly on your gloves when you're pulling off the masking around panels - everyone will laugh - but the tape/pooky combo won't stick to your gloves!

Regards,
James
 
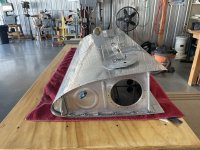
So - one more question before I seal my tank leak. Does the new proseal (chemseal B2) stick to the existing sealant that is already in place? I found a small 1/4” wide gap in the fillet on the inside of the tank right where the leak was happening. Do I need to remove the adjacent cured sealant before applying the new stuff, or does the new application just cover everything up? I would also like to add more sealant to the aft baffle edges in that outer bay because there is very little original cured sealant there now - just a very small bead. No leaks there yet, but I’m not confident it will last long. My access plate that I removed and cleaned up was put on using proseal and a gasket. The gasket was some kind of fibrous material and had proseal on both sides of it and there was some evidence that it was leaking a little - not visible until I removed the tank. I’m probably going to be doing the same thing to my other tank, because it must have been done the same way.

62C654B6-66B7-479F-B6C8-2CA7A082A9E3.jpg

Thanks
 
Fuel leak

Scott,
Glad to see you are almost in the air with this project.
After many fuel tank repairs in the turbine aircraft I can give you a couple of hints:
1: Clean the area you are going to seal with isopropyl alcohol 99% if you can find it. This won’t leave a film like acetone or MEK.
2: Scotchbrite the present sealer you are going over then clean it.
3: Once everything is back together then use a heat lamp directed on the new sealant area to heat things up. This will accelerate the cure, especially if using B2 sealant.

Good luck
 
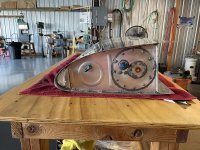
Thanks Phil. I did as suggested, and now waiting for the cure. I have a test card with the stuff, so I have an accurate indication of how it sets up……. What a mess though. I had proseal on everything. Went through 2 T-shirts and a bag full of gloves. Even got some in my hair. Working inside the tank in bay 1 through that big opening isn’t as easy as it would seem. I had my 8 year old grandson at the hangar today ‘helping’ me. It was well worth it. My grandson, with black fingers, now knows a thing or two about sealing fuel tanks. During this leak fix, I discovered something that makes the whole leaky tank thing worthwhile. There was a Vans notification in 2000 that said all RV aircraft should have an anti-rotation bracket installed in their wing tanks on the B-nut on the fuel pickup tube. Then later, they came out with a mandatory service bulletin to secure that B-nut with safety wire to prevent it from becoming disconnected from the tank bulkhead fitting. Later that whole thing was modified with a supplied anti-rotation bracket that was keyed to the B-nut to prevent it from becoming dislodged (PN T-715). Well, I happened to have a set of those special brackets, and my tanks were not in compliance with either instruction. My left tank probably isn’t either, so it comes off next. I bought the kit used, so the only way to know, unless the previous builder(s) have kept accurate construction records, and then passed them on - unlikely, is to open them up. The leak provided me that opportunity. “Opportunity” - that is me trying to feel better about something that I don’t like doing, at a time I want to fly my “new” bird. It will happen, and hopefully, no more fuel leaks.
 
I used almost all of the 2 oz sealant kit to re-seal a lot of bay 1, and seal the anti-rotation bracket, inspection panel, and the fuel sender, which I removed to ease access. I also made a new fuel pickup tube because the original one didn’t look so good. This thing just can’t leak now……. hoping……

009E22A8-CF62-4719-9B8B-B24B70B871DA.jpg
 
Vans denies any responsibility for the poor workmanship of the QB tanks. I called them about mine and they told me that it was to be expected and to put some proseal on the leaking rivets. When we finally repaired the tanks we found a paper sticker on the aluminum INSIDE one tank. I still had to purchase the repair kits from vans to repair the poor workmanship.

For the most part Vans does a great job at making kits, but if you buy QB wings expect leaks and little to no help fixing them.
-Marc

I got my QB wings in 2006, apparently failed to notice Van's tank test, and have merrily flown 1420hrs without a leak. Guess I dodged a bullet (so far?)
 
Back
Top