What's new
Van's Air Force

Don't miss anything! Register now for full access to the definitive RV support community.

Different cooling set-up

RV8RIVETER

Well Known Member
Patron
Here are few primer pictures of my cowl work to date. Not an expert glass man, but not from lack of effort. Learning as I go. Sorry for the crappy photos, I couldn't find my hanger camera so used the cell phone.

A shot of the cowl exit. I cut the square ramp out and added the rounded exit. A two part exit nozzle will connect here and run back, with a 6.5 inch diameter outlet, for starters. I have different designs to try for the outlet nozzle so am making provisions so that they can be easily swapped out. I poured the foam for the nozzle plug today.


The air intake scoop is also my air filter housing. Went with a 3 inch dia inlet opening, very rounded profile intake. I have already made tthe flexible upper which will be prosealed on top and the filter slides in from the back. Still working on it.


The main cooling inlets are 3.8" in diameter. The oil cooler intake, the single inlet, is 1.75 inches in daimeter.

 
Last edited:
*****Resurrecting this thread by copying 3 year old posts/pictures from "my project status" for more work context. I am finally ready to start taking data measurements in a series of various outlet shape experiments. *******
--------------------------------------------------------


For anyone interested and who don't mind seeing rough work in progress..... I unmolded my exit tunnel and nozzle, located it on the fuselage, and then seperated the configurable outlet.

The side view from inlet to exit nozzle.


The view fwd looking of exit nozzle A.


The end nozzle removed. I plan to take data with this config and then with various different end nozzle designs.
 
Last edited:
preliminary work

The original oil cooler set-up just plain did not work, so back to the drawing board and the new cooler and set-up is working well.
The new cooler set-up was engineered on having to fit all to existing engine compartment conditions.

There is a 3 inch hose to route air to the cooler. I cut the top out of the left side plenum and the cooler duct was made and built into the
new plenum top.

Left inlet area was reworked for approx 18 sq in, but Cyl 2 CHT was higher than before, so I recently opened it
up to approx 19 sq in and it dropped 30 degrees. I may open it up to 20 sq in when I make it pretty to
repaint, unless the pressure data says it is not needed.

The right inlet area is approx 12.5 sq in and has worked perfectly from the start.


PLENUM MOD FOR COOLER


LEFT INLET can see the cooler duct entrance
 
Last edited:
Ready to start testing

My design ideas are along the lines of making the inlets only as large as required for good cooling in hot conditions and sizing the exit for good recovery velocity and smooth re-entry to free stream. I will also be attempting to incorporate exhaust augmentation and possibly free stream acceleration of the outlet air. We will see how that goes.

Finally made my pressure sense box with Freescale pressure transducers (3 differential and 2 absolute) and mounted
it to the plane today. Thinking this may be the Mark 1 box as there are higher resolution sensors now and I also
want a barometer to take an ambient pressure reading inside the box for reference. I have a data aquisition unit
and will be flying my test hops with it recording the data to my laptop. When I finish flying the entire series, I
will write-up a full report to add to this post.

For reference, the current outlet area is approx 52-54 sq inches.

PRESSURE BOX, tested and potted.


MOUNTED on the firewall.


SENSE TUBES to the upper plenums


Only took me 3 years to get ready.:rolleyes: I am not the fastest builder/experimenter as the airplane is lower priority than the family, but I hope to have finished my initial run of experiments within the next 3 months and will post the data then.
 
Last edited:
Not really

Son of Horton;)

Wade is developing a high speed inlet setup - maybe with an augmenter type outlet? - where Dan uses a low speed inlet along with a throttled outlet.

Given enough real estate, either can be made to work.

Dan uses the opposite of Wade's approach, which is actually a bit easier to engineer. I know this because I tried a similar approach to what Wade is doing, but after it failed, I moved to the Horton camp. I had been told about the large inlet/throttled outlet quite a few years back, but had forgotten it until Dan reminded me.

Wade: You have your work cut out for you! The fwd ducting will be critical if your system is to work, and the outlet is critical if the system is to be less draggy.

The SCAT hose to cooler setup is draggy - if it almost works, I would suggest a smoother duct be constructed to get that part up to spec. A directed oil cooler outlet is also a plus.

In any case, I applaud your efforts! Keep me in the development loop, please.

Carry on!
Mark

Mark

Thanks for the input. You are correct the hose is draggy but was needed for my cooler rework modification. I did not want to make glass ducts until I was sure it would be the final iteration. You can't see it, but I do have a cooler outlet duct that goes straight down thru the heat valve (oil cooler heat is my heater) and out to the firewall curve.

The peak of the mountain for me is an entirely sealed system from inlet to outlet, but this is just the early stages of the climb so far. I will gladly email you more detailed reports as I compile them.
 
You betcha!

Mark

Thanks for the input. You are correct the hose is draggy but was needed for my cooler rework modification. I did not want to make glass ducts until I was sure it would be the final iteration. You can't see it, but I do have a cooler outlet duct that goes straight down thru the heat valve (oil cooler heat is my heater) and out to the firewall curve.

The peak of the mountain for me is an entirely sealed system from inlet to outlet, but this is just the early stages of the climb so far. I will gladly email you more detailed reports as I compile them.

Hey Wade:
You bet I want updates. If you make this work, I gotta understand how you did it. I see Reno applications - if it works!

F one boss at gmail dot com

Carry on!
Mark
 
Wade,

Like Marky-Mark, I think this is really cool work. It will be very interesting to see your test results. Can you post wider angle views of your inlets, and maybe a side-view of the exit with the nozzle installed?

Can you share the thoughts behind your design decisions? I'm very interested in hearing the background.

A couple thoughts?not criticisms, just details I learned from Steve Smith (we'll see if I get them right). I also know these are experiments, and you may have some of this in mind for future versions?but here goes (hope it adds value):

The wetted area represented by the exit appears large?it drops down below the cowl quite a bit. Decreasing the circumference to decrease the downward protrusion may help. My visual SWAG is that you have more than enough cooling exit area, so may be able to go smaller.

The sides of the primary exit (forward of the removable nozzle) appear to converge, both as they move up towards the fuselage, and as they move aft. If you can get those sides parallel to the airflow, all the way till they end, it may enhance flow and decrease flow separation.

The sides of the removable nozzle, at the top, converge quite a bit. You made a nice trailing edge shape, but that convergence could cause separation. That area above the nozzle has a lot of interacting shapes?looks really cool, but might be a flow separation area.

It appears you are necking down the area with that nozzle?one option to consider might be bringing the shape up more from the bottom, rather than down from the top. That would decrease exit area, and wetted area, in one step.

The swale in the bottom of the scoop may be detracting too. The low point on the gray portion, near the clecos, may be forced on you by the exhaust?but if not, any way to decrease that bump and curve could be beneficial, from both a wetted area and airflow perspective.

All that being said, you may have other inlet to exit ratio and shape interaction motivations in play here, so please take all this as just stuff to throw up on the drawing board.

Lots of neat work there?its fun to see it coming together! Look forward to hearing about your results!

Cheers,
Bob
 
Wade,

Like Marky-Mark, I think this is really cool work. It will be very interesting to see your test results. Can you post wider angle views of your inlets, and maybe a side-view of the exit with the nozzle installed?

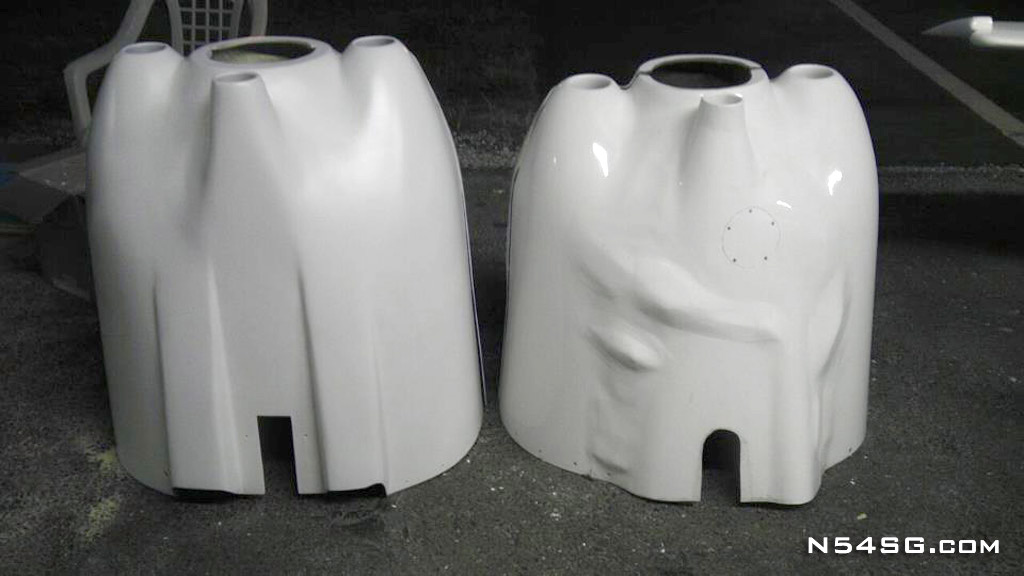
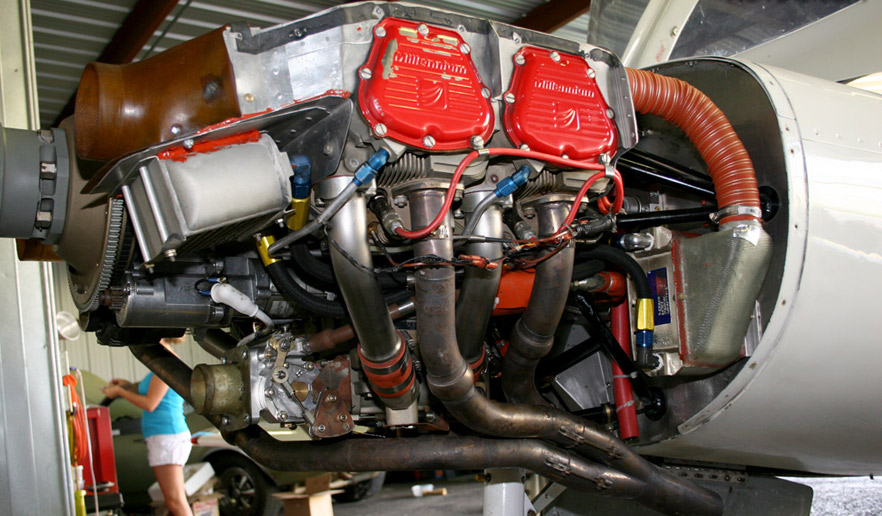
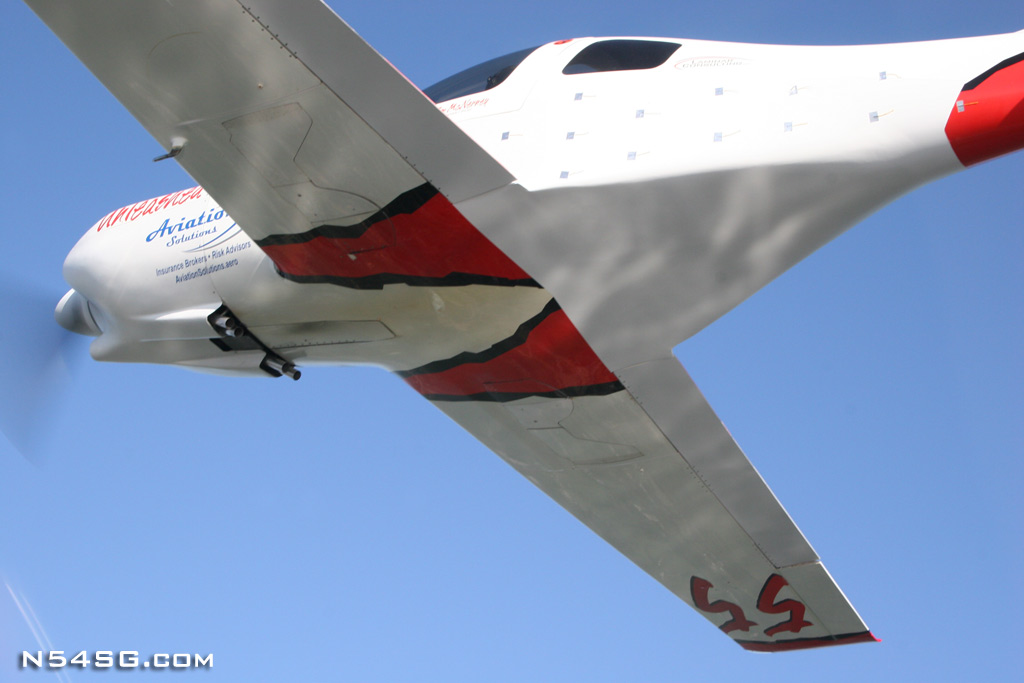
Thanks Bob, no worries, I take all input as constructive and enjoy the exchange of ideas that this forum facilitates. I am very appreciative of any input from those like you and Mark, who have tinkered in this area before. In the early picture above you can see the entire front cowl in foam, it looks the same today, except the left inlet has been opened up to become one hole. I will make sure and post the views you request when I have more info. You can also find pictures of my cylinder baffles on other threads, I keep the air in contact with the cylinder all the way around.

Can you share the thoughts behind your design decisions? I'm very interested in hearing the background.
I heard the stories about 200hp RV-8 and you "NEED" louvers, ect.. Set me to doing a lot of reading. It appeared plain to me that the stock inlets are actually oversized, which led to more thinking. Turns out 12 sq inches of area will keep 2 rows of a Lycoming below 300 deg with hard running at our speeds. Then came to realization that a "system" approach is needed. So my work is not just the exit, but the system as a whole. Sorry, I am rambling.
The cowl flap is the easiest (and most elegant if Dan is doing the work;)) way to get variable cooling flow, but I did not want to have anything to control. Or maybe I hit my head as a child and like to do things differently, wait I did hit my head in 5th grade... :) 
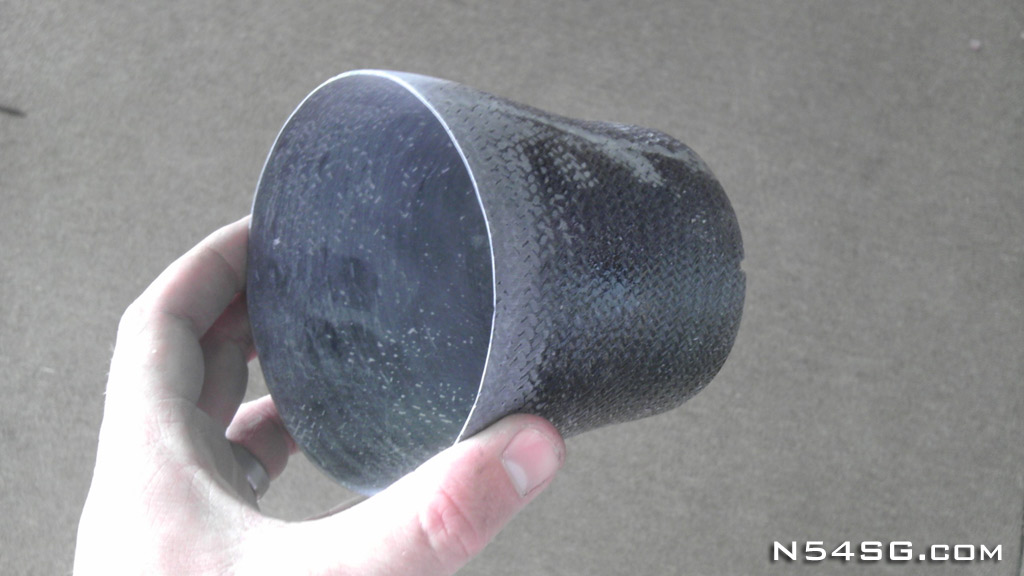
I have been intrigued by the idea of exhaust augmentation and trying to recover some of that heat energy that is otherwise wasted. In a general nutshell, my original goal was to size the inlets for cruise and use the augmentation to get good cooling in climb when airspeed is lower, no cowl flaps. Then in discussions with Paul Lipps I started thinking about actively trying to accelerate the exit air as well. I made a mold and am playing around with 4 or 5 different nozzle designs in my head to try out. No aero engineer, though I started out at UT on that path be before life got in the way.

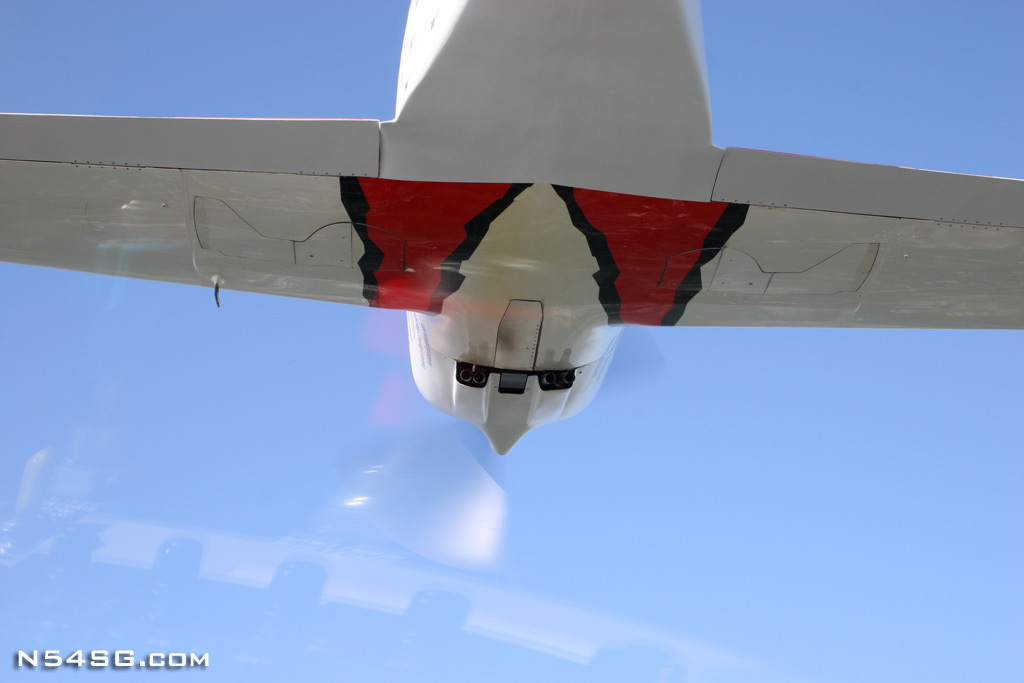
A couple thoughts…not criticisms.....The wetted area represented by the exit appears large…it drops down below the cowl quite a bit. Decreasing the circumference to decrease the downward protrusion may help. My visual SWAG is that you have more than enough cooling exit area, so may be able to go smaller.

The sides of the primary exit (forward of the removable nozzle) appear to converge, both as they move up towards the fuselage, and as they move aft. If you can get those sides parallel to the airflow, all the way till they end, it may enhance flow and decrease flow separation.

The sides of the removable nozzle, at the top, converge quite a bit. You made a nice trailing edge shape, but that convergence could cause separation. That area above the nozzle has a lot of interacting shapes…looks really cool, but might be a flow separation area.

It appears you are necking down the area with that nozzle…one option to consider might be bringing the shape up more from the bottom, rather than down from the top. That would decrease exit area, and wetted area, in one step.

The swale in the bottom of the scoop may be detracting too. The low point on the gray portion, near the clecos, may be forced on you by the exhaust…but if not, any way to decrease that bump and curve could be beneficial, from both a wetted area and airflow perspective.

I hear you, I have increased the wetted area. Darn compromises to get flying and not be too radical on an existing plan airframe to start. This shape is dictated by my exhaust system. I may change the angle of the collector to allow a much closer to the body configuration in the future. I was also worried about vibrations and heat on the bottom of the fuselage. For all of those reasons, plus the fact that I actually want the outlet in the free stream, starting here to see what happens. The nozzle convergence was a bit sharp for my liking so it has since been extended the lower the angle. I do like the looks, but the reason was to see if I can keep the boundary layer air moving smoothly back and between the cooling outlet flow and the fuselage. Kind of like the nozzle fence on the Lancair Evolution to keep the exhaust off of the fuselage.

I am also bothered by my current oil cooler set-up. It works, which was a relief, but I think a dedicated inlet is better and would be even better to have it part of the outlet duct on the bottom of the cowl. I am not the best at explaining the ideas in my head, so hope this all makes sense and help answer some of your queries.
 
Last edited:
Thanks Wade;
After getting the basic airplane built, this topic is one of the best parts of the whole forum!
I'm working with a liquid cooled engine. Radiator + scoop is part of my life.
So I read everybody's posts on scoops, inlets, radiators, ducting, louvers air exits etc.
Vetterman's exhaust site has a great bit on underbody drag reduction.
I just tried something new (to me): Vortex generator inside the oil cooler scoop.
On my RV-8, the entire right cowl inlet feeds a Mazda Rotary RX-7 car oil cooler. To get the airflow to follow the divergent path along the floor (to get more even air distribution thru the cooler) I added a "Hall" type vortex generator. I put it just aft of the divergent point with the fins up in the bottom of the straight in free stream area. It made a profound difference in oil temp. Those little hummers can make air turn thru the inside radius of a duct. May be helpful steering the under cowl air to go where you need it.
The Vortex generator idea came from a Boeing engineer friend as an off hand comment!
 
Last edited:
Scott

Thanks for adding that. I would have loved to try a rotary but I was afraid it would add 6 more years to my build. :)

I have sifted thru a couple dozen research papers in my quest for knowledge and one was on vortex generators on the inside of an S-duct for jet engine inlet design. They allow you to increase the divergence angle of your duct. If my memory is correct, turbulent flow increases the heat transfer efficiency as well.

Would love to see a presentation thread of your engine work.
 
Last edited:
Wade,

Everything you said makes good sense?some great experimenting going on in your skunk works?will be fun to watch and learn! Gonna go find that cylinder baffle thread too! Thanks!!

Scott,

Any pics of the scoop vortex gens? As Wade said, would love to see more on your installation!

Cheers,
Bob
 
Interesting stuff. I went the low speed approach. I figured I might share what I have done to contribute to the conversation.

I am cooling 400 cubic inches, both CHT and Oil, with 19.25 square inches of inlet area, total. Two 3.5 inch diameter inlets. The important thing being, 3.5" expanding to 4" diameter in the first 2" of depth. These are the inlets:

Cowl_46.jpg


Something I did that I think is important is to extend the inlets away from the rest of the cowling surface. This helps get the inlets into clean(er) air and maybe out of the boundary layer created by the spinner. Starting at the tip of the spinner, you have a big 'wake' of slower disturbed air. If your inlets are in the wake, you not getting very good relative airspeed, thus you need more of it. (bigger inlet) I don't have a great picture of this, but look at my cowling build referenced below and it will make sense. Here, found this pic. This shows my old cowl next to my new cowl. Notice the inlets and their relationship to the spinner flange:

Cowl_58.jpg


Like you, oil temp was a bit of an issue. I run 2 coolers, a 9 row and a 6 row in series. Although 2 coolers is complicated, I am working with MUCH less space than an RV. Racing at Reno requires high rpm, sometimes 3,000. At the end of a ~9 min race, on an 85F day, I just barely reach 230 on the oil. CHT will be 395, maybe 400 by the end of the race. So, although that is warm oil, it is just on the edge of being enough cooling. Not too much, not too little. 95% of my daily flying has the oil under 200. This is an older pic showing the old 4 into 1 header (for sale!), but shows both coolers:

oilcooler_blog.jpg


For space reasons, I really haven't been able to refine the exit area of the cowling like you have. For that, I am jealous. My goal was a less than 1:1 ratio of inlet to outlet. I'm guessing I'm pretty close to that, but I think it could be smaller. I have a nose gear in the middle, so things get more complicated. Here is a pic of everything retracted, in flight:

tuft_test_06.jpg


tuft_test_07.jpg


A few projects of mine that you may find interesting and show the construction of everything:
Cowling Project
Baffles, Plenum, Diffusers
 
That's nice work Tom.

Everybody remember that inlet size is largely a matter of which approach you use for converting dynamic pressure to static. Small inlets are for internal diffusion, which requires internal length for a gently expanding smooth-walled duct, which in turn requires a prop extension.

No prop extension? Use a large inlet with a throttled exit and do the conversion out in front of the inlet. It's frictionless, and low velocity through the hole means internal shape doesn't matter much. Some recent designs don't have any internal ducting at all.

Small hole on a shorty cowl, feeding some badly shaped "coupler"? Good luck. It will have poor upper plenum pressure (poor conversion of dynamic to static), so the only way to get enough air to flow through the engine fins will be to reduce lower cowl pressure...meaning a huge exit.

Note that with Tom's well-made internal conversion setup he can use a small exit for maximum exit velocity...reduced cooling drag.

In the end, which approach (internal or external) to use mostly depends on CG.
 
Back
Top