What's new
Van's Air Force

Don't miss anything! Register now for full access to the definitive RV support community.

Oil Cooler Bracket Separated

mfshook62

Well Known Member
What would be the best way to repair this. The bracket that attaches the oil cooler has separated. Actually the baffles on both sides were cracked in a couple of places because they were joined together at both cylinder heads, and there was no expansion joint. Any ideas on a sturdier way to attach the oil cooler.


crack2.jpg
 
Last edited:
Heres a picture of how I did mine...
I think if I were you I would just remove the complete damaged section and build a new reinforced one.

IMG_4379aa.jpg


IMG_6232.jpg


Added the above image to show the brace on the inboard side of the cooler.
 
Last edited:
Me too.

Hi Mike,

My RV-8 has the same problem. I'm repairing it now if you want to come over and take a look. Give me a call if you'd like.
 
Heres a picture of how I did mine...
I think if I were you I would just remove the complete damaged section and build a new reinforced one.

IMG_4379aa.jpg
Agreed with Walt's suggestion. I had a similar crack though not nearly as bad, and I suspect mine was due to the oil fitting/hose hitting the engine mount during start/stop when the engine moves the most.

I replaced and reinforced it, but also turn the 90 degree fitting to allow more clearance to the engine mount and have not had any issues since.
 
Answers in archives....as usual

What would be the best way to repair this. The bracket that attaches the oil cooler has separated. Actually the baffles on both sides were cracked in a couple of places because they were joined together at both cylinder heads, and there was no expansion joint. Any ideas on a sturdier way to attach the oil cooler.

Very common problem so there's unlimited info on this topic in the VansAirforce archives. Try the following threads for starters:

http://www.vansairforce.com/community/showthread.php?t=59770&highlight=baffle+cracks

http://www.vansairforce.com/community/showthread.php?t=44318&highlight=baffle+oil+cooler+brace

If you're still not satisfied try an archive search under "baffle cracks".

Incidentally....no use trying to repair your baffle. Replace the whole left rear baffle at the oil cooler and modify it to add stiffness.
 
Reading how many folks with the standard setup experience this failure I have probably gone overboard, but hey.

I have sandwiched the corner of the no. 4 side baffle between two bent angles. The one with the notch goes on the inside. I've also extended this down a bit to hold the alternate air control cable (credit to Rick Galati for this idea). Although not visible in these photos, like others have posted, I've riveted an 1/8th angle to the aft baffle to accept a brace from the engine case.

29qh2c4.jpg


devgh2.jpg


i4r5h4.jpg
 
Last edited:
I've done...

... something similar.

I installed this support-rod last summer and no cracks anywhere so far.


Mine cracked within 25 hrs but I never let it get that far along.

Fixed it with new parts and a big 1/8" angle riveted in that corner like Matt and a brace similar to the post #8.

I would say it is more common than not that this corner cracks if you follow Van's plan...
 
Here's what I did: Fixing the baffle cracks. One of the things I discovered as I reworked the baffle is that putting a cross brace and a piece of angle on the baffle inboard of the cooler both help stop the flexing in that area. Not enough hours since the repair to tell if my design will stop the cracking but I have hopes.
 
... something similar.

I installed this support-rod last summer and no cracks anywhere so far.


I'd be a bit concerned about the eccentric loading on the right-angled bracket attached to the crankcase. It seems to me that axial loads through the stiffening angle attached to that right-angle bracket might tend to loosen the crankcase bolt. If the bolt backs off then the crankcase seal could be compromised. Additionally, if the bolt backs off then the bracket can rotate and the fuel injector line (attached to the bracket) might fatigue and crack under the oscillating movement.
 
I just finished building this part of the baffles last week... based on others' advice I reinforced this area considerably. Some pictures that may help:

20110611_baffle4.jpg
20110611_baffle6.jpg

20110611_cooler4.jpg
20110621_brace.jpg


More details here:

http://www.rv7blog.com/2011/06/11/4-cylinder-baffle-oil-cooler-mount/
http://www.rv7blog.com/2011/06/21/oil-cooler-brace/

mcb

I noticed your brace to the cylinder. There was a lot of discussion about this location vs tying to the crankcase. I am not sure there was any definitive yes or no, but Captain Avgas provided a couple links. The first link has a lot of discussions about the topic. Just something to consider reading.
 
I noticed your brace to the cylinder. There was a lot of discussion about this location vs tying to the crankcase. I am not sure there was any definitive yes or no, but Captain Avgas provided a couple links. The first link has a lot of discussions about the topic. Just something to consider reading.

Oh believe me, I read every VAF thread about oil coolers I could find. :) My reasoning is that since the rest of the oil cooler is supported by the very same cylinder head, attaching the extra brace there ought to be okay. We'll see how it works.

mcb
 
Last edited:
Oh believe me, I read every VAF thread about oil coolers I could find. :) My reasoning is that since the rest of the oil cooler is supported by the very same cylinder head, attaching the extra brace there ought to be okay. We'll see how it works.

mcb

Matt, I agree with you entirely. The original Van's design for the mounting of the oil cooler is predicated on virtually all loads being transmitted directly to the cylinder head.

I'd have more reservation about bracing the oil cooler to the crankcase. I like the idea of the oil cooler/cylinder head assembly being able to move independently of the crankcase to accomodate differential thermal expansion.
 
Oh believe me, I read every VAF thread about oil coolers I could find. :) My reasoning is that since the rest of the oil cooler is supported by the very same cylinder head, attaching the extra brace there ought to be okay. We'll see how it works.

mcb

Matt - I have bracing very similar to yours and its worked great for 500 hours or so. I think your reasoning is sound. The original setup per Van's cracked after about 200 hours.
 
Matt - I have bracing very similar to yours and its worked great for 500 hours or so. I think your reasoning is sound. The original setup per Van's cracked after about 200 hours.

Thanks Alan, that's a great data point! Since we're all left to our own devices here, it's good to hear from someone who's already paved the way.

cheers,
mcb
 
Mag cooling tubes, looks like to me.

BTW, mine cracked as well within 25 hours, and I used the 1/8" angle to support it. Plenum seems to support the other side very well...

baffle-crack-002w.jpg


12-31-10-003w.jpg
 
It's my understanding that VANS sells a bracket to mount the oil cooler on the firewall. You might want to check it out. Ron
 
Mag cooling tubes, looks like to me.

BTW, mine cracked as well within 25 hours, and I used the 1/8" angle to support it. Plenum seems to support the other side very well...

Chad, you might like to consider shaving a bit off the length of your cooler bolt spacers and inserting a large washer at either end to distribute the loads from the spacer to the oil cooler flanges. The spacer tube has a tendency to crack the oil cooler flanges if the load is not distributed over a larger area.
 
Chad, you might like to consider shaving a bit off the length of your cooler bolt spacers and inserting a large washer at either end to distribute the loads from the spacer to the oil cooler flanges. The spacer tube has a tendency to crack the oil cooler flanges if the load is not distributed over a larger area.

Or just use a spacer/clamp strip about 1/8 inch thick on the inner (nearest the cylinders) flange to spread the load. The outer flanges are less critical.
This is one certified O-360 installation and you can see these strips (#11 - note that the bottom arrow is slightly off...:)..)

tiger-oil-cooler.jpg
 
Or just use a spacer/clamp strip about 1/8 inch thick on the inner (nearest the cylinders) flange to spread the load. The outer flanges are less critical.
[/IMG]

Yep, that's what I did. If you look carefully you can see that I have spacers inside and outside of the outer flange. I've seen cracking on the outer flanges of a number of coolers.


Uploaded with ImageShack.us
 
Yep, that's what I did. If you look carefully you can see that I have spacers inside and outside of the outer flange. I've seen cracking on the outer flanges of a number of coolers.


Uploaded with ImageShack.us

At your oil cooler inboard scalloped flange, is that white line on the engine mount adjacent to the oil cooler flange where the oil cooler flange makes contact with the engine mount?
 
Good question but the similar line on the lower tube farther out makes me think it's just a flash reflection artifact. I hope I'm right.
 
At your oil cooler inboard scalloped flange, is that white line on the engine mount adjacent to the oil cooler flange where the oil cooler flange makes contact with the engine mount?

Good question but the similar line on the lower tube farther out makes me think it's just a flash reflection artifact. I hope I'm right.

Patrick is correct....it's just flash reflection. It could hardly be otherwise because the engine has not yet been run. In reality I have considerable clearance between the cooler flange and the engine mount but it just doesn't appear that way in the photo.
 
Last edited:
Oh believe me, I read every VAF thread about oil coolers I could find. :) My reasoning is that since the rest of the oil cooler is supported by the very same cylinder head, attaching the extra brace there ought to be okay. We'll see how it works.

mcb

About 5 years ago when my baffle cracked in much the same way as others, we repaired the baffle and added a brace to the cylinder head similar to what Matt's photos show. In 5 years I have had no problem with baffle cracking... It would appear that this strategy works very well.

If anyone needs additional info, please let me know.

Victor
 
Experiment awaiting test in 2012

Here is how I fabricated my oil cooler corner.
I will report on the performance in 2012. **EDIT** 2019, 800 hrs, still good. The J channel worked great.
I did some metal bashing to form stiffening flanges that were not in the plans and also added a J channel to stiffen the rear baffle. It is quite stiff.
Operation will prove whether it is enough or not.

13568529524d855b1532f90.jpg


13483774724d855bf5dddf0.jpg


6938503344d855bf5e7a30.jpg


9744268474d855ddd1d000.jpg
 
Last edited:
Oil Cooler Brace

This brace is made by Vic Skodzinsky who also makes the beautiful Carbon Fiber aileron hinge/fuel vent fairings that many of you have used. It is light weight and very strong. The ends can be adapted to your application with a metal clips if needed. Vic can be reached at 330-605-6997
 
just saw ths, went out to hanger and removed top cowl, mine is cracked from top to bottom. i have 98.5 hrs. callled my hanger buddy and his is cracked 3" down. he has 125 hrs. hey van fix this, to many accourances.
too cold to fly anyway. 5 degrees out. heating system on these is not good. but boy what a beautiful ride!!! you froze in my citabria too!!!
 
Inspect your cooler very carefully also. My baffles cracked like that and the cooler mounting flanges cracked also, right through the center of the finned area on one side. Even though I had thru-bolted the flanges with spacers between like most people do.
 
Has anyone talked to Van's support guys to see what he recommends. I have the same problem at 140 hours with a very smooth FADEC engine so the baffle holding the oil cooler has to be too weak. I have the tube spacers between the oil cooler flanges with the washers as recommended. It would be nice if we had and engineered fix for this instead of 1000 different trial and error shots at it.
 
For whatever it's worth, here's what I did evolving from other posts on this forum. So far only 6 hours, but if this sucker cracks I'll be surprised.

Hardware store aluminum angle stiffener:


1/8 sheet to spread the load, note the aluminum angle stiffener bolts to it at the outboard end:


Additional .040 doubler:


No photo unfortunately, but oil cooler attached with 6 thru bolts with sleeves between the flanges.

 
Just a Question

Has anyone made the cooler mount more flexible as opposed to stiffer? That head bangs around even if the engine feel is "smooth" . An outstanding engineer at Conti once told me: "on aircraft engines we frequently make things that break MORE FLEXIBLE to avoid load transfer". Since this cooler is essentially mounted to the head, has anyone tried rubber isolation mounts?

Just thinking and asking, as I will be doing what others have successfully done with case brace, inner spacer, thicker outer flange and stiffener to the head as well. Maybe I will try Matts lower stiffener too.

For reference no installation would ever bolt to a diesel engine head. A head bolt can see 50g's. Stuff bolted to heads (without engineering, analysis and testing) almost always fails. A lesson learned repeatedly as new engineers designed new things.
 
I too am going through this whole process, having cracked at about 80 hours from top to bottom. Doing the standard reinforceing and doubling....

If this doesn't work, going to look at some way to remote mount the oil cooler to the firewall. I know other models do it!
 
Just completed the repair on my cracked cooler mount. Standard Van's baffle installation. I only have 57 hours, and removed cowl for general inspection. Probably wouldn't have even looked at the cooler mount except that I caught this posting last week. There were hairline cracks above and below both platenuts on outboard side. I definitely don't think it would have gone another 50 hours.

Did pretty much what others have done with a 1/8" reinf. angle, 1/8" doubler under the existing stiffner angle on top portion of cyl. 4 baffle tied into the forward baffle screw, and brace to inboard side of cooler from backside of center rocker cover screw. I now have a new attach point to lift the engine. The whole fix took about 25 hours over several days. Done with the original baffle construction could have done it in a couple of hours with scrap materials from the kit.

I won't say it because many others already have.
 
Last edited:
Experiment awaiting test in 2012

Here is how I fabricated my oil cooler corner.
I will report on the performance in 2012. **EDIT** 2019, 800 hrs, still good. The J channel worked great.
I did some metal bashing to form stiffening flanges that were not in the plans and also added a J channel to stiffen the rear baffle. It is quite stiff.
Operation will prove whether it is enough or not.

13568529524d855b1532f90.jpg


13483774724d855bf5dddf0.jpg


6938503344d855bf5e7a30.jpg


9744268474d855ddd1d000.jpg
I like the rzbill way in post 28 which is btw similar to Ron RV8 in post 34. rzbill’s photos have disappeared; I’m glad I saved them in my Google Photos and I link to them below.

It appears I’m not the only one thinking the issue is not weakness in the corner but the mass of the oil cooler bending/flapping the corner like a hinge. This is addressed with either a beam or a brace and my eye finds the beam more elegant.

 
Last edited:
I did similar to Tracy after my baffle cracked in under 50 hrs. Then after repairing the baffle the oil cooler flange itself cracked. No more issues after the relocation, a new cooler and 700 hrs.
 
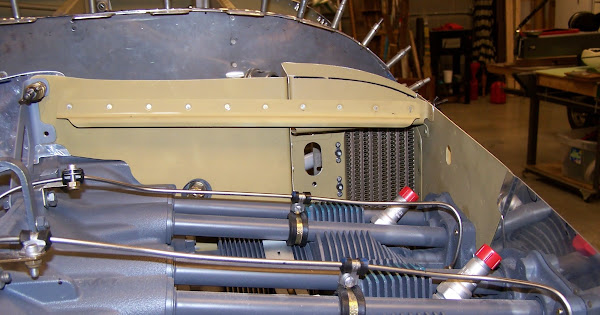
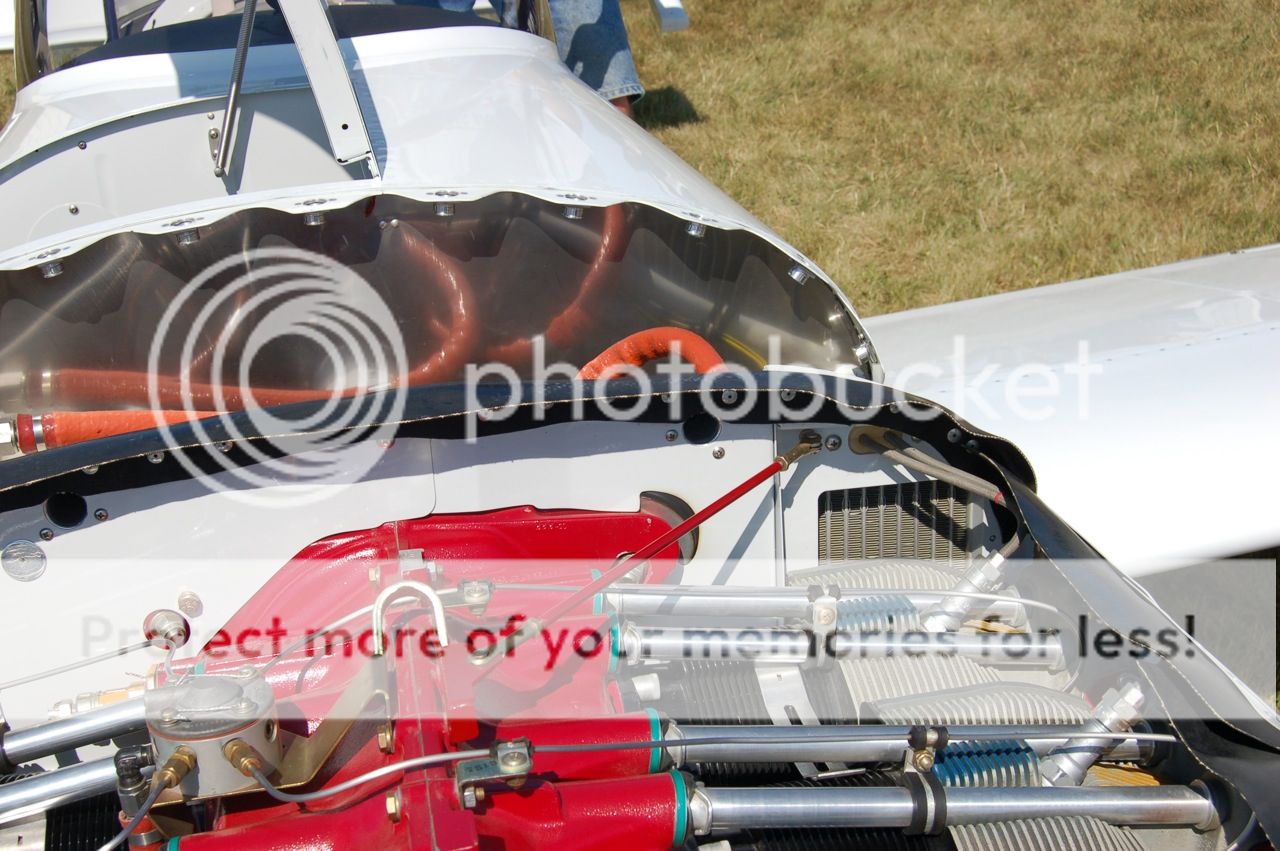
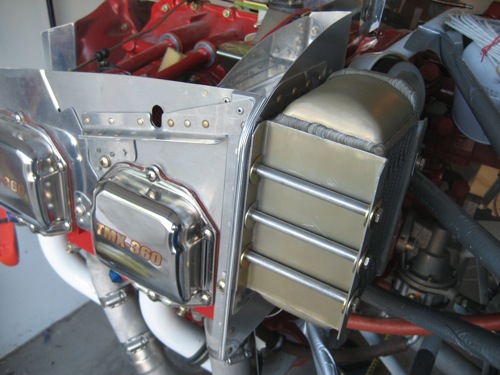
There are two kinds of Van's aircraft pilot/owner, with baffle mount oil coolers: those who have had cracks and those who will have cracks..... Direct mounting is handy and works, but by the time I repaired, reinforced, braced the cooler mount on my first RV it looked like bridge work. After you fix it work on keeping it from happening again is two fold.

1) Common solution is 
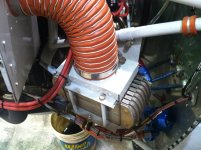
mount cooler off the baffle and use a short duct to connect the two, cooler supported off engine mount. Due to room on a flying RV it may be difficult and not desirable as a retro fit. New build strongly consider it. If you do remote or off baffle mount cooler, DYI design/Fabrication, or one of the kits the duct must be very large area, almost as large as the cooler. Do not use the old Van's kit with small SCAT and box plenum, it's insufficient. Min is a 4" SCAT. The transition going form round duct to rectangular at cooler should be smooth or funnel not a box. Exit air out of cooler, consider short, shield, deflector, baffle or duct to assure are exits in the right direction into a lo

2) During/After repair consider:
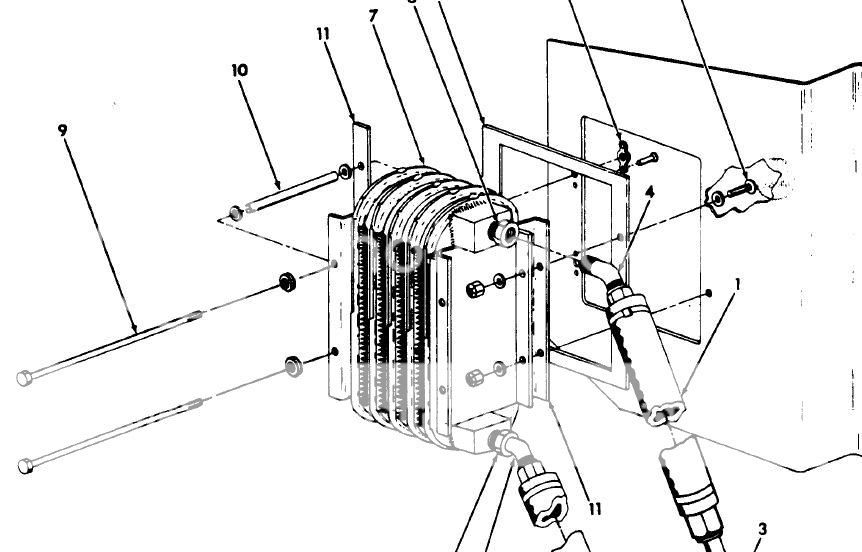
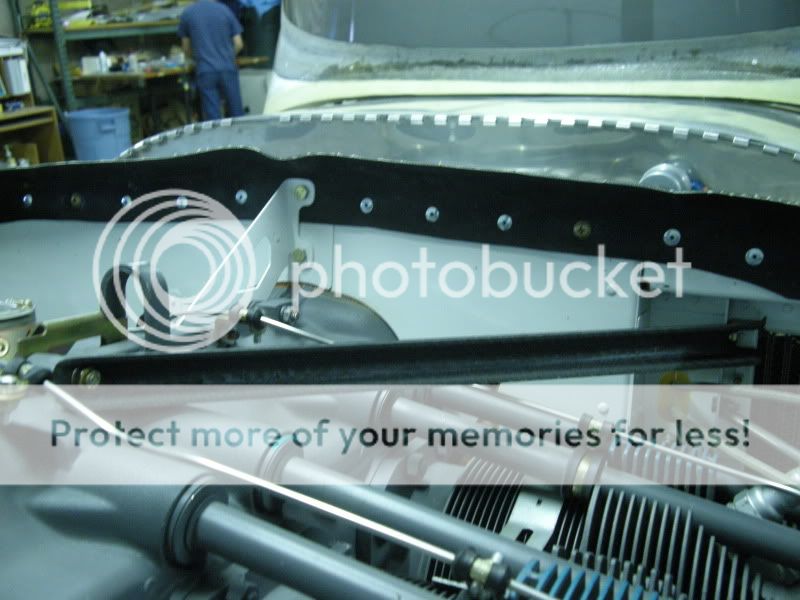
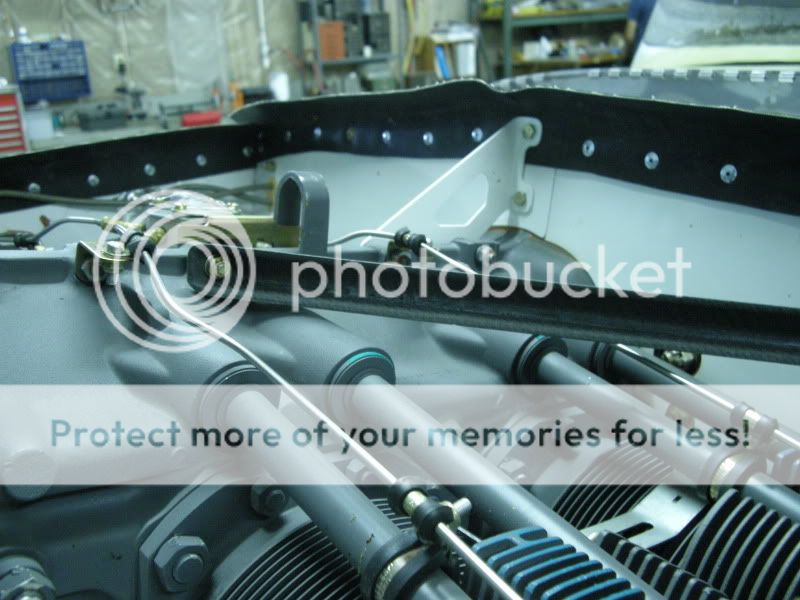
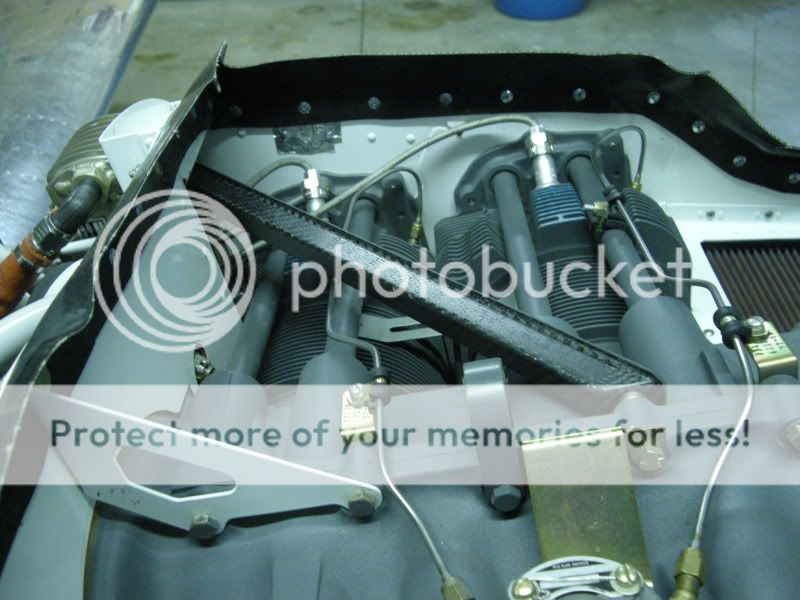
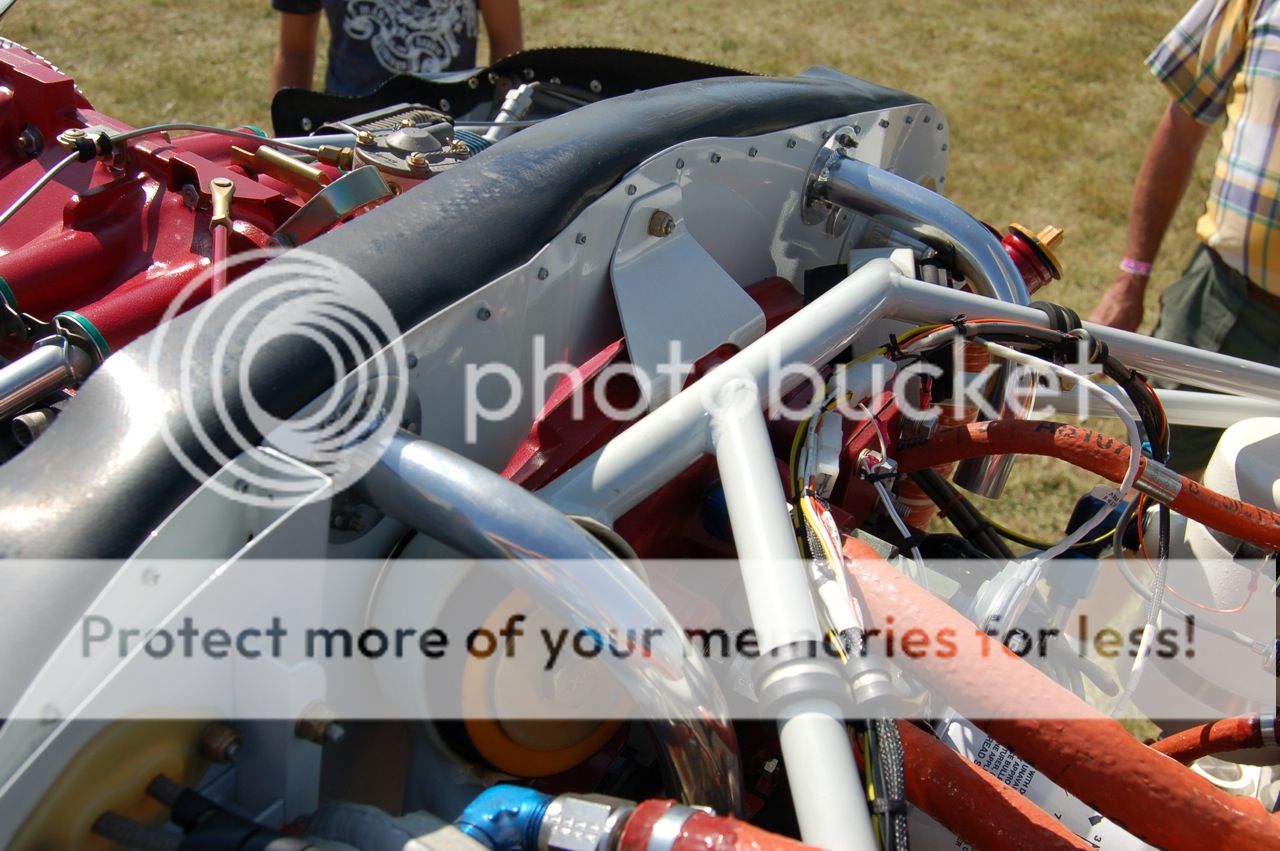
  • STRUT aluminum angle inside top of the cooling plenum, from top edge of cooler mount to lifting lug on engine or for example.
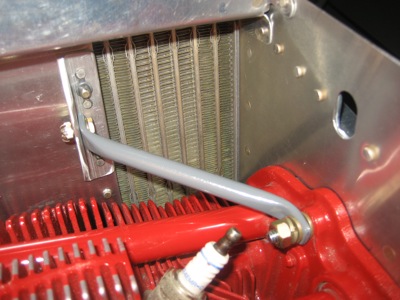
  • SUPPORT the hoses, with wiggle room to avoid all the dead weight of hoses hanging off cooler. Engine wiggles around crank axis and cooler moves mostly up/down.
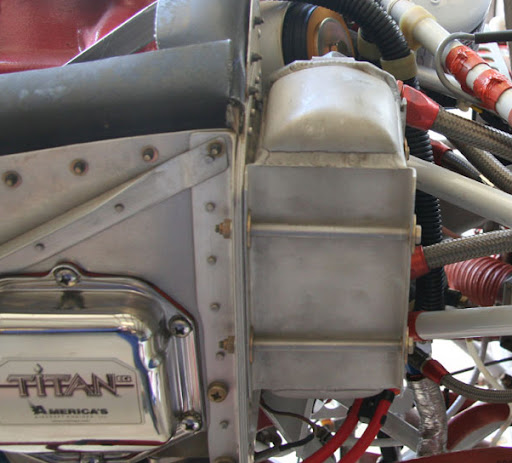
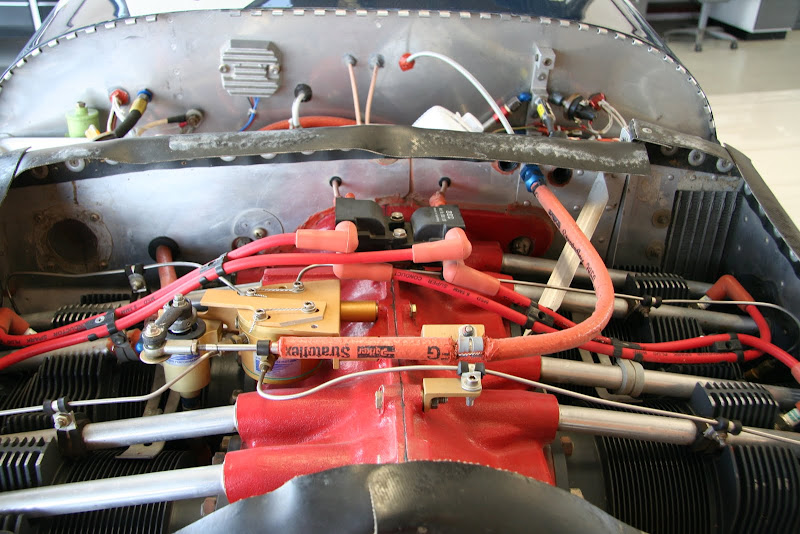
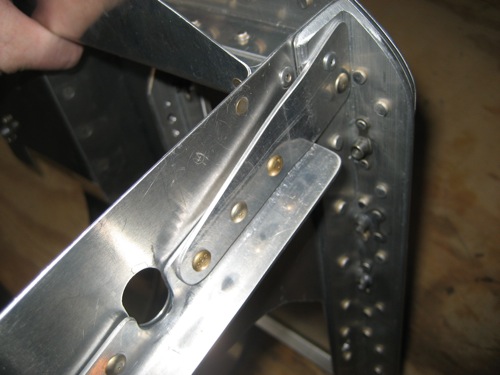
  • RADIUS FILLER on oil cooler flange, not just a washer. Radius filler, thick alum, like one long washer, fits tight into radius of cooler flange radius. Coolers can/do crack.
  • PROP BALANCED by Pro, at cruise and high power, RPM and MAP with prop in low pitch & OFF low pitch stop, i.e. cruise pitch.*
  • ENGINE ISOLATORS - get better newer engine vibration mounts **

+ I had a helicopter A&P / AI guy do my 2nd prop balance after another guy tried. Way different, Helo guy's detailed process and results noticeably better. This was almost 20 yrs ago. The 2nd balance several accelerometers used. His machine was paper tape graph recording. He knew if Vib's were from prop or accessory case. We did several run ups at different power, RPM's and MAP's, up to full power high RPM. Yes it was tied down well. Weights added, removed, moved and repeated test. NIGHT AND DAY.... In cruise I noticed it was smoother. I had it balanced by someone else before and it was not right. May be the 2nd balance was overkill but results were noticeable. IMHO prop balance is part math, physics and science and part art, skill and experience. Whatever he did worked. A poorly balanced prop will break things under the cowl. That is not new or news.
If you have not run up your engine with cowl off before or lately, try. Have video cameras set up, side, front, and record start up and shut down. Play it back at slow speed. Put some bright stickers on the valve covers. It reminds me of a wet dog shaking to dry off. There may be some youtube videos... Even if prop/engine is balanced large deflections starting and shutting down is common. See next Par.​
** The LORD deflection control isolators. engine mounts, the ones with with three pieces, two halves and a third silicon inner spacer to control large deflections I swear by. They are unbelievably expensive now, which makes the less expensive band attractive. But pay now or pay later (in broken parts). My first 300-400 hours cracked VAF Airbox and oil cooler mount. After prop balance with new mounts, the next 1300 hrs no issues. I can say the LORD mounts made a noticeable difference as did the second prop balance. Which had most pay back? Both. They both helped. If you change your engine mounts get prop balanced. At engine overhaul just replace engine mounts, they don't last forever. If your mounts are old replace them. Some RV's are now 20, 30, 40 years old, bought and sold. Original mounts? Replace them.
 
Last edited:
Back
Top