What's new
Van's Air Force

Don't miss anything! Register now for full access to the definitive RV support community.

Push button start w/ toggle magneto switches

WingnutWick

Well Known Member
Hello again,

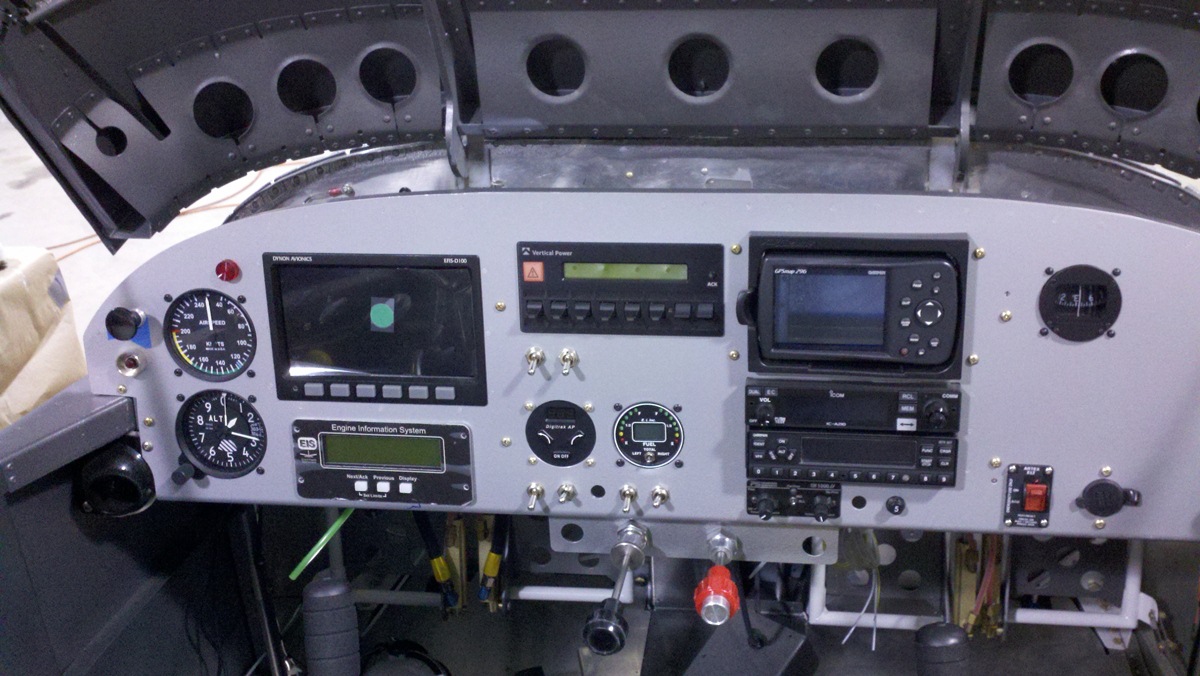
I am looking to change my standard key ignition to a push button start with toggle switches for the magnetos. While more mechanically savvy, I am the first to admit I'm not the most educated on the electrical side of the house (though I am learning). Looking on Aircraft spruce I see a variety of possible switches for both. For example the starter: http://www.aircraftspruce.com/catalog/elpages/pushbutswitch132.php and the magneto switches:http://www.aircraftspruce.com/catalog/elpages/metlevswitch.php#review_tab

But I am not sure if I am safe with the amp, volt specifications. I have your standard system with a 60 amp alt. For those who have done, or have seen this done before, I'm looking for suggestions on the best switches to use for this.

Thanks a lot!
Wick
 
B&C Starter Switch

Starter Push-Button Switch


Price: $17.00

Item Number: S895-1

I used this and two ignition toogle switches.
 
I use Mil Spec locking toggles for the ignition and a push button for start. The locking toggles ensure that you can't just bump the switch to the alternate position. I don't have P/N's with me but can supply them if needed.
 
Some suggestions...

Toggle switches - I highly recommend going with the slightly more expensive MS switches like these:
http://www.bandc.biz/toggleswitch-MS35058-22.aspx

Install them with protection so you can't accidentally turn the ignition off. I really like the Space Shuttle switch guards from Perihelion Designs:
http://www.periheliondesign.com/switchguards.htm

For the start switch, this one works well:
http://www.bandc.biz/starterpush-buttonswitch.aspx

While the B&C part comes with a circular guard, I prefer mine mounted under a hinged guard like this:
http://steinair.com/storedetail.cfm?productid=373

Note the round pushbutton switch fits perfectly under the hinged guard. If you're going to purchase the Space Shuttle guards for the toggle switches, Perihelion can also supply the hinged switch guard.

One other big note here. With a magneto, the engine runs when the P-lead circuit is not grounded. In terms of "switch-ology" this means the switch is open circuit "open" to make the engine run. We close the switch contacts to connect ground to the P-lead. This means we have to install the switch upside down in the panel. Keep in mind the normal orientation of a switch is "up = on = closed circuit"... in this case we want "up = engine run = OPEN circuit". This means we have to drill the small hole for the anti-rotation tab opposite the normal orientation for our ignition switches.

As an aside, some folks get very concerned about some kid inadvertently activating the starter while your airplane is at a breakfast or airshow. The quick fix for this is to install a circuit breaker collar on the starter circuit breaker, thus ensuring the starter never gets power. Similarly, a bar with a lock, a bolt with a nylock, or any similar device through the ignition switch guards prevents the switches from being toggled into the "live mag" condition.
 
I had a plane with two toggle switches for the mags. The left toggle mag switch was pushed up for the momentary position in order to start the plane. The plane had 2 slick mags, with the impulse on the left mag.

If I had to perform an "in the air" restart, I had to remember to turn off the right toggle switch before pushing the left toggle switch up to restart. The starter would not engage if I forgot to turn off the right mag. I found after years of flying with a keyed mag/starter, this new procedure was unnatural to me. I was concerned I would forget to turn off the right mag in order to restart the engine in a real emergency. I replaced these toggles with the standard keyed starter/mag.

I only post this as something to consider before making the switch.
 
Last edited:
I didn't build my plane, but the gentleman who built it did exactly what you're proposing and I really like the way he did it. Here's a photo showing the two locking mag switches (you must pull them out to operate), the starter button enabler switch (lower right), which is protected, and the starter button below that. Hopefully you can do some googling based on this image to figure out the parts. My logs, etc. are in storage at my A&P's place.

Screen%20Shot%202015-07-21%20at%202.41.07%20PM-XL.png
 
I use Mil Spec locking toggles for the ignition and a push button for start. The locking toggles ensure that you can't just bump the switch to the alternate position. I don't have P/N's with me but can supply them if needed.

Dan - just a thought here, with no negative intent.

I considered using the locking switches and in fact purchased them. Then I got thinking about the "what if's" and realized there was a down-side to the locking switches. The down-side is that we can't turn the engine off quickly when using them. In the event of a couple of situations happening (losing the tip of a prop in flight, losing brakes on the ground in tight quarters), one wants to be able to kill the engine quickly. Grabbing the mixture is one option, switching the ignition off is another. With locking toggles that second option is removed.

That's why I opted to go with guarded switches rather than locking switches since the guarded switches can be turned off in one downward motion with two fingers.

Again, just throwing this idea out for consideration. We all have our preferences.
 
Stick Grip Switch and Enable Circuit

I have my starter switch on the pinky button of the stick grip, which lets me keep the stick back when starting. But I put an enable switch in the loop on the panel. The switch has to be up to complete the circuit so that the starter engages when you push the button. If the circuit is open (switch down and guarded), the pinky button does nothing.

I also have two toggles to ground the mags. My impulse coupling is on the left mag, so I start with the left mag switch up and then I switch on the other (unground) once the engine is running.

Works great.

-Matt
N402BD
 
Dan - just a thought here, with no negative intent.

I considered using the locking switches and in fact purchased them. Then I got thinking about the "what if's" and realized there was a down-side to the locking switches. The down-side is that we can't turn the engine off quickly when using them. In the event of a couple of situations happening (losing the tip of a prop in flight, losing brakes on the ground in tight quarters), one wants to be able to kill the engine quickly. Grabbing the mixture is one option, switching the ignition off is another. With locking toggles that second option is removed.

That's why I opted to go with guarded switches rather than locking switches since the guarded switches can be turned off in one downward motion with two fingers.

Again, just throwing this idea out for consideration. We all have our preferences.

That is a good point that Klaus Savier once made to me. But then he races and uses a home brew prop. However I have a certified metal prop and consider the risk minimal, and at most it might cost me a second. Certainly, the flip up guards would be considerably slower.
 
sstarter push button

I use a marine quality push button - no problems with the electrics that way. Also, the thing is fairly hard to push, so accidental activation of the starter is minimized. Toggles that work great can be found at the Aviation Aisle at Homey Depot - get those rated for higher amperage. You don't need the amps, but you do need the quality.

Carry on!
Mark
 
...I considered using the locking switches and in fact purchased them. Then I got thinking about the "what if's" and realized there was a down-side to the locking switches. The down-side is that we can't turn the engine off quickly when using them...

...That's why I opted to go with guarded switches rather than locking switches since the guarded switches can be turned off in one downward motion with two fingers.

Again, just throwing this idea out for consideration. We all have our preferences.

There are several different configurations of the “pull and flip” locking toggle switches. I have some laying around that require the 2 separate actions in one direction only – i.e. pull and flip to “ON”, but only a single flip action to return to “OFF”. I’m not a big fan of having an ignition switch that can “easily” be moved to “OFF”, but it might work for some.

Another concept is the use of one toggle switch to turn the ignition “ON” “OFF” and (momentary) “START”, and another toggle (3 position) which controls the mode – i.e. “LEFT” “BOTH” “RIGHT”. In this case, one switch can kill both ignitions if needed.
 
Last edited:
One advantage of the toggle switches is that one can be easily rigged to act as an ON/OFF for a single side Electronic Ignition.

No relays involved, which would usually be the case with a rotary switch.
 
I use two DPDT toggle switches (three positions) located ahead of my throttle quadrant on a self produced angled mounting plate.

The switches are wired to provide an interlock for the starter switch located on my Infinity stick grip. Below you see the left and right switch positions - top,middle, and bottom.

Left Mag. Right Mag
ON (Start). ON
GND. GND
GND. GND (Start)

You can engage the starter in two ways:

Left = top, and right = bottom (left impulse mag on, right mag grounded- this is the normal start position.
Left = middle, right = bottom. Starter can engage but both mags are grounded - this is a maintenance mode)
In any other position the starter is locked out. For instance, after a normal start the right mag switch is flipped to ON and the starter circuit is bypassed.

Don
 
Thanks!

Thanks guys, this is all great info and exactly what I was looking for. I like the flip up guard push button and the mil spec mag switches. blueflyer I am a little confused why you have to turn off the right mag for a re-start. With my understanding, if you had to restart the motor in flight, you would want both the mags on correct?

Thanks all!

Wingnut
 
Generally, only the left magneto has an impulse coupling which delays the spark plug firing until top dead center. A keyed ignition switch automatically disables the right magneto when turned to the start position. Leaving both on when starting would cause the right mag to fire it's plug well before TDC and would prevent the engine from starting.
 
Wingnut - for in-flight starts, the question of whether or not the right mag is turned on is based on whether or not the prop is windmilling.

If windmilling, the prop is turning far faster than the starter would crank the engine, so the impulse coupling would not be active. Keep the right mag on in this instance.

If the prop is stopped, logic would dictate that using the left mag would be the best option when engaging the starter.

Frankly, if the prop stopped for reasons other than a maneuver which resulted in a drastic airspeed reduction, then you're not likely going to be worrying about which magneto to use! LoL
 
I am a little confused why you have to turn off the right mag for a re-start. With my understanding, if you had to restart the motor in flight, you would want both the mags on correct?

Thanks all!

Wingnut

During start, the mag with the impulse coupler (typically left) should be the only one active. Otherwise, the right mag, firing 25 or so degrees BTC could cause the engine to kick back against the starter and possibly cause damage.

That said, if you are going with P-Mags instead of standard magnetos, it is a non-issue. P-Mags deal with starting automatically (from what I've been told).
 
Last edited:
Keyed switch

I used a marine keyed switch for the starter instead of the push button and toggle switches for the mags. I like having a key.
 
The RV-12 Uses toggle switches for the dual electronic ignitions and a key for the starter switch. That seems to be a good security item.
 
I have done a push bottom before for starter, but had a momentary toggle switch too. You had to hold the momentary toggle and mash the button at the same time to crank. Virtually impossible to accidentally do, especially because they were fairly high on the left side of the panel. It worked great. Mags were two toggle switches.
 
My -6 came with the standard key switch, but I didn't like the keychain swinging around in a circle while doing rolls.

I took it out and replaced it with three stout toggle switches. SPST for the left mag (on-off), DPST for the right mag (On-On), and SPST momentary (Off-(On)) for the starter.

The starter is wired through one side of the Right mag switch, so with the right mag switch down (mag off) the starter is enabled. The other side of the Right mag switch is wired to the mag, up on, down off.

The starter toggle also has one of the red flip covers for protection in flight. Don't want to be hitting it by accident, although the interlock on the Right mag switch should protect it.
 
I was concerned about too much complexity during an in flight restart.
I went simple, with toggle switches (upside down) for mags and a push button for starter.
I have old Bendix 200 mags, the left has Shower of Sparks. The starter button also activates two automotive (black ice cube) relays. One engages the retard points, the other powers up the starting vibrator (Shower of Sparks). I start with left mag only, which automatically is retarded when I push the start button, but I have tried it with BOTH mags ON and it starts just fine with out kick back (cold engine) possibly because the right magneto has to turn about 120 RPM to make a spark? The starter doesn't quite turn the engine that fast, or it's fast enough to carry through and start.
I just thought it would be too difficult to tend the throttle, hold the stick back, hold a safety toggle and push the start button with only 2 hands? :confused:
If the engine quits during a whifferdill, I need to continue to fly the plane, plus push the start button. I'm thinking about moving the start button to the throttle handle...
 
I was concerned about too much complexity during an in flight restart.


....


I just thought it would be too difficult to tend the throttle, hold the stick back, hold a safety toggle and push the start button with only 2 hands? :confused:
If the engine quits during a whifferdill, I need to continue to fly the plane, plus push the start button. I'm thinking about moving the start button to the throttle handle...


Very good observation Scott! Once in a while I practice dead stick approach and landing with prop stopped. I have my hands full when I need an airborne restart. Start button on the throttle or stick would be a great idea.
 
I'm thinking about moving the start button to the throttle handle...

Caution: Having a single start button on either the throttle or stick could be an issue if you bump it accidentally. I suggest wiring one on the throttle and a second on the stick. Hook them in series, so you have to push *both* to engage the starter. That way, at least you need *two* inadvertent button pushes to accidentally start it.
 
A simple guarded arming switch generally solves the accidental starter bump issue. I have the start button on the stick and it works well.
 
I use a double pole single throw switch for the right mag. Wired so that the starter solenoid circuit only gets power when the right mag is earthed. that way the starter will not activate if the right mag is on. To restart a stationary engine in flight the right mag has to be earthed and the left mag On. No risk of damage to the ring gear or starter. Just flip thee right mag on and the starter cannot activate.
 
A simple guarded arming switch generally solves the accidental starter bump issue. I have the start button on the stick and it works well.
That is the other option, but he said he was thinking about having his hands full for an in-air restart, possibly close to the ground... Needing to take your hand off the throttle or stick to reach over and flip an "arming" switch is much slower than just hitting the two buttons that are already at your fingertips.

The harder part is finding a good throttle grip that has buttons.
 
A simple guarded toggle seems the best solution to me. This should provide enough protection from inadvertent actuation. With the guard set to hinge upwards, a single movement of the forefinger from below can flip the guard and actuate the switch in one go. If the prop is stopped then your throttle hand is doing nothing. The starter switch should be near the throttle.

As far as using locking toggles for the mags, I don't see the problem. You don't shut down the engine with the mags normally, so why do anything different in an emergency? When the s@&t hits the fan, your flying hand will no doubt be in a white knuckle grip on the stick, meaning once again it's the throttle hand that's available. The quickest way to shut down the engine will be what comes naturally, and that should be to yank back on the throttle, mixture or both. Mags come after and the locking feature shouldn't be an issue.
 
And this is why I use this form!! I would have never known about the mag needing to be off, or the fact that the switches have to be wired opposite. I decided to go with a double pol switch to manage this. Toggle switches with guards.

Thanks for all the help!

Wingnut
 
wire diagram

OK guys,

I have the switches in hand and I just want to run it by a couple eyes to make sure I'm wiring these up correctly. Keep in mind I am not an EE and have limited electrical experience, so I am looking for a QA. Reference the photo attached. Top is the traditional switch I have, and below is how I am thinking of wiring it. Note, the two mag switches are single POL. So what I did was run the power for the starter through the R Mag switch. Seeing as the mag only works when the switch is in the OFF position, this would kill two birds with one stone: switch in ON(DOWN) position = starter button is "hot" and R mag is off (grounded). After start I switch it UP (switch apparent OFF) which turns on the mag and prevents the starter from being used. Is there an issue with this thinking? Primarily making a dual use out of a single POL switch in this instance?

Finally, please check over the rest of the diagram. I figured I'll connect the two grounds for each mag together to the ground wire that I take off the original switch. The numbers are associated with the numbers on the keyed switch diagram.

Any QA is appreciated before I move forward! Thank you!!!

-Wingnut

PS: I am wanting to use a single pol vice double pol on the R mag switch simply because the switch I want to use is single pol only.

PSHSTRT.png
 
Buy a DPST switch. They are cheap. Your diagram has B+ going to the mag. You can isolate the starter and mag grounding with another pole (DPST)
 
Buy a DPST switch. They are cheap. Your diagram has B+ going to the mag. You can isolate the starter and mag grounding with another pole (DPST)
I think that's what he's showing... black on one side, red on the other. It took me a minute or two to figure that out - otherwise the bigger problem would be the battery being grounded. :)
 
PS: I am wanting to use a single pol vice double pol on the R mag switch simply because the switch I want to use is single pol only.

You can't. In your circuit, if you use a single pole switch for the Right mag, when you turn the mag on you will short the Battery to Ground. That'll melt the wiring right out of the cockpit.

You have to have a double pole switch for the Right mag switch. Red circuit as you drew it on one side, black circuit as you drew it on the other.
 
Some suggestions...

One other big note here. With a magneto, the engine runs when the P-lead circuit is not grounded. In terms of "switch-ology" this means the switch is open circuit "open" to make the engine run. We close the switch contacts to connect ground to the P-lead. This means we have to install the switch upside down in the panel. Keep in mind the normal orientation of a switch is "up = on = closed circuit"... in this case we want "up = engine run = OPEN circuit". This means we have to drill the small hole for the anti-rotation tab opposite the normal orientation for our ignition switches.

Or just use SPDT switches and use the opposite terminal.
 
I see what you're saying though (purely for my own understanding) I think you mean when the switch is ON, to mean the R MAG is off, then the batt would be connected to the ground. Looks like I am stuck with the double pole or the SPDT method. Thanks a bunch for the help and please pardon my lack of electrical expertise.
 
I see what you're saying though (purely for my own understanding) I think you mean when the switch is ON, to mean the R MAG is off, then the batt would be connected to the ground. Looks like I am stuck with the double pole or the SPDT method. Thanks a bunch for the help and please pardon my lack of electrical expertise.

This is all covered in detail on Bob Nuckoll's Aeroelectric.com web site. Here is just one example... The site has many more... http://www.aeroelectric.com/PPS/Adobe_Architecture_Pdfs/Z11N.pdf
 
I put my simple B&C pushbutton switch way over on the left of the instrument panel and up high, allowing me to use the right hand on the throttle. There's NO way you can accidentally brush up against the switch in that configuration (and if you could, why is your master on in the first place?)

The two toggle switches -- on to ground for the mag, and one to the CB for the Lightspeed -- are grouped together AWAY FROM ALL OTHER TOGGLES .

A lovely, and simple configuration and solution that costs about $25 tops.

I'm not the smartest guy in the world, but I'm glad I did it this way. (More info)

2011-10-14_19-26-55_168.jpg
 
Last edited:
Canadian_Joy said:
This means we have to drill the small hole for the anti-rotation tab opposite the normal orientation for our ignition switches.
Is it just me or do others just snip the anti-rotation tab off their switches as well? I don't find my switches rotating after installation. I have a socket that fits over the locking nut on the switch, that was ground flush so it would grab all the way into position flush against the panel. With that, i've always been able to lock the switch in place so it wouldn't turn.

I think the bodies are too close together behind the panel to allow one to turn more than 20 degrees or so... So I wouldn't lose any indication of which way the switch is turned, even if it did come loose.

I installed a small 2-hole doubler plate behind the mag switches on the right fixed portion of the instrument panel. The anti-rotation tab engages the edge of the doubler preventing the switch from spinning even if the nut loosens up over time.
 
Is it just me or do others just snip the anti-rotation tab off their switches as well? I don't find my switches rotating after installation. I have a socket that fits over the locking nut on the switch, that was ground flush so it would grab all the way into position flush against the panel. With that, i've always been able to lock the switch in place so it wouldn't turn.

I think the bodies are too close together behind the panel to allow one to turn more than 20 degrees or so... So I wouldn't lose any indication of which way the switch is turned, even if it did come loose.

There's a really neat trick to dealing with these anti-rotation tabs if one is fabricating a panel and has good access. If one uses a small-diameter cutoff wheel on a Dremel tool, one can make a 1/8" wide divot in the back side of the aluminum panel with its depth controlled by the radius of the cutoff wheel. The anti-rotation tab will sit quite nicely in this little slot in the back side of the instrument panel. When the nut on the switch is torqued, the anti-rotation tab will bend backwards slightly since it's not protruding through the entire thickness of the panel.

This technique allows the switch to be free from rotation while the face side of the panel isn't marred by the appearance of the anti-rotation holes.

If one is fabricating a net-new panel it only takes a few minutes to grind these little divots into the back side of the panel. One can also add a divot above and below the switch to allow the switch to be clocked normally (up = ON) or reversed.
 
Or, backing plate with locating holes. This is my ignition or mag switches. Haven't identified an engine yet. Before I installed the panel I drilled locating holes on the opposing side so I can be either mags off or e-mags on just by turning the switches over.
 
Is it just me or do others just snip the anti-rotation tab off their switches as well? I don't find my switches rotating after installation. I have a socket that fits over the locking nut on the switch, that was ground flush so it would grab all the way into position flush against the panel. With that, i've always been able to lock the switch in place so it wouldn't turn.

I think the bodies are too close together behind the panel to allow one to turn more than 20 degrees or so... So I wouldn't lose any indication of which way the switch is turned, even if it did come loose.

My solution for anti-rotation was to have the tabs machined into the panel in the first place. Works perfectly.
But you do have to think about this at the beginning of panel design/fabrication.

DSC014461.JPG
 
Back
Top