What's new
Van's Air Force

Don't miss anything! Register now for full access to the definitive RV support community.

question on match drilling practice kit

spaceflightmeow

Active Member
I have a match drilling conundrum on the Van's practice "rudder" kit. In the picture below, you see a three-layer stack which must be drilled. The top (end rib flange) and bottom (skin) pieces have prupunched holes, but the middle piece (spar) has no hole. The top and bottom holes are not perfectly aligned, so if I just back drill through the skin, it will make a figure 8 hole on the spar.


What to do?
 
It's been a long time since I did a practice kit so perhaps I'm wrong, but just from your pictures I would:

1: Cleco the ribs onto the skin aft of the spar.
2: Cleco the spar onto the ribs using what holes you already have (in the web).
3: Drill into the spar in the intermediate holes between the ribs, but not on the rib hole yet. Cleco as you go.
4: Remove the ribs but leave the skin/spar assembly clamped together.
5: Drill the last hole in the spar using the skin but not the rib.
6: Reassemble and match drill that last hole.
7: If it doesn't line up something else is wrong.

I'm in the process of a wing kit (RV9) right now and this type of problem occasionally occurs. The procedures for drilling the wing walk doubler come to mind...
 
Last edited:
That should work, thanks! It was late and my brain was asleep. Glad I put the drill down and came here instead of pushing ahead and doing something stupid.
 
I recently completed 2 of these practice projects. I do not recall having this issue, however on the first project, I did a poor job aligning the rib and edge of the spar, which caused a miss alignment of the spar doubler. I took it as a lesson learned about attention to detail with alignment, and got my first experience drilling out rivets. Since it was practice, I let the bad doubler drilling slide and completed the project. From your photo it appears the rib flange is slightly inset from the edge of the spar. It should be exactly flush. This would account for the misalignment of the prepunched holes.
 
This is a good situation for practice. The challenge is that using a thin skin to keep your bit aligned is not a good situation. There is not enough area to keep the bit in place. This is a situation that will occur many times. You have several options.

Drill a proper hole in another piece of material about the thickness of the spar. Deburr, then as you have clamped and aligned all, and this is near the last hole, use this thicker piece as a drill guide to drill through the pieces.

Or - assemble, cleco, and get everything else aligned, then before you drill this missing hole, mark it with a sharpie through the skin on both sides, use a good set of magnifiers to center punch the hole position, (you may beed to dissemble to see it well) then drill it dissembled with 2 sizes smaller drill bit. Reassemble, use a punch to get best alignment, clamp with cleco or swivel foot vice grips (which ever you have and works best), and then match drill to final size.

I think the latter method would yield the best results.
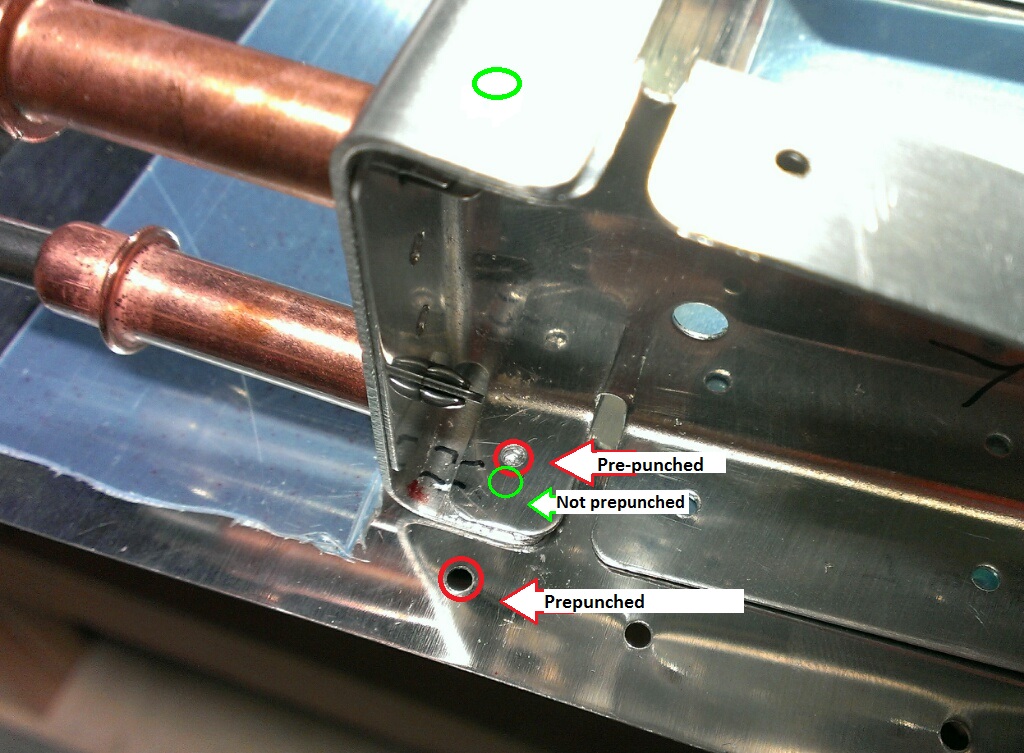
 
I found many times throughout my build that when holes didn't align, there was usually a part which was improperly oriented. Turn around the offending part and suddenly things fit.

I can't confirm that this is the problem here, but something to watch for during the build. Van's often drills parts in a non symmetrical manner so that they can only go together one way. Sometimes it's not immediately obvious so when this happens take a step back and ask yourself, is there another way this could go together...?
 
Back
Top