What's new
Van's Air Force

Don't miss anything! Register now for full access to the definitive RV support community.

Set rivet diameter and height on dimpled surface

N5916R

Active Member
Don't know how to put this into the search function so it has probably been talked about and I just can't find it. Here is the question:

Doing some practice kits again before I start to rivet skins to structure. I have a rivet guage that shows the diameter of a properly set rivet as well as a notch that if the rivet fits under, it is supposed to be the correct length. On a dimpled surface I get the correct diameter but the rivet seems too "long". I can only guess that setting the rivet against the dimple is what is casing this. Any thoughts?

Thanks
 
Best thing I did, regarding checking my rivets, was to put aside my rivet gauge and grab my dial indicator, dial calipers, whatever you want to call it. The rivet gauge is great for a quick recalibration of your eyes but it doesn't tell the whole story.

There is quite a tolerance in shop head diameter, but in some references there is a max shop head height and in others there is not.

From what I understand, sometimes the length of the rivet is not the exact size required (maybe a little too long), in which case you will in fact end up with a shop head that is a bit longer than what your rivet gauge will show as acceptable. The main thing here is that the rivet that is a bit too long is one that has been called out by the plans.

Take the above for what it's worth. I'm no expert, but maybe one will pitch up with some advice.
 
The short answer to your question would be that the notch should fit over the top of the shop head of the rivet and stop at a height that is approximately offset by the height of the dimple. I'm totally guessing here, but I'd say it'd be somewhere around 1/16".

In my opinion, the rivet gauge "key" can be a bit misleading sometimes. Depending on the surfaces you're riveting and the exact length of rivet chosen for the stacking of materials, you may not be able to use the hole or depth on it as an absolute measure of perfection. For instance, if you choose a rivet that is on the acceptable-but-short side, it may not fill the hole until it's been squashed too short. Likewise, if you use an acceptable-but-long rivet, you may need to squash it to the right height but now it's too fat for the hole. It's all relative, and there is a somewhat large gray area.

I don't want to advise against using tools like these to double-check your work, especially early on while doing the practice kit... but realistically once you start building for real and get a few hundred rivets under your belt you probably won't use the key very often, if at all, to inspect your work.

There is a "perfectly" set rivet that is the perfect length for the chosen material thickness, and then you can use the key to show that it fits perfectly in the hole and is just the right height... and then there is a +/- 10% deviation from perfection that can easily be seen by the eye after a bit of practice. I think most builders on here would agree all we really care about is to be within that +/- 10% range, there is very little cosmetic and essentially no structural difference between a perfectly set rivet and one that is close.
 
It's probably worth checking this document which is on Van's site:
Mil-Spec for rivet installation

You can use a measuring tool to see if the shop head is within the specification.

As for which length rivet to use, that's worth verifying out, too. The length suggested by the plans is the right place to start, but you might need to vary that in a particular instance.

Dave
 
?..... On a dimpled surface I get the correct diameter but the rivet seems too "long". I can only guess that setting the rivet against the dimple is what is casing this. Any thoughts?

Thanks

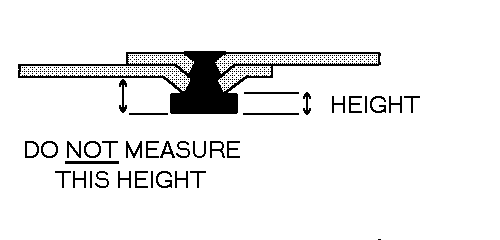
The length is checked from the top of the dimple to the top of the shop head. I'm guessing you are checking the length from the wrong starting point. Think of the case of a standard 470 rivet. Your gauge would check from the base metal to the top of the shop head. Dimpling raises the base metal.
 
I have a rivet guage that shows the diameter of a properly set rivet as well as a notch that if the rivet fits under, it is supposed to be the correct length.

I'm not sure you're using this correctly...the hole for the diameter is the *minimum* diameter (the rivet should NOT pass through the hole), and the notch is the *minimum* height (the gauge should not pass over the rivet, or at least just *barely* pass over it).

If the rivet fits through the hole, it's underdriven. If it passes underneath the notch, it's either overdriven or was too short initially.

That said, everyone else here is right...you'll get to where you don't really need to use the gauges, unless there's a question about a particular rivet. And the general rule is that one that is overdriven but has sufficient *diameter* is acceptable (as long as it's not smashed down totally flat).
 
From my several decades old web site that created the Mil-spec document that Vans ripped off... :)

cs_rivet.gif


It was in the introduction to the Mil-spec document.
 
the hole for the diameter is the *minimum* diameter (the rivet should NOT pass through the hole), and the notch is the *minimum* height (the gauge should not pass over the rivet, or at least just *barely* pass over it).

Since the gauge measures these as minimums, it is acceptable for the rivet to enter the hole and still meet the minimum (as long as there is no play).

Regardless, keep in mind that the gauge is to check that you meet the rule of thumb guideline of .5 rivet diam for thickness and 1.5 of its diam for shop head diam.

These are not the absolute minimums as far as meeting the MIL Spec are concerned.

This is described in the more recent rev. levels of Section 5 of the construction manual.
 
Since the gauge measures these as minimums, it is acceptable for the rivet to enter the hole and still meet the minimum (as long as there is no play).

Yep...just making sure somebody wasn't using the tool "backwards" (ref. the statement about the notch passing over the shop head). Thanks for clarifying!
 
I keep hearing in my head "for the purpose of education and entertainment"....the answer was right there in the diagram DO NOT MEASURE THIS HEIGHT. But the rest is educational. The further I get down the road, the more I am believing that your wings are better than your tail and your fuselage is better than your wings as you gain more experience with all aspects.

I squeezed about 100 rivets on my rear HS spar today with my Main Squeeze. That is a chore. But I left thinking it was like splitting and stacking firewood, hard work but a sense that when done I had actually done something. Good times.
 
I keep hearing in my head "for the purpose of education and entertainment"....the answer was right there in the diagram DO NOT MEASURE THIS HEIGHT. But the rest is educational. ......

Unfortunately everyone took the web based Mil-Spec we generated but never took the introduction diagram that was made specifically for typical RV skin rivets...:rolleyes:
 
Gauges

Maybe my gauges are different but the holes in mine are definately not minimum Mil Spec dimension. They are ideal diameter and the notch is minimum height.
I made new ones with a minimum diameter hole and ideal diameter hole. A perfect shop head fits the ideal hole. If a shop head fits the minimum hole, I drive is a little more but stop before the shop head is shorter than the notch.
 
Avery Tools

Maybe my gauges are different but the holes in mine are definately not minimum Mil Spec dimension. They are ideal diameter and the notch is minimum height.
I made new ones with a minimum diameter hole and ideal diameter hole. A perfect shop head fits the ideal hole. If a shop head fits the minimum hole, I drive is a little more but stop before the shop head is shorter than the notch.

If they are stamped "AE" they are made by Avery and their web site says this (my bold) -

SHOP HEAD RIVET GAUGE SET
Set of four gauges for -3, -4, -5, & -6 rivets. Each gauge measures MINIMUM height and MINIMUM diameter of shop heads AFTER setting. Eliminates guessing if your rivets are properly set. Works for measuring both universal head and flush rivets. Precision machined to size from 2024 aluminum. Rivet size permanently stamped on each gauge. Color coded anodized finish. MANUFACTURED IN OUR OWN SHOP. Instructions included. PART # 1007
 
Regardless of what the catalog says, I am pretty sure that if you measure the gauges you will find that they match what the .5D X 1.5D rule of thumb dimensions would be, not what the MIL Spec minimums are.
 
100deg -110 deg

So to set the right rivet dimensions makes sense but a question in regard to the dimple deg. Watching an old WW2 training film the dimple on the underlying skin should be set to 110 deg with the overlying skin set to 100deg.
You may have already had this discussion I was wondering is this still common practice?
 
Gauges

Regardless of what the catalog says, I am pretty sure that if you measure the gauges you will find that they match what the .5D X 1.5D rule of thumb dimensions would be, not what the MIL Spec minimums are.

Yep. Exactly how mine measure.
 
Regardless of what the catalog says, I am pretty sure that if you measure the gauges you will find that they match what the .5D X 1.5D rule of thumb dimensions would be, not what the MIL Spec minimums are.

I just checked my Avery gauges and Ken is absolutely correct - they are sized for a "perfect" 1.5/0.5 rivet head.

I made the mistake of believing the web site blurb. Mine are old ones and I assumed the current ones meet the words in the web page...:rolleyes:

A minimum size 1/8 rivet head diam. can be 0.024 inches less than the gauge hole - a very loose fit but still in spec.
 
Minimum

Makes you wonder how many planes are flying around with rivets below minimum diameter. The gauge will fit.:eek:
 
I made the mistake of believing the web site blurb. Mine are old ones and I assumed the current ones meet the words in the web page...:rolleyes:

They probably don't Gil

Not Bob's fault... for decades, RV builders have been led to believe that 1.5 X .5D was the absolute rule. I did myself.
 
18 years....

They probably don't Gil

Not Bob's fault... for decades, RV builders have been led to believe that 1.5 X .5D was the absolute rule. I did myself.

Hopefully not for the past 18+ years.

Vans mentioned the specs in a RVator and had links on the company web site to spec. in 1997...

https://web.archive.org/web/19970628182402/http://www.vansaircraft.com/internet/links.htm

A decade later in 2007 it was directly hosted on the company web site.

Should be enough time for builders to catch up...:)
 
Should be enough time for builders to catch up...:)

Well, I think it is obvious it is not.

Since even the first of this year, the forums are full of posts where people say Van's speced out too short of a rivet for such and such... there is no way that it can meet the minimum diam and height specs. Other posts that say it must be .5D thick and 1.5D in diam. And on and on.....

Yes, Section 5 in the construction manual talks about it and even mentions that sometimes a rivet call out is made because it will meet the actual MIL Spec minimums and avoid using the next longer rivet which would have much higher risk of getting a bad shop head and a possible damaged hole when they attempt to remove it.
 
I actually went back and read the instructions on my rivet tool....Cleveland version purchased this year. For mine if the rivet fits the hole but has no play in it, it is set at the minimum.

I wont even tell you guys about shearing 4 AN3 bolts because I had never used this IN LBs torque wrench and how little pressure you really need to torque those...........The education continues.
 
So far in this thread, unmentioned is the study done of rivets that weren't set to specifications. Some were under-driven, others over-driven. A few were bent over.

I don't have that study at my fingertips to include here, but IIRC, even the worst-driven rivet maintained a very high percentage of strength when compared to perfectly driven rivets.

The bottom line is that, once you have driven a rivet, unless it is complete shambles, you are likely better off leaving it alone, as you are more likely to do additional damage by trying to remove it.

OTOH, if you have an entire row of "bad" rivets, you might reconsider. But one or two bad rivets in a row won't reduce the strength of the assembly in a measurable way.

BTW, it's a light-weight "tractor". :p
 
Back
Top