What's new
Van's Air Force

Don't miss anything! Register now for full access to the definitive RV support community.

Build table ideas

MekMouse

Active Member
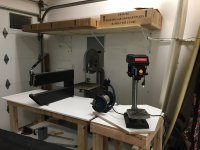
As i'm getting the shop set up while waiting on that elusive first kit to appear. I probly should get a work table put together.

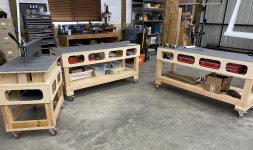
I have built several benches and tables for different project purposes so I have a few ideas for this one as far as functions and features go. One question I'm wondering about is the dimensions.
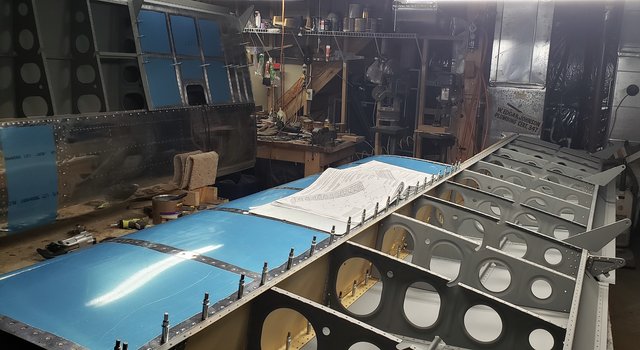
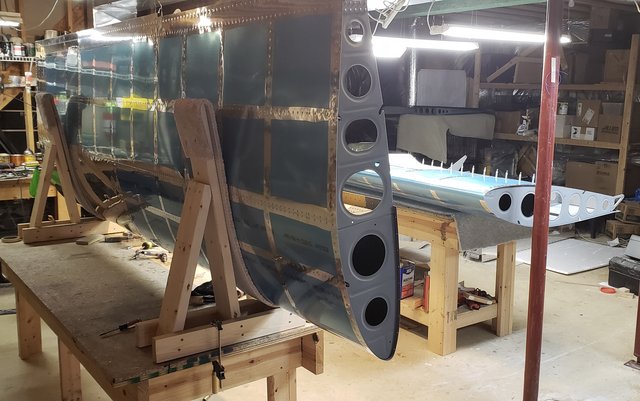
I have a 24x36 shop and will be building a -10. What size surface would allow me to fully support the horizontal stabilizer and/or wings during the build?
Is there any benefit to having two benches that are of different lengths but still join up for the chosen total length?
 
what are your opinions on the width of that version based on what it's used for?

I like to access things from both sides so the width becomes a concern.

How long is the wing spar? that should help determine how long overall I'd want to design around
 
Flexibility is the key since the tasks will change throughout the build. Two benches would be better than one. Make them the same height so you can use them as one bench or split them apart for 2. The EAA bench are great. Make them the height that works best for you. I made 2 EAA benches and used solid core doors I had lying around as the tops. The tops had an inch or so overhand so I could easily clamp to the sides.
 
I also built the EAA bench, with a couple inches overhang on 2 of the sides. I also built a 3rd more square bench with the leftover piece of the top. Worked out very well, as I was able to choose between benches as I progressed. Ended up with my vice mounted to the end of one of the long EAA tables, but could remove it if necessary. Having 3 benches allowed me one for tools and the plans, while the other two were in use supporting the aircraft pieces.

Welcome to the RV-10 build madness. It's all worth it when it's done!
 
lazy

I also built the EAA bench, with a couple inches overhang on 2 of the sides. I also built a 3rd more square bench with the leftover piece of the top. Worked out very well, as I was able to choose between benches as I progressed. Ended up with my vice mounted to the end of one of the long EAA tables, but could remove it if necessary. Having 3 benches allowed me one for tools and the plans, while the other two were in use supporting the aircraft pieces.

Welcome to the RV-10 build madness. It's all worth it when it's done!

My second EAA bench was square, with a Lazy Susan on top. the Lazy Susan is triangular with a bench grinder, drill press and belt sander. It has worked out really well.
 

Attachments

  • 2E7B40FE-8E82-4041-8894-D034E4E438DF.jpeg
    2E7B40FE-8E82-4041-8894-D034E4E438DF.jpeg
    577.6 KB · Views: 262
Last edited:
homing in

Flexibility is the key since the tasks will change throughout the build. Two benches would be better than one.

I also built the EAA bench, with a couple inches overhang on 2 of the sides... Ended up with my vice mounted to the end of one of the long EAA tables, but could remove it if necessary...

Welcome to the RV-10 build madness. It's all worth it when it's done!

For sure 2 benches is the plan. both same height. I'll take the suggestion to add in an overhang all around.
Also will come up with an idea for short tiny bench or some kind of shelf that could be used in between to place the dimpler when needed. Especially for larger skins.

If I do them both at 6ft long does that give ample length for Hori stab and wing spar support?
 
Am I the only one who put legs on the (-10) tail kit shipping box and called it a table? It was just right for my one car garage space.
 
I built several EAA-style tables, with overhanging edges for clamping. For the wings, I lined two of them up end to end, spacing them just far enough apart to mount my DRDT-2 on a removable shelf between them for dimpling the skins. I leveled the two tables with shims under the legs so both top surfaces were co-planar.

My main workshop is about 17x37 inside and I have additional workspace in the unheated part of the barn as needed.

I also made three long,narrow and tall EAA style tables to serve as standing workbenches lining several walls of the shop. They're about 96L x 22D x 37.5H, and hold most of my small parts and some machines like a mini mill, bending brake, belt sander, and other assorted stuff. The tops of these are the cuts of MDF leftover from making the smaller EAA tables with overhangs, which are 27 x 63.

For the fuselage, I took the crate that the wing skins came in, mounted casters underneath, and built a superstructure on it that holds the fuselage. I'm considering building a rotisserie for the fuselage but I'm frankly not sure it's necessary, except perhaps in the paint booth.
 
Last edited:
I recommend two different height tables:
- Both 3’ X 8’
- One 27” high, the other 37” high
- Neither one on wheels.

Using wing riveting as an example, the higher table is just the right height to rivet the ribs and the top skin. The top skin riveting is done with the wing vertical on the spar and secured to the table. Then the wing goes flat onto the top skin (use some carpet on top of the table) to attached the leading edge and gas tank.

For the harder bottom skins, two wing stands secured to the lower table provided the perfect height to do the “reach under the skin” rivet bucking process.

The lower table is also the right height for fuselage assembly.

Three RVs came off these tables.

Side note - an additional 4’x6’ table on wheels comes in handy for part prep and such.

Carl
FD4-B5-CC8-BF32-4227-91-E8-F21-FD9-F1-AA32.jpg


A743-C7-E8-B485-45-CB-A1-BE-03-FD9-FAC3842.jpg
 
I recommend two different height tables:
- Both 3’ X 8’
- One 27” high, the other 37” high
- Neither one on wheels.

Carl

A743-C7-E8-B485-45-CB-A1-BE-03-FD9-FAC3842.jpg

Carl, I agree about the heights. Also, I love your wing cradles. I made a more "standard" wing rack out of a rack someone gave me, leftover from their RV-7 build. It has casters on it, so I can roll the wings in and out of the shop for storage or working. I widened the cuts in the rack end, and made slings out of carpeting similar to yours. I like the idea of having a sling rack that can sit on top of a table, too, like yours.
 
I also like a 37” high working height, and my latest work bench top is 78” X 30” with 3” overhangs for clamping made from 3/4” plywood for the top surface, with a 3/4” base surface underneath, inside the 3” overhang. It’s a very solid work bench and is mounted on full swivel, locking ball bearing wheels so I can move it around my workshop easily.

FAC897B6-78D0-4E2C-8365-B2EC519D5EEA.jpg

BE21D5D3-9843-4EB8-8661-1CF0764A074C.jpg
 
great ideas, every one of 'em

I recommend two different height tables:
- Both 3’ X 8’
- One 27” high, the other 37” high
- Neither one on wheels.


A743-C7-E8-B485-45-CB-A1-BE-03-FD9-FAC3842.jpg

you bring up a good point with having tables of different heights available. I do a bit of woodworking and R/C planes and find depending on the task and work piece, I like the bench to be higher or lower. too bad it's not a simple thing to properly build up a telescoping table. I could design one easy enough. I just lack the proper tools make it. at least out of metal. (Design Engineer juices are starting to flow :eek: )
 
Last edited:
The shipping boxes make some pretty nice lower "tables". I made two low tables (about 18") that I mainly intended to use to make working in the fuselage easier once the aircraft got on the gear, before the wings were installed. Turns out that they are very useful for lots of other stuff as well.

As others have said, don't forget the overlap on the top of the EAA tables for clamping stuff.
 
My second EAA bench was square, with a Lazy Susan on top. the Lazy Susan is triangular with a bench grinder, drill press and belt sander. It has worked out really well.

I REALLY like this idea as I have a tiny shop with very limited space. Can you please tell me:

1) What are the dimensions of the square bench top?

2) What lazy susan mechanism did you use that could handle the weight?

3) Is there any wobble of the triangle as you beard down with the drill?

Thanks!
 
I made a modified "Paulk" workbench like Jay Bates did here: https://jayscustomcreations.com/2015/06/modified-paulk-workbench/. I didn't need the portability of Paulk's original workbench but I did want mobility so I built a 2x4 base similar to what Jay Bates did and put it on casters. I built mine years before Bates did but his is done better!

I kept the system holes Paulk has (similar to the Festool MFT) since I have the Festool stuff for woodworking and it makes for convenient clamping and perfect holes for losing rivets and nuts.

The torsion box style workbench is strong and gives room under the bench for quick tool & rivet storage so you don't have to worry about having extra space. I keep the bucking bars, fluting pliers, etc in there. The area under the bench has even more part storage and could be fitted with drawers or whatever for hardware storage.
 
While waiting months for my first kit, I built up three “Ron Paulk” inspired work tables. Two are 24”x72” and 36” tall. Both on full swivel lockable casters. The third table was made 24” x 30” for my DRDT-2. The work location of the DRDT-2 is the same height as the other two tables. Should give lots of flexibility.
 

Attachments

  • 98286149-40A2-4098-99C7-FFB57F6F0FBD.jpg
    98286149-40A2-4098-99C7-FFB57F6F0FBD.jpg
    437 KB · Views: 376
Answers

I REALLY like this idea as I have a tiny shop with very limited space. Can you please tell me:

1) What are the dimensions of the square bench top?

2) What lazy susan mechanism did you use that could handle the weight?

3) Is there any wobble of the triangle as you beard down with the drill?

Thanks!

It is right about 2’x2’

The bearing is from home depot. I also added 4 carriage bolts screwed into the top deck with some blind nuts from the top and plain nuts on the bottom to support the table and keep it from rocking. I also made cam locks for each side but never used them since the carriage bolts have enough friction. I used the same melamine as the table top with some grease and it runs smooth.
 
Last edited:
My take

It's probably obvious by now from all the posts that a lot depends on your shop size and space dimensions, and how exactly you plan to use your bench(es).

What worked well for me was two 6' long x 30" wide x 35"high EAA-style benches. No I couldn't make them this size with just the one sheet of plywood as per the EAA plans, oh well. Made them during the build of my RV-6, now they're in my hangar and they serve me well there.

On one bench I also added a 28" deep full-width drawer using two 24" full extension drawer slides.

I also put casters at the bottom at one end - no, the bench doesn't sit on the casters but instead they are placed on the sides of the legs right at the bottom such that I can lift the other end to tip it onto the casters and move it around a little easier when I need to, see pic.
 

Attachments

  • bench.jpg
    bench.jpg
    288.1 KB · Views: 141
  • bench_drawer.jpg
    bench_drawer.jpg
    427 KB · Views: 146
  • caster.jpg
    caster.jpg
    445.9 KB · Views: 115
Last edited:
keep bring the ideas

While waiting months for my first kit, I built up three “Ron Paulk” inspired work tables. Two are 24”x72” and 36” tall. Both on full swivel lockable casters. The third table was made 24” x 30” for my DRDT-2. The work location of the DRDT-2 is the same height as the other two tables. Should give lots of flexibility.

I did something similar to Doug but used retractable wheels that you just step on to raise and lower. One in each corner of my 2 EAA tables.

https://www.amazon.com/dp/B086W2S4FC?psc=1&ref=ppx_yo2_dt_b_product_details

I was considering a different torsion top design for this project. I'm liking this variation and the casters for rolling them around.

Just need to clean up and reorganize the shop to figure out the layout and space needed. (might need to get rid of the project car :( )

Henry, if you're open, I wouldn't mind coming up to check out your set up.
 
You can make very complicated tables. It's not necessary - what is necessary are flat, stiff tables with replaceable tops, and plenty of surface area. The more tables the better.

This shows how I made mine.

It's possible to make almost anything more complicated, more expensive and more time consuming. But why on earth do that when simplicity is better?

Dave
 
Back
Top