What's new
Van's Air Force

Don't miss anything! Register now for full access to the definitive RV support community.

flap switch

vonjet

Well Known Member
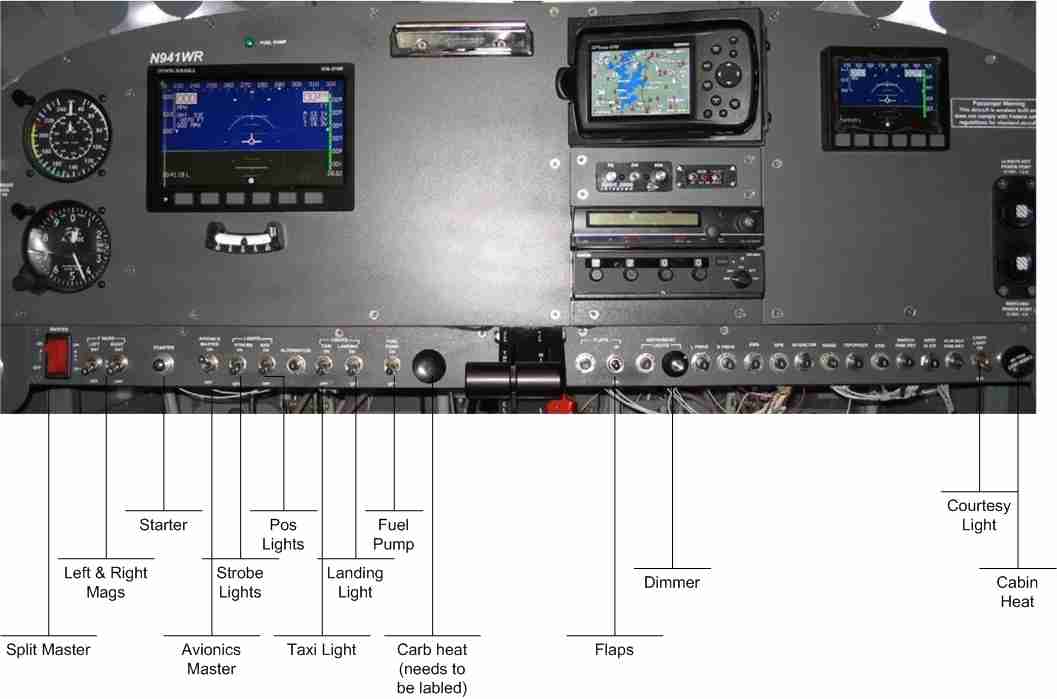
Anyone see anything wrong with using a switch that is
ON-OFF-Momentary ON for flaps?

I plan to use the momentary on for putting flaps down. If you move the switch to the up position it stays there and the flaps will come all the way up hands free.

What im worried about is leaving the switch in the up position or will I have to return it to center (off) position in order to avoid some kind of damage to the motor?

Bryan
 
The flap motor has a decoupling feature on both ends of its stroke. The motor just freewheels once it hits the end.

You do not want your motor running all the time when in the up position so you would either have to move the switch back to off or add an up limit switch to kill the motor once it was up.
 
What im worried about is leaving the switch in the up position or will I have to return it to center (off) position in order to avoid some kind of damage to the motor?

Yes you will want to return it to the off position after raising the flaps, so the motor doesn't run freewheeling forever. Or, install a limit switch to turn the motor off for you; do a search here to see ways people have done that.

(I'm currently running exactly the setup you describe, with a (ON)-OFF-ON DPDT switch, momentary for flaps down. It's real nice for touch and goes, to just click the switch up to raise flaps. I find it hasn't been a problem to remember to center the switch again after a few seconds. But I'm working on installing a limit switch anyway, which will also permit adjusting flap travel range... now it's 45 degrees, which is too much.)

--Paul
 
Here's a copy of my schematic from a previous thread showing how to wire the ON-OFF-(ON) flap switch with a limit switch.

Thanks, Vern


flap_switch.jpg
 
try a timer.

Or you could add a delay timer to the retract function so the motor only runs for say 10 seconds or so. It is possible to buy units that will do that function for you.

Dave
 
or just mount the stock switch to the right of the throttle so you can toggle it up and down while your hand remains on the throttle. Simple and very reliable.

That's how mine is set up and it works great, even better with the throttle quadrant.

 
ShowPlanes , makes a flap control unit that is pretty slick.

Momentary down on toggle switch gives first position of flaps, another gives second, and another gives full.

One lift on switch gives full retraction.
 
Flap limit switch circuit

To follow up... Finally installed an up flap limit switch in our RV6. I used a circuit different from ones I've seen here so far, so I'll post a schematic of it:
limit_sw_sch.png

It works well, and has the virtue of simplicity; no relays, and you don't have to run extra wires from the limit switch to the panel switch.

The diode rating shown is overkill, but GP1006's (or a GP1007, at 1kV) are less than a dollar each, and you won't have to worry about any inductive spikes that are likely to occur when S1 breaks the motor field.

--Paul

Paul, I like this circuit... simpler and easier to install! The benefits of running a separate wire back to the panel (shown in my diagram) is that I can have an annunciator light connected to it, plus I run it to an airspeed warning system that I made.

I generate a tone in my audio system if I exceed flap speed with the flaps extended. This requires the extra wire. [Note, this is not a Vx Aviation product-just a one-off that I made].

Good tip, thanks!
 
The benefits of running a separate wire back to the panel (shown in my diagram) is that I can have an annunciator light connected to it, plus I run it to an airspeed warning system that I made.

Annunciators would be nice... maybe one for "flaps not up" and one for "flap motor running". And the airspeed warning would be great too. If I was building I would definitely think about that, but on this flying -6 getting an up limit switch without having to snake an extra wire to the panel was a big plus!

--Paul
 
Hi everyone, I'm new to this forum. I don't own an RV, actually I am restoring a 60 year old Luscombe at this point but...

I'm in the midst of doing an annual and some mods on an RV4 for a customer and this flap circuit is one of the things I need to do. I'm looking at using an MS27717-31-1 DPDT momentary on-off-on switch and would like to incorporate an up limit switch.

So my question is where is the best place to mount it (limit switch) on the actuator arm. I'm sure I could find a place but I shouldn't have to reinvent the wheel because I know you guys have been at this for a long time.

Any tips or advice would be most welcome.

Paul Irvine
Vintage Air Restorations
 
Up limit switch

To Garage Guy....
Where did you buy your S1 and where/how is it mounted? I have the momentary down solid up switch on my Infinity stick grip and I am continually forgetting to turn the motor off after flap retraction. I'm still in phase I flight testing so I haven't burned the motor up yet, but I will if I keep doing this. The first time it happened was on one of my initial engine run-ins and the motor ran for about half an hour. It was hot to the touch. I'm either going to put in a limit switch or try to replace the stick switch (not easy) to a momentary/momentary.

Thanks,
Scott Hersha
RV-8 FB, Phase I
 
Where did you buy your S1 and where/how is it mounted?
Here's the setup:
limitsw.jpg

The microswitch is a Honeywell 41SM1-T, rated 11A at 250V, available from mouser.com. It is mounted on a piece of angle together with the GP1007 diode, and that is mounted on a 0.10" aluminum plate screwed into nutplates in the floor panel, to add some stiffness in that area. The actuator arm is overkill, but that's what can happen when you are a garage guy and there's a milling machine in the garage :cool:
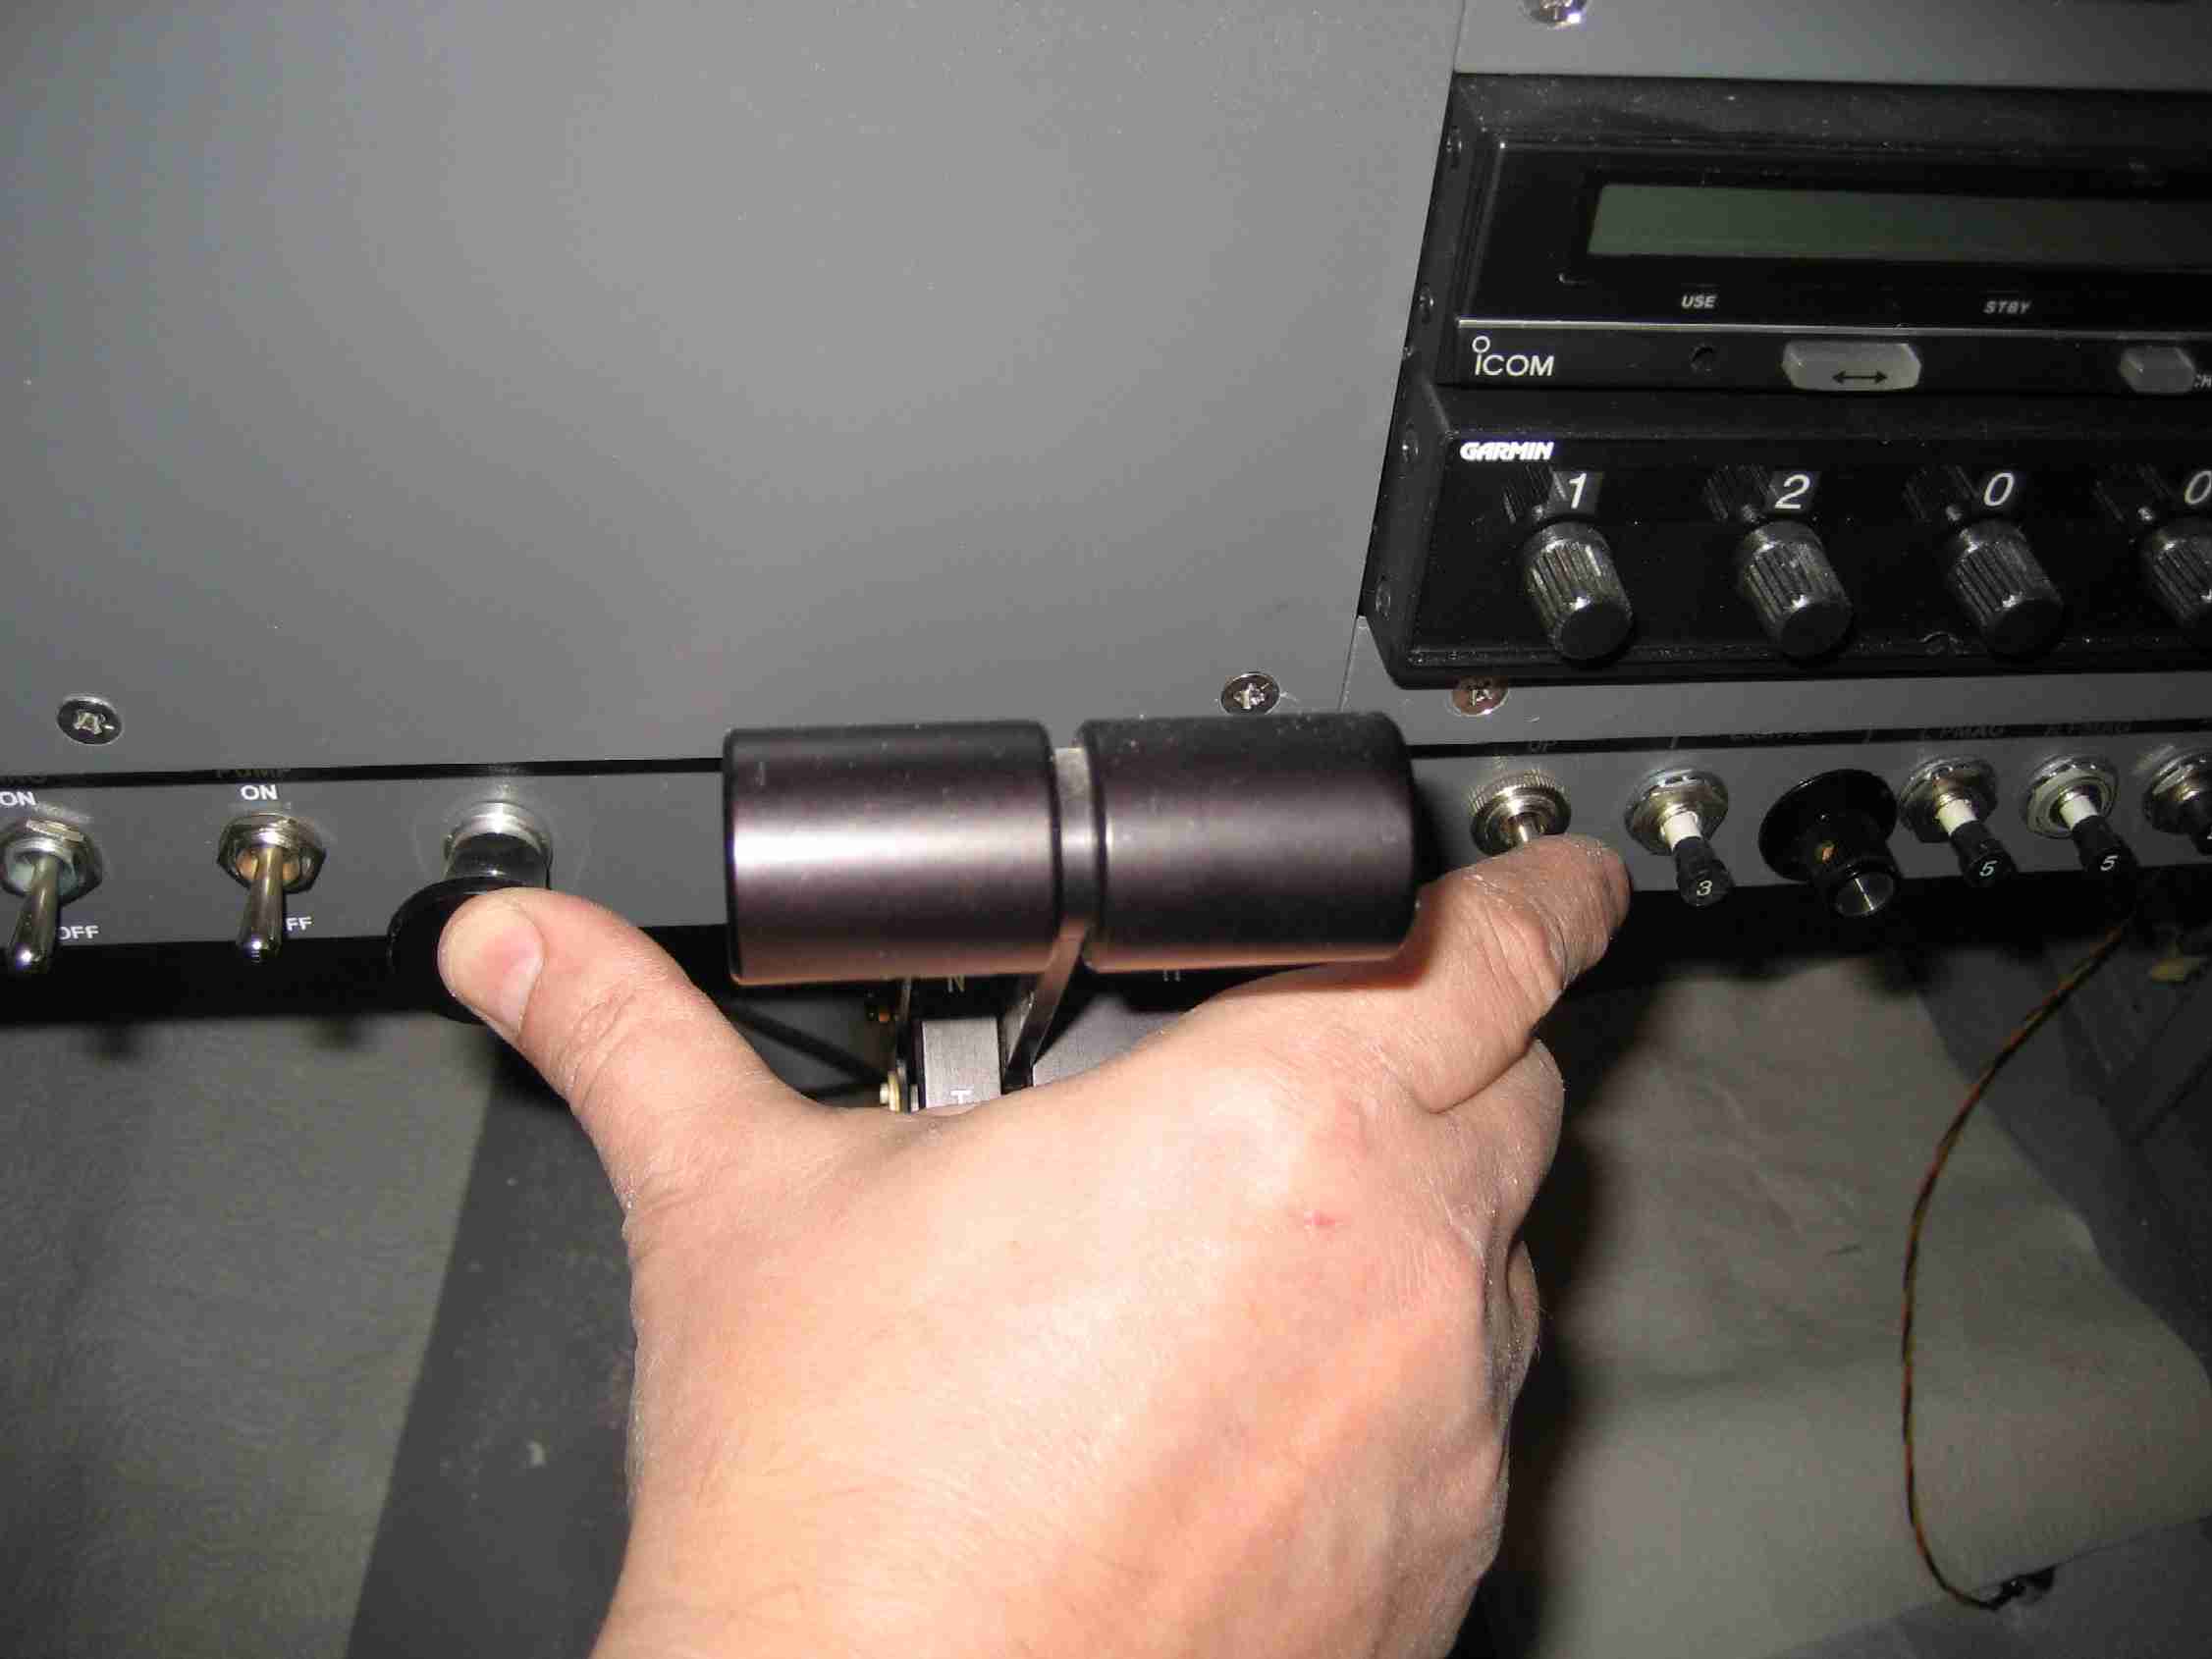
. The threaded 3/8-16 nylon rod lets you adjust the limit point quite accurately.

This is in a RV-6... I'm not at all sure exactly where to put things in a -4 or -8.

--Paul
 
It's been a while this topic was discussed... is there any trick how to connect the ring terminals to the lugs of this @#$%$ flap switch? Especially the lugs that receive two ring terminals.
Either this switch should get an award for bad design or i am just kinda retarded.
 
It's been a while this topic was discussed... is there any trick how to connect the ring terminals to the lugs of this @#$%$ flap switch? Especially the lugs that receive two ring terminals.
Either this switch should get an award for bad design or i am just kinda retarded.

If you are referring to a switch that has screw terminals, the easiest way to handle two wires going to the same terminal is to crimp the two wires in a larger ring terminal, maybe the blue (14-16AWG) instead of the red (18-22AWG). I do prefer the push-on type spade terminals on switches, though, so you don't have to fumble around with the screws. Make sure you give the two wires a good pull test after crimping them to the larger ring terminal.
 
Back
Top