What's new
Van's Air Force

Don't miss anything! Register now for full access to the definitive RV support community.

Reaming Control Stick Base

CharlieWaffles

Well Known Member
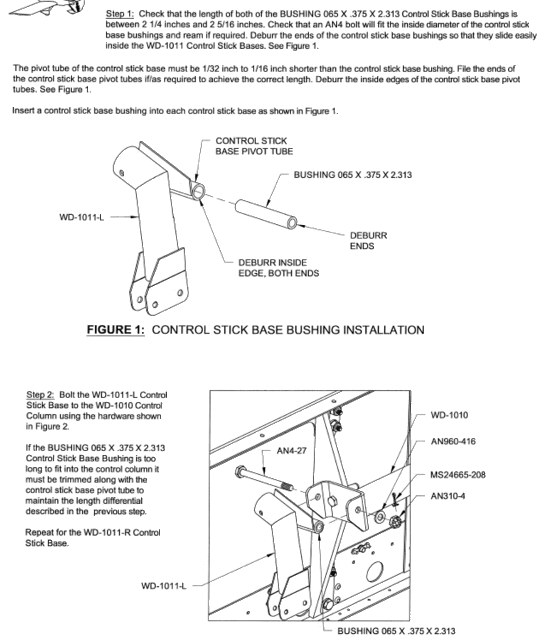
I was working on assembling the Control Sticks today and wound up with an issue. In the photo below, there is a bushing that gets fitted into the control stick base. The bushing is supposed to fit an AN4 bolt, which it didn't so I reamed it with a 1/4" drill bit. Then the bushing was supposed to go into the control base, but it wouldnt fit. The bushing diameter was .375 as expected, but the powder coated base was just undersized. I deburred the edge on the base thinking that would help, but the bushing would go - even with a plastic mallet. I then deburred the outside edge on one side of the bushing, still no go.

So I decided to try to ream the Control Base. I use a 3/8" drill and placed the piece in my drill press. I slowed it to the slowest speed (620 rpm) and applied a good amount of liquid Beolube. I VERY slowly lowered the bit and it wasn't more than a second or two before it starting smoking and the heat was obviously building up as the powder coating started to shrivel up and discolor. So I stopped, let it cool and figured I was going too fast. So I waited a few minutes, more oil and tried again, same thing.

So I'm wondering, did anyone else have to ream their parts or was I just unlucky? If you did ream them, any pointers on how to do this without smoking the piece and ruining the base?

I'm off to Van's again tomorrow to replace the bushings (just picked up the missing ones today) and another set of the stick bases.

embed
 
Charlie, I can't recall all the details now, but do remember that I spent a lot of time cleaning up the stick bases and getting everything to fit correctly. A lot of time.
 
Yeah, I removed quite a bit of powder coat to get the holes to align. It was no big deal and I just used a 1" Scotchbrite wheel to remove it. It took about 10 seconds.

Do be careful reaming those holes though. They can come out oblong pretty easily.
 
Bushings

I had the same issue. For the bushing, I tied using a drill bit but it ended up making the inner hole not very round. So bought new ones and used a reamer, came out perfect.

For the stick bases, did what phil did and used a small scotchbright wheel on a drill and cleaned the inside of the hole. Took no time and the bushings slid right in.
 
So no one had to ream the inside of the stick base itself? The 3/8" size hole in the base where the bushing slides into.
 
Give me the step you're working on in the plans and I'll see if it rings a bell.

I think we're all confused about what you're asking. Are you talking about the gold bushing and reaming the hole it slides into? Part numbers would help.

BTW - Your photo link isn't working.

Phil
 
Last edited:
There was a nasty burr and excessive powder coating on the ends of the bushing tubes on my sticks. I hit the holes with a countersink, then reamed the tube with a reamer,,,,not a drill. A light roll of the ends of the bushings on the deburring wheel and they slid right in with no problem.
 
There was a nasty burr and excessive powder coating on the ends of the bushing tubes on my sticks. I hit the holes with a countersink, then reamed the tube with a reamer,,,,not a drill. A light roll of the ends of the bushings on the deburring wheel and they slid right in with no problem.

If we're talking about that section of the stick, then that's exactly what I did there too.
 
Reamed the Bushing Stick Base Was Good

Page 39-8 step 1 says it may be necessary to ream the bushing (brass?) to fit the AN 4 bolt. I had too. No mention of a need to ream the hole in the stick base. Mine fit fine if I recall correctly.

Eulice
Rebuilding RV-10
 
I am referring to the stick base itself WD-1011 (Step 1, Page 39-8). The issue is the brass bushing doesn't slide into the base even once the powder coating is removed. I spoke with vans and they said to ream the hole - which is 3/8" size.
 
Ok, I went to Vans and yes indeed, it was a case of undersize hole on the stick base and slight oversize on the bearings. So I went and got some NICE chuckable reaming bits from a local machining shop. I reamed the bushings to 1/4" and they were a lot more consistent on the inner diameter than the drill did initially.

I then reamed the two 3/8" tubes on the stick bases. A little smoke, but not as much and I kept it well oiled. I had to grind/sand down the base slightly so the busing actually was longer than the base. On one, even after reaming it to 3/8" the bushing still wouldnt insert smoothly. So I carefully "polished" it on the scotchbrite wheel to very slightly reduce the other diameter to allow it to insert into the base.

It just took more machining to get it all to work, but it did. I had to clean and reprime part of the stick base as the powder coat either cooked off from the initial ream attempt or from the size fitting work. But they are mounted and move freely around the bushing now.
 
Education and recreation....now you know a drill bit is entirely the wrong tool for this task ;)

I'd suggest that every builder should own 0.1875, 0.250, and 0.375 reamers.

The stick is a welded assembly. The pivot tube would typically be fabricated from 1/2" dia x .065 wall tube, meaning the ID is a nominal 0.370". After welding it would be reamed to 0.375" for a bushing. Reaming increases the bore size and corrects any warpage due to welding.
 
What's funny is one Vans tech said to use a drill bit, the other that walked by said, "oh, you need to ream that, a drill is too aggressive" and walked on. The first tech said, "nah, you can drill it just fine".
 
Another thought is a set of adjustable hand reamers. They work pretty good for match fitting bushings and close tolerance holes. At least they don't make triangular holes.
 
Ream

Keep in mind that AN bolts have a manufacturing tolerance. The upper limit is still under the fractional size. The reamer I use for my landing gear bolts is .3095 or .003 under 5/16. All smaller AN bolts are similar. Drills are a no/no in my shop for enlarging holes, especially for a bushing that it appears should be a light press fit. NAS bolts will be slightly larger than AN bolts, so if a fit is just slightly loose you may be able to correct it with a NAS bolt. The expansion reamers are very fragile and easy to break, especially in a welded bushing. It would have been much better to chuck the bushing in a drill press and file/polish it down to fit, one end at a time.
 
The expansion reamers are very fragile and easy to break,

Sorta fragile, but you can match a lot of holes before you break one (if you're careful). Upside is you can choose exactly how you want it to fit without having to buy (and wait for) specific sizes.
 
BUSHING

Expansion reamers work very well under many circumstances. When welding an assembly such as the stick bushing it is very easy to get in a hurry, cool the weld too rapidly, and air harden at least part of the bushing. A straight flute, high speed steel reamer, with the proper lubricant and driven at a very slow speed, can cope with the air hardened spots. An expansion reamer probably not.
 
I'll give you that one. I've chipped a lot of bits & stuff when encountering a weld zone. Sometimes you feel like a bow & drill caveman. Me make fire!
 
Back
Top