What's new
Van's Air Force

Don't miss anything! Register now for full access to the definitive RV support community.

Fiberglass Edge on Plexiglass

DanH

Legacy Member
Mentor
It's one of those questions which pops up on a regular basis: How do you get a nice edge where fiberglass overlaps plexiglass?

You do it with plastic tape. I use 3m Fineline tape.

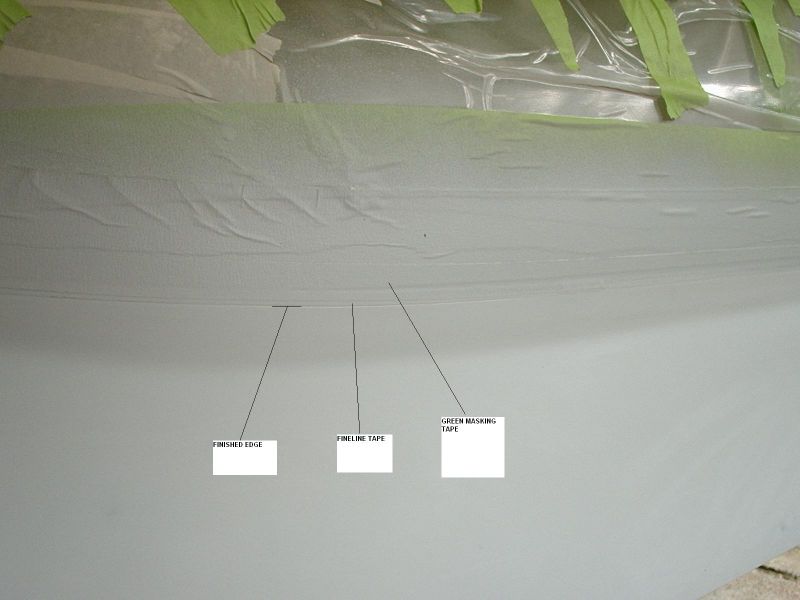
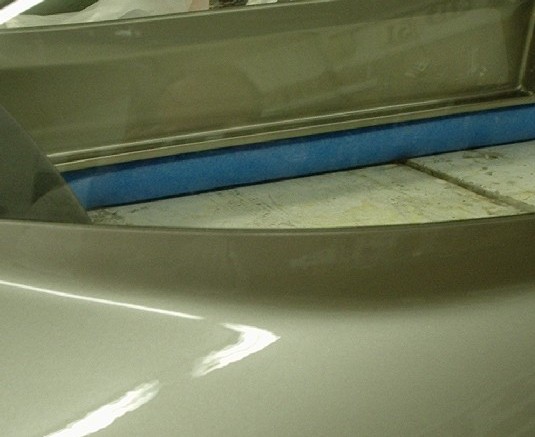
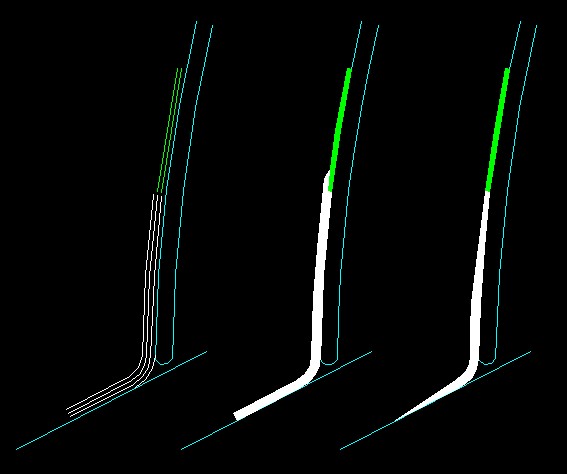
Lay down a tape line on the plexi precisely where you want the glass edge (green, in drawing below). If it's not straight or perfectly positioned just pull it off and do it again. Tape is cheap.

When you have the first tape layer on and positioned where you want it, go back and lay another ply of tape exactly on top of the first. Depending on the thickness of the tape you may want a third layer too. The total thickness of the tape buildup determines the thickness of the subsequent fiberglass edge.

Now do the fiberglass cloth layups. Butt them up close to the tape. Paint a little excess epoxy at the butt so any gap between tape and glass fabric is filled. The glass layups will be thicker than the tape line. The wet epoxy edge should lap over the tape. Allow full cure.

Make up a little sanding block, maybe 6" long and 1" wide, whatever is comfortable and fits the work. Stick 120 grit paper to it and start sanding carefully along the butt joint. Your goal is to sand the new glasswork down to the thickness of the tape. Stop when the tape edge becomes fully exposed. Do not sand into the tape.

When you peel the tape you'll have a defined edge with a consistent thickness.

Plexi%20Edge.jpg
 
Last edited:
If you'd like to put together a photo journal of exactly what you're talking about, I offer up a canvas for you :D

Thanks for this post, been reading build logs trying to figure this out.
 
Last edited:
Different color tape will let you know when you are getting close to first layer

Having just completed this task on my RV-10, this is a great idea that I'll try on the last two window installs. The first three I used all black tape. Having a different color would have made things a little easier to sport.
 
Thanks, Dan, for posting this! I just finished doing this task on my canopy, and it works really well. I bought some bright orange electrical tape at Home Depot that's 7 mils thick. It was the perfect choice for the final thickness, and easy to see. I posted lots of pics and details in my online log, for anyone interested in looking.
 
My FG Transition Experience

I am currently working on my fiberglass transitions for my RV-10 around my door and rear windows. I used Dan's method with the first layer of black electrical tape and a second layer of orange tape. Applied the fiberglass lay ups last Saturday. Single layer of glass. I had some issues about filling the edges between the tape and FG with resin. The resin did not want to readily flow into the gap. Kept checking inside for daylight to make sure they were completely filled. Sanded the FG down to the second layer of tape Sunday. All looks pretty good with the following observations:

As mentioned, I am working on the side windows on an RV-10. I used thin wooden templates to cut the rounds on the corners of the windows. I first tried to just bend the electrical tape around the corners but did not like how the curves turned out. They were not consistent. Seems cutting around some sort of template makes a better job with more consistent curves. Do most just let their painter deal with the curves?

The downsides of cutting the corners verses rounding the tape is that you have extra layers of tape were you overlap. When you are trying to sanding the corners, the tape wants to pull up at those overlapped joints. I also had a tape roll-up problem in some of the strait areas that did not overlap as well, but that may be because of my over aggressive sanding. There also may be an issue in the fact that you will score the plexy. I tried to minimize this by using sharp exacto knives.

Some RV'ers mention tinting the resin for this process so that it any resin that shows from inside is blacked out. This seemed to me to be a good idea, but I did not find any information as to what to use for tint. So I went to to the paint store and ask for black tint. They went in the back and squirted a half ounce or so of black paint tint into a plastic cup and gave it to me. And that is what I used.

So from here I still have most of the electrical tape in place, excluding area's that rolled up on the edges when sanding. These seem to be fairly easy to retape with some accuracy due to the well defined line established on the edge. I am thinking micro fill the area's, fill pinholes with resin, and even primer prior to removing the tape.

I have a question as to the final thickness along the edge of the fiberglass to window edge. I have read Dan's post several times and he does not mention sanding the fiberglass down to the first layer of tape. Subsequent posts seem to indicate sanding the fiberglass edge down to the first layer of tape. This may just be a personal preference issue but I would like to hear opinions. If I could find a way, my preference would be to tapper the fiberglass and subsequent paint completely out at the window edge, but I just cannot see how to do this without scratching the glass. So second best option for me would be to sand down to the first layer of tape. Would this leave a strong enough joint?

Comments from those who have been here are welcome.

Eulice Curington
RV-10
 
I used the ACS tiny that mike posted the link. That bottle is enough to do many rv-10s.

I also used the electrical tape method. I only had issues with two forward curves. Using an xacto knife, I just cut a relive cut on the back side to allow the tape to conform to the curve. Just don't make the cut in the same location for the second row.

I also have taken the tape off and re-taped between tasks to ensure that if anything got under the tape I could address it right away. (ie painting, sanding, etc)

Bob
 
I first tried to just bend the electrical tape around the corners but did not like how the curves turned out.

I'm not a fan of electrical tape given the easy availability of professional masking products. Try 3M 215 or 218 Fineline tape. It comes in widths as narrow as 1/16", has a great adhesive, and is stretchy, so you can tape small radius corners:

http://solutions.3m.com/wps/portal/...ECFTDQGLE0000000_nid=S5M0N94TLPbeVBZCZCKZL4gl

http://solutions.3m.com/wps/portal/...ECFTDQGLE0000000_nid=G6KW24LGPXbeVBZCZCKZL4gl

If bending narrow tape won't work, then yes, cut radius sections from wide tape before applying them to the plexiglass.

For sure you want plastic fine line tape for subsequent finishing steps. Here the original scuffed tape has been peeled and discarded, new fine line tape applied, masking lapped over it, and a few coats of K36 high build has been sprayed:

Canopy%20Trim%20Edge.JPG


I have a question as to the final thickness along the edge of the fiberglass to window edge. I have read Dan's post several times and he does not mention sanding the fiberglass down to the first layer of tape.

You can thin the edge if you wish, with a lot of variations on exactly how. I'd do all the gross sanding as previously described, with multiple tape layers in place, not sanding through any tape layers (there is no need for different color tape layers). Then I'd pull all that scruffy tape and re-tape.

Let's assume you use 3M 218. It's 4.7 mils thick, so three tape layers is roughly 0.015" while two plies of 9 oz glass would be about 0.020". Following layup the initial rough sanding down to tape thickness would cut about halfway through the top glass ply leaving a full undisturbed ply under it.

Pull the scruffy tape and re-mask with a single layer of fine line. A little sanding with 320 and fingertips or a very small block just along the very edge would cut it down to 0.005". That's what I did in the picture you see above, before spraying the K36.

If you really want to make the glass edge disappear, space the tape about a 1/16" away when you re-mask, then gently finger sand the glass edge to nothing (note: I have some reservations about this idea and have not tried it). You'll dull the plexiglass in the 1/16" open space, which is good....you need it for subsequent paint adhesion.

I didn't feather the glass edge to nothing on my current canopy, although I did space the final tape line away just a bit before paint. At one tape thickness the finished edge is clearly visible under the paint. The metallic basecoat highlights it. It would not be obvious at all under a solid base.

BTW, in this case the spacing was mostly about aligning the paint edges on the inside and outside of the plexi; the Showplanes canopy frame gets both interior and exterior paint.

Canopy%20Edge.JPG
 
Last edited:
Back
Top