This is specific to the original RV-12 with the tank behind the co-pilot seat. I use this on every flight. My original fuel measuring stick was a 5/16 wooden dowel extremely warped, (Home Depot stocks lots of the warped ones). The curve is necessary to fit down the filler neck. I drained the tank and filled it 1 gallon at a time and calibrated the dowel. These marks were also transferred onto the computer to create a full size drawing so I could reproduce the fuel stick.
The wood dowel worked fine but it eventually broke almost dropping the broken end into the fuel tank.
Bored I decided to make the ultimate fuel stick with the exact curve to navigate the filler neck of the -12.
Making a curved composite rod was harder than I thought. I made it using carbon fiber tow and epoxy, then grooved the gallon marks and painted them in with white paint. The stick is sanded with 220 grit for a matt finish to contrast with the wet fuel.
I made 2 sticks with different curves that are required for the different gas caps, standard and locking, the pictures are labeled. The difference is the curve that makes it drop through the neck easy.
Download and print the picture on 3 pages, use landscape mode, and print in default image size. Tape the 3 pages together at the arrow marks and confirm it is the correct size with the 24” scale line.


wetted with fuel

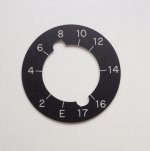
standard gas cap

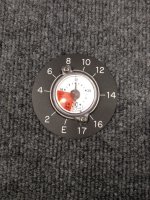
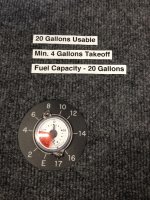
locking gas cap
The wood dowel worked fine but it eventually broke almost dropping the broken end into the fuel tank.
Bored I decided to make the ultimate fuel stick with the exact curve to navigate the filler neck of the -12.
Making a curved composite rod was harder than I thought. I made it using carbon fiber tow and epoxy, then grooved the gallon marks and painted them in with white paint. The stick is sanded with 220 grit for a matt finish to contrast with the wet fuel.
I made 2 sticks with different curves that are required for the different gas caps, standard and locking, the pictures are labeled. The difference is the curve that makes it drop through the neck easy.
Download and print the picture on 3 pages, use landscape mode, and print in default image size. Tape the 3 pages together at the arrow marks and confirm it is the correct size with the 24” scale line.
wetted with fuel
standard gas cap
locking gas cap
Last edited: