What's new
Van's Air Force

Don't miss anything! Register now for full access to the definitive RV support community.

Tru Trak Servo Arm ? Belt and Suspenders

Ironflight

VAF Moderator / Line Boy
Mentor
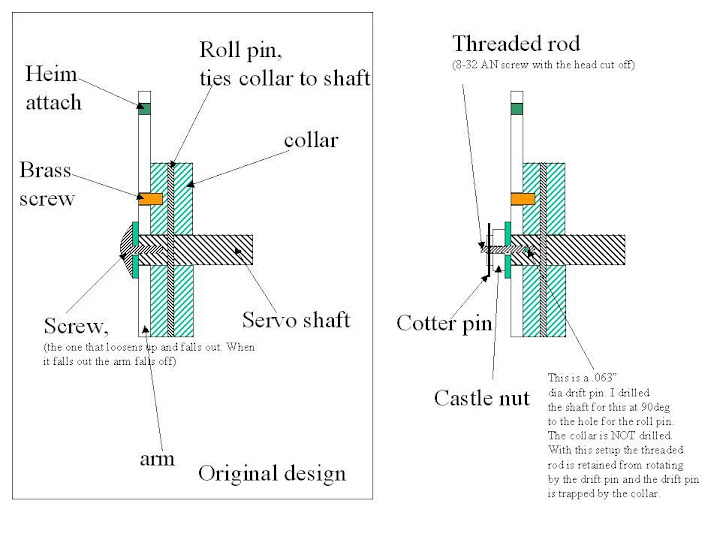
Last year, Tru Trak issued a Service bulletin and provided replacement screws due to some instances of the screw that holds the servo arm to the output shaft backing out. There was at least one report here on VAF of a servo arm falling off of the pitch servo, and causing a jammed elevator during a loop ? a situation handled with extreme professionalism by the pilot who saved the craft and brought the story back. The new screws supplied by Tru Trak had a daub of blue locktite on them, and were supposed to fix the problem.

We put the new screws on both servos in both of our airplanes as soon as they were available, and felt happy that we had addressed the problem. But during those last week?s annual on the RV-6, we found the roll servo screw backed out about half way, and the pitch servo screw slightly loose. A hangar discussion with neighbors and mechanics brought up no new ideas for keeping the screw in place (other than more locktite), but did bring to light a guard that our F-1 owning neighbor had fabricated to keep the arm on the servo in the case that the screw did back out ? a nice set of ?suspenders? to back up the ?belt?. This was very much in line with my philosophy that any potential failure WILL happen, so you better have a backup plan.

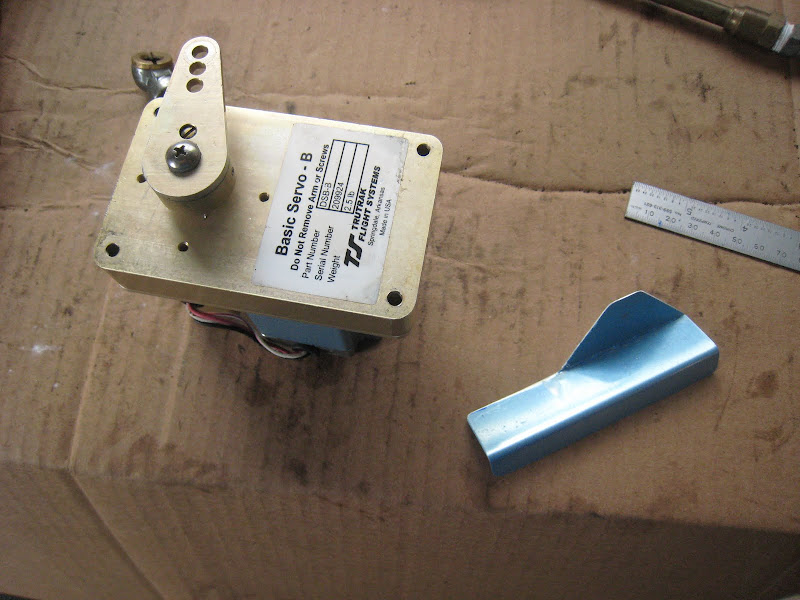
As an engineer, I am always aware of the potential for unintended consequences when making a modification, so it took me a couple of hours to convince myself that this guard has no reasonable downside. As was pointed out last year during discussions of this issue, it is important that the arm not be secured so securely to the output shaft that the shear pin cannot perform its function. The design is such that if the servo were to ?run away?, the pilot can exert enough force to shear the pin, causing the output shaft to freewheel independent of the arm, preventing jammed controls. This ?new? guard (my neighbor gives credit for the design to Blue Mountain, who had it on their servos which he had until his recent conversion to GRT/TT equipment) will keep the arm from backing off the shaft if the screw gets loose, and I can?t see a reasonable way in which it could jam the controls. This certainly doesn't negate the need for careful inspection, but makes us feel better between Annuals.

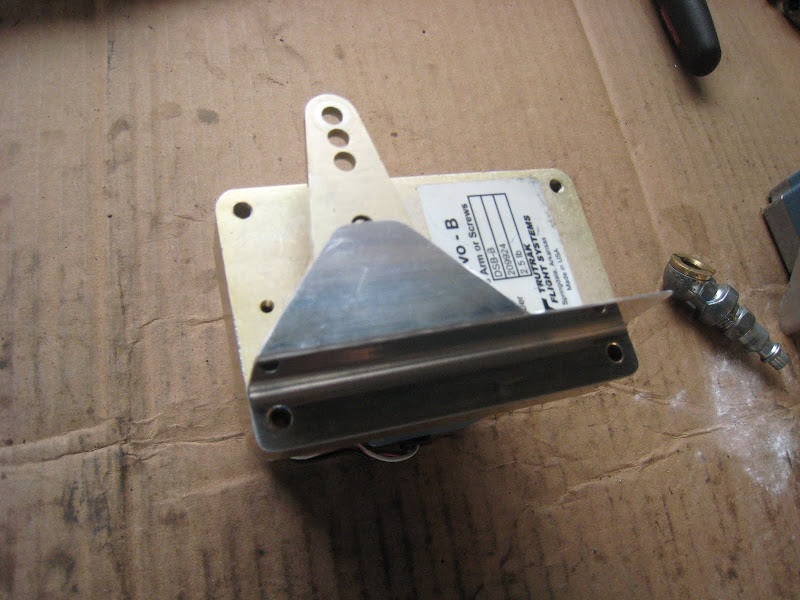
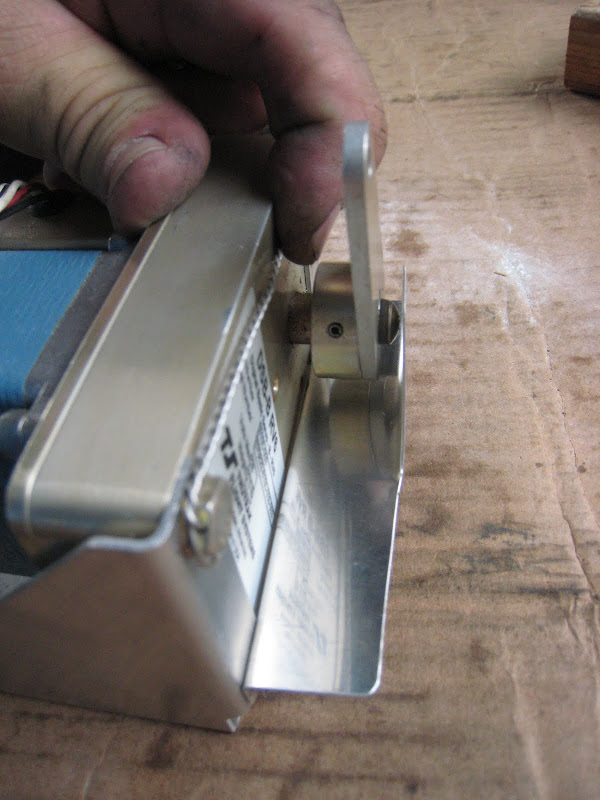
Fabricated out of some scrap .025 Alclad, the brackets are basically ?Z?-sections with a web of 7/8? and the little pyramid cut to cover the output shaft area. Full throw of the controls with the servo and guard installed was tested after installation, and nothing even comes close to interfering or binding. Adding the guard does add one potential ara where FOD could hide ? but there are already other places where this could happen in the RV without servos at all ? so keep loose stuff out from underneath your floorboards.

Pictures are worth much more than my words on how to build them:

IMG_4041.JPG


IMG_4043.JPG


IMG_4046.JPG


Paul
 
Paul, screws that want to back out can really be ornery, and it might even lift that tab up a fair ways.

Would it be possible to use a socket head cap screw there? One can drill those for safety wiring, probably even buy them that way.
 
Paul, screws that want to back out can really be ornery, and it might even lift that tab up a fair ways.

It might - but I still think it is going to keep the arm from pulling off the end of the output shaft - it would take a huge force to make that happen.

Would it be possible to use a socket head cap screw there? One can drill those for safety wiring, probably even buy them that way.

The problem is that there is nothing to safety them to - if the shear pin goes, the screw stays fixed in the output shaft, and the arm needs to be free to rotate. Tyeing the screw to the arm would defeat the shear screw purpose.

Paul
 
A hole in the bracket flange...

Paul,

A variation on your bracket could be to put a hole in the bracket flange a bit bigger than, and in line with, the screw head, and then shorten up the web so that this hole in the flange fits over the screw head and the flange lays close to the arm.

This arrangement focuses on retaining only the servo arm in the event that the screw backs out...it is not designed to hold the screw in if it is trying to back out.

The primairy benefit of this approach is that that the servo arm screw torque can be checked easily witout taking anything apart. I would think this check should be performed regularly.

And, if the force of the screw backing out might be sufficnet to bend the bracket, that possibility is eliminated as well.
 
Paul, got it, couldn't tell from just the picture. So, the screw is not really tightened against the arm?
 
Paul, got it, couldn't tell from just the picture. So, the screw is not really tightened against the arm?

Correct - there is a nylon washer under the screw to allow it to slip if the shear pin goes (and it does - we've had a shear pin go once).
 
Last edited:
Loose Screw

Dave,

Just "Food for Thought:" With your approach, if the screw backs out completely, there's a "loose screw" rattling around the control system area. Your idea of mainly retaining the servo arm is a good one, but maybe an additional cap, magnet, or some other means could be devised to capture the screw if it backs all the way out? Also, it might be good to have a nylon washer secured to the inside of the guard for retaining, but not restraining, the servo arm. Food for thought, anyway!

Best Regards,

Bill Palmer :)
 
Tru Trak response

Paul,
I guess it's back to the drawing board for TT. Please keep us informed of their response/action.
Don
 
cap screw and bracket

Paul,
Here's a thought: What about combining your bracket idea with Alex's cap screw idea? Use your bracket as a place to attach the safety wire from the cap screw. Put a couple of holes in the side of your bracket, carry the safety wire over the top and down the side to the holes, wire in an "in-n-out" sort of way (in one hole, out the other). It would keep the safety wire out of the way of the arm motion, and would still provide enough "lock" to keep the screw from backing out all the way.

Regards,

It must be too early in the morning Moose - not sure I understand what you're saying - but I certainly wouldn't want to tie the moving screw to the fixed bracket - that would just unscrew the thing or break the safety wire pretty quick. The screw turns with the arm through it's range of motion (maybe 60 degrees?) during operation. I'm going to go wake up now.....and call Tru Trak!

Paul
 
Paul, thanks again for the call this morning.

All: As soon as we're all up to speed around her this morning we'll take a look at this and see what we can come up with. I'll post back with what we find/figure out/decide/etc. Thanks everyone for the constructive thoughts!
 
I had the retaining screw on my pitch servo come loose a couple of times. The first time I used blue Loctite (242) and when I checked it again at the next conditional inspection it was backed out a couple of turns. I thought about using red Loctite (270) but was concerned about disassembly if the shear screw ever broke. What I ended up doing was replacing the screw with a long set screw that is installed with red Loctite. After allowing this to set up I reinstalled the arm with a nylon washer and locknut. This has stayed tight for sometime now.


Danny
 
Now that seems like an excellent idea!!!

I had the retaining screw on my pitch servo come loose a couple of times. The first time I used blue Loctite (242) and when I checked it again at the next conditional inspection it was backed out a couple of turns. I thought about using red Loctite (270) but was concerned about disassembly if the shear screw ever broke. What I ended up doing was replacing the screw with a long set screw that is installed with red Loctite. After allowing this to set up I reinstalled the arm with a nylon washer and locknut. This has stayed tight for sometime now.


Danny
any chance of pics of this set up?
 
It must be too early in the morning Moose - not sure I understand what you're saying - but I certainly wouldn't want to tie the moving screw to the fixed bracket - that would just unscrew the thing or break the safety wire pretty quick. The screw turns with the arm through it's range of motion (maybe 60 degrees?) during operation. I'm going to go wake up now.....and call Tru Trak!

Paul

Iron,
Sorry, it's probably me. Got a head cold and the decongestants have me a bit loopy. From the discussion it sounded like the screw did not turn with the arm. My bad.
 
I have been reading this and the previous threads about this issue with interest as I too have one of these autopilots. If the threat with a permanently attached arm is a run-away servo, wouldn't turning off the autopilot stop the situation? I realize that it might get a little hairy in the meantime.:eek: What do the "certified" installations use? Maybe it doesn't equate with our situation.

Tom
RV-7A N175TJ Flying
 
Some servo's have a slip clutch that will prevent a jam inside the servo from locking up the flight controls. TT and Dynon do not have a clutch and they both depend on a shear pin or screw to prevent any jams.

The odds of a stepper motor jamming internally are slim but you never know!!!!

I have been reading this and the previous threads about this issue with interest as I too have one of these autopilots. If the threat with a permanently attached arm is a run-away servo, wouldn't turning off the autopilot stop the situation? I realize that it might get a little hairy in the meantime.:eek: What do the "certified" installations use? Maybe it doesn't equate with our situation.

Tom
RV-7A N175TJ Flying
 
some more thoughts...

First, I like F1Rocket's idea a lot. Will red locktite hold well enough that the locknut can go on and off without turning the setscrew? If the red locktite will hold that well, then we could just use it on the screw. In the odd event that you want to take the screw out, you can heat the screw to soften the locktite. Just holding a soldering iron on the screw head should do it, locktite will soften long before the heat can conduct into the servo far enough to do damage (I think...).

Question: it seems like my Trutrak servo does have some kind of clutch. Or maybe it is just the break-loose setting for the stepper motor torque set-up -- because with my a/p engaged, I can overpower it with the stick. It makes a kind of ratcheting feel - is that the stepper motor "slipping" because I'm exceeding its set torque limit, or is it some kind of clutch slipping?
 
First, I like F1Rocket's idea a lot. Will red locktite hold well enough that the locknut can go on and off without turning the setscrew? If the red locktite will hold that well, then we could just use it on the screw. In the odd event that you want to take the screw out, you can heat the screw to soften the locktite. Just holding a soldering iron on the screw head should do it, locktite will soften long before the heat can conduct into the servo far enough to do damage (I think...).


My experience with red Loctite 270 is that if the threads are clean the install is pretty much permanent on small hardware without the application of heat. On my Rocket the servos are not mounted in service friendly locations so climbing in with a soldering iron or mini torch is not something I wanted to be doing. Also, its easy to get a bit too much loctite on the threads and have a bit of it ooze out as you install the hardware. This could then weep between the arm and the shaft causing the two to bind. Installing the set screw first and then using a locknut to hold the arm on seemed like the best way.


Danny
 
I have been looking at this problem a little more closely this afternoon, and now I am questioning the effectiveness of the brackets that I fabricated. The reason is that the control arm effectively sits flat on the capstan surface that is locked to the output shaft of the servo by a set screw. If you remove the screw entirely, the arm does not "pull" off the shaft - it slides off in shear (except for being held by the height of the shear pin. If the arm lifts maybe 3/32" until it is off the shear pin, then it is going to slide right off the capstan, and we once again have the potential for jammed controls. (How might it lift? The pushrods to the bellcranks are not in plane with the arm - there is a levering action that could pop it off pretty easily.) The little safety brackets I built, if pushed out by the screw , will not prevent this. I am not saying the bracket won't retain the screw - but we don't know that it will. We simply don't know what is unscrewing the screw, and therefore, don't know how tenacious it is in seeking its freedom. I still see no harm in the bracket - I am just pointing out that it may not function the way I thought it might.

The bottom line here is that we simply don't understand the mechanism that is causing the screws to come undone. It could be vibration, it could be torque from the motor acting against the control forces. We simply don't know without engineering tests. And until we know the root cause, we do not have a way to say that any "fix" is going to solve the problem - how can you solve a problem that you don't truly understand?

If this was a certified airplane, a potential for jammed controls would probably lead to an emergency AD. We are not subject to this kind of AD, so we need to act on our own - I suggest checking your screws soon! I also think that some serious engineering has to be done to prove that we understand the cause of this problem. I still think that Tru Trak autopilots perform as well as the best out there, and have feature-sets that are hard to beat. I will continue to use them, and might very well have a new one in our new plane. But I am absolutely convinced that we have got to see some real engineering analysis done to find the root cause of this problem in order to find a solution in which we can have confidence. Any company that can build an autopilot this good should be able to do that.

In the meantime, we need to keep looking at our servos, and do it on a regular basis. My intuition tells me this isn't going to happen on one flight - but regular inspections are going to be part of our maintenance regime until we have a known-good fix.
 
Last edited:
Paul, could you be so kind as to sketch the parts in the area of interest? I cannot tell what is what or the design intent. But, it sounds like a good ME problem!
 
Shaft modification

Paul, thanks making this post. I'm installing my servos now, so it's very timely.

I seem to recall a response from Dynon in the original discussion in which they indicated they thought of this very problem when developing their servo and chose to use a longer shaft with a threaded end which held the arm on using a castellated nut.

Such a change would eliminate the possibility for the arm to become disconnected and jam the controls.

The idea of using a cap screw and safety wiring it to the arm was also discussed...and discarded. Not a good idea (read that thread for the details).

Lastly, I just re-read Dan Horton's post about the proper installation direction of the AN3 bolts and realized I had just installed my pitch servo with the bolts going the wrong direction. The more I read Dan's posts, the more I admire him.

Watching with interest,
 
One thought here, the set screw setup describer earlier----

You do not need to depend on the red locktite to hold against the torque of the lock nut, use an allen wrench in the set screw to resist the lock nut.
 
Yep, put the locktite in to stop the setscrew from working out but you can use the allen wrench to prevent breaking it loose when tightening the locknut. Just like adjusting valves in a solid lifter engine....

One thought here, the set screw setup describer earlier----

You do not need to depend on the red locktite to hold against the torque of the lock nut, use an allen wrench in the set screw to resist the lock nut.
 
I have been thinking and wondering about the cause of screw coming untied despite the use of blue loctite and can not find an reasonable cause for it.
And the more I think about it, the more I like Danny's idea about using a screw as a permanent solution and putting a nut over it. With that idea, there is much can be done to ensure a that it will never come lose by itself.

Any ideas as one can get a screw with the allen head (the type used in valves etc?
 
While I also like the idea of using the set screw and red locktitie, how do we know that the locknut we put onto it is not going to come loose as well? intuitively, I think it should work - but then again, intuitively, the existing screw should stay put. Until we understand the mechanism causing the problem, we can't be sure that we have fixed the problem. I am anxiously awaiting some more word from TT - I know they are working on it!
 
Intuitively-------intuitively:eek:

An engineer used intuitively twice in the same sentence??
 
Properly installed with Red Locktite, the setscrew should never come out. Apply a good high quality locknut to that and you should be good to go. After all, we trust our bottoms to a few dozen of those all over the airplane. Heck one could even drill the setscrew and install a castle nut and cotter pin.

Who knows, TT may decide to redesign the output shaft to something similar to Dynon's design. That would be expensive on their end....

While I also like the idea of using the set screw and red locktite, how do we know that the locknut we put onto it is not going to come loose as well? intuitively, I think it should work - but then again, intuitively, the existing screw should stay put. Until we understand the mechanism causing the problem, we can't be sure that we have fixed the problem. I am anxiously awaiting some more word from TT - I know they are working on it!
 
Last edited:
I have no idea what the shaft on the TT servo is made of but if you use locktite on the threads of the setscrew, make sure that both materials are not stainless or the locktite will not setup or will take forever to cure....

There is an activator/primer that will solve this issue.
 
....The new screws supplied by Tru Trak had a daub of blue locktite on them, and were supposed to fix the problem.

We put the new screws on both servos in both of our airplanes as soon as they were available, and felt happy that we had addressed the problem. But during those last week?s annual on the RV-6, we found the roll servo screw backed out about half way, and the pitch servo screw slightly loose.

I found the same problem on my roll servo at about 13 hours, when I inspected it after inadvertently breaking the shear pin. The screw (new type, with blue "reusable" locktite) had backed out a turn or so, and was easy to remove. Scary.

I found that the "reusable" locktite screw wasn't, in that it exerted too little force to resist backing out.

I'm glad Paul posted his experience. I sure like the idea of a set screw or similar arrangement permanently attached to the servo, with a nylock nut holding the control arm on.
 
I very reluctant to post this, but I don't believe this is a airworthy installation without a positive locking feature for these screws. When the original service bulletin came out I inspected my servo's and found one of the screws loose. Believe me, a shudder went up my spine and I was angry with myself for not seeing this critical design flaw when I did the original installation. Loctite is NOT a sufficient locking feature when it comes to flight control systems. It will only be a matter of time before someone is killed when one of these screws backs out and the pilot will not be able to salvage the situation. I'm suprised that Tru-Trak hasn't realized the potential disaster that awaits them when (not if) this happens.
I propose that Tru Trak consider the following modification. This consists of installing a threaded rod (cutting the head off of a AN 8-32 screw?) into the servo shaft and securing it with loctite AND and a cross drilled precision ground 0.063" dowel pin. Note that the dowel pin only goes through threaded rod and the servo shaft, not the torque arm driving collar. With the collar installed the dowel pin is trapped.
My only concern with this modification is the fact that the 8-32 threaded rod has a considerable amount of it's cross section removed with the cross drilled hole. But this concern is mitigated by the fact that the threaded shaft has very low torque applied since the castle nut is only snugged up enough to keep the torque arm in place. The snugged up castle nut is retained with a cotter pin. I believe this will finally resolve this situation while retaining the ability of overpowering the fuse pin if the servo goes stupid. I've attached a screen shot (I hope) of a power point sketch (the dreaded Powerpoint engineering) of this design.
servo_cross_section.jpg


Regards,
Doug RV6
 
Last edited:
I was thinking along the same lines for a field fix but wonder what drilling for the drift pin will do to shaft strength right there. There is also the (slight) potential for the pin to shear, allowing the threaded rod to turn anyway. I don't think I'd consider it a permanent solution.

I believe TT will eventually have to re-engineer the shaft, probably making it longer and threaded and drilled for a castle nut at the end. When they do, hopefully they willl offer some sort of exchange program to get the fix out to existing installations.
 
I love the idea of the setscrew with properly used red Locktite. Unless heated, that should never come out. 8-32 screws are pretty small to be drilling holes in...
 
Unless TT comes up with something soon,

I'm in for the set screw / red locktite and castle nut with cotter pin too.

On a related note, I've always wondered how the existing design can result in a consistent breakaway torque. The shear pin and resulting torque is repeatable, but the additional torque capacity of the installation screw can vary quite a lot depending on installation torque. I found no spec for installation torque with the replacement screw, and this had me wondering. The proposed set screw / castle nut installation provides a way to minimize breakaway torque variations with the existing design.
 
First, thanks everyone for the great suggestions. We appreciate that.

Next, in speaking to the great folks at Nylok, we believe the reason some of the screws have loosened is residual chemical threadlocker in the shaft threads. According to them, this will cause inconsistency in holding torque with the new screws. With that info in hand, this would only happen in a retrofit application. We have some preliminary solutions hashed out that will make a reasonably easy field retrofit application.

If someone has a servo manufactured AFTER 1/22/09 and you have a screw that has loosened, please let me know. The first part of the serial number is the date of manufacture. For example, 090122 would be 1/22/09.

As to proper torque to put the screw on, as I've said before, there isn't one. There can't be. With the nylon washer there, you'll never get a consistent installation torque due to crush. It's there so that the arm will definitely slip under the screw.

I'll post back when things are more solid on direction. Thanks!
 
Just thinking out loud. Help me out here.

I've been thinking about this quite a bit, (I know, I know). I pulled the wing access panel a week or so ago and that servo screw was fine. I had marked mine with the orange tattle tale stuff when I installed the last fix, (screws with the thread locker that TT sent) because I did not want to try and use a screwdriver and break the thread locker loose. I'll check the elevator servo screw this evening.

One thing that bugs me is; shouldn't we be catching this sooner? It would seem to me that if the screw backs out much at all the arm would move on the shaft and autopilot control would be much impacted if not lost?? Maybe, we're not using the autopilot on all the flights? Maybe, we should make it a point to check it even if we aren't planning on using it?

Until TT comes up with a good fix, how can we easily perform a preflight check? How about engage the autopilot while on the ground and move the stick until you feel the rachet effect. If the servo arm slips without the ratcheting, you have a loose screw and need to abort?

Just thinking out loud. Help me out here.
 
One thing that bugs me is; shouldn't we be catching this sooner? It would seem to me that if the screw backs out much at all the arm would move on the shaft and autopilot control would be much impacted if not lost?? Maybe, we're not using the autopilot on all the flights? Maybe, we should make it a point to check it even if we aren't planning on using it?

I only have a sample size of "1", but the roll servo screw on Louise's -6 was backed out quite a ways, and there was no noticeable play in the A/P when engaged.

Lucas - good to hear you guys are still puzzling over this. I have seen lots of proposed ideas for solutions, but still interested in figuring out the actual cause so we can be confident in the fix!

Paul
 
Just FYI, as a cautionary thing, I check both of my servos and the screw was unmoved since last which was replaced by the screws TT had sent. I also put orange tattle tale on both screws so I can have a visual check on them.
I
just checked the hours since the screw was replaced and it is over 150 hours ago. I use my A/P often specially on trips.
 
Last edited:
Checked both of mine this weekend as well. Snug as a bug.

erich

p.s. estimating 40 hours flight time since screw change-out per TruTrak, and most of that is with AP disengaged
 
Last edited:
Reporting hours

It would seem to me that if the screw backs out much at all the arm would move on the shaft and autopilot control would be much impacted if not lost?? Maybe, we're not using the autopilot on all the flights? Maybe, we should make it a point to check it even if we aren't planning on using it?

Until TT comes up with a good fix, how can we easily perform a preflight check? How about engage the autopilot while on the ground and move the stick until you feel the rachet effect. If the servo arm slips without the ratcheting, you have a loose screw and need to abort?
.

Mikey had about 130 hours (I need to check the exact number when I'm back home) on the servos since installing the "new" screws. As I mostly use him to commute to work and the (too rare) long x-c these days, the vast majority of that time is with the autopilot engaged. I would estimate over 100 hours with the autopilot engaged. As Paul has said, the roll servo was backed out several turns and the pitch servo was backed out about 100 degrees. I would assume that this issue is at least partly related to use- and/or flight (i.e., vibration) hours so it might be helpful if folks reporting on their servos give a sense of flight- and use-hours.

As part of my pre-flight check, I always engage both the roll and pitch autopilots, gently bump them to the "stops" to ensure they engaged, dis-engage them, then do a full-motion check before the run-up. There was no noticeable play in the system. I used both autopilots for about 40 minutes (most of the commute home) on the last flight before tearing into the plane for the annual. No clue. I don't believe there is a pre-flight check short of visual inspection....which isn't a fun process in the case of my plane.

Thank you, TruTrak, for taking this issue seriously and working on it. I've got to say I'm a little less comfortable flying right now than before this observation. To everyone else, please check your screws occasionally. Based on my experience, I think I'll be checking them AT LEAST every 100 hours until I'm confident there is a real fix.
 
Just Brainstorming

Since we're all thinking of ideas, how about this. Is the screw really the root problem? I am thinking that the shear pin is the problem. What is someone was to replace it with a bolt and then tighten the screw without the plastic washer. I know that there would be no failsafe for a servo motor run-away but on my unit I can either overpower the servo or turn off the autopilot. Without the possibility of the shear pin breaking, there is no chance for the servo running and backing the screw out, therefore the arm cannot fall off the shaft causing a control jam. Just a thought.

Tom
RV-7A N175TJ Flying
 
Shear Pin

The shear pin is not really there for servo runaway since killing the power to the servo will stop that...the shear pin is there to prevent an internal catastrophic mechanical failure of the servos themselves (i.e. the stepper motor and the gear train) from jamming the flight controls.

Skylor
RV-8QB Final Assembly
 
Mine are O.K. so far

I just got back from the airport. I checked the elevator servo and the torque seal indicated no movement of the screw. I have 75 hrs since installing the screws that TT sent. So both aileron and elevator are holding at this point.

I believe there may be some confusion, probably on my part, over the brass screw being used as a shear pin and the roll pin, both depicted in Doug's post #38. Am I correct in that the roll pin is not designed to shear or at least the brass screw should shear first?
 
Back
Top