What's new
Van's Air Force

Don't miss anything! Register now for full access to the definitive RV support community.

More heat !!!

lockeed

Well Known Member
Did my first couple winter flights with the RV6 on Thu and Fri. Loved it.

The only downside is I had to get up to 4500-5000ft to get smooth air on friday and it was kind of cold... The heater couldn't produce enough heat to properly warm the cabin.

I did some "cold weather prep" to the plane not too long ago which paid off. Like insulating the canopy properly, pluging up the air inlets etc... The cabin is also insulated... But still, it was getting chilly at FL050!

I've looked around to find hints and techniques used by some to get more heat from the heating system, anything new in that department ?

Appart from putting a couple of those on the floor? :eek:
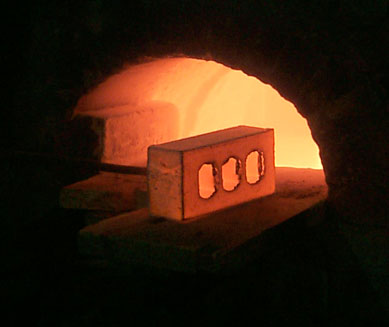
redfield_hot_brick.jpg
 
another thing to try

Others have reported putting stainless steel scoring pads in the muffs to get more heat. Not sure about this maybe, others with first hand experience can chime in. Or you can search the forums.
 
Others have reported putting stainless steel scoring pads in the muffs to get more heat. Not sure about this maybe, others with first hand experience can chime in. Or you can search the forums.

Putting a couple of those in the muff made a huge difference for me - also, I restricted the size of the air inlet going to the muff by about 30%. I have lots of heat now.

If it is really cold, I'll toss a couple of foam pipe insulators into the gap by the slider rails.
 
Inlet to what

Putting a couple of those in the muff made a huge difference for me - also, I restricted the size of the air inlet going to the muff by about 30%. I have lots of heat now.

If it is really cold, I'll toss a couple of foam pipe insulators into the gap by the slider rails.

I have not hooked up my heat muff yet, but how does limiting air going into the heat muff help make more heat. Did you mean you reduced the cockpit inlet, which attaches to the heat muff out let? I am sure there is some physics principle I don't get. I woulld like to make these mods as I am building, it will be cold many of the days here in the NW.

Cheers
 
More heat

Did the scour pads, helped quite a lot, though don't get too aggressive with limiting airflow as it may be OK when really cold, you may have an issue in summer even though you are dumping the air.

Air leaks are important, push rod boots are great as well as foam block on the spar penetration. I have not bothered with the rear bulk head V ridges as the incoming air has to go out some place. I recently did the Aero Classic Sportsman 2 interior which help a lot with insulation.

One of the best things to seal up the slider canopy was to cement HD marine vynl around the inside edge of the skirt at the back with outside edge free to inflate against the fuselage. Took a similar approach with the sides so that the top edge folds over the slider rail and is sucked down to seal. Both work good with nothing to mess with as the seals travel with the canopy and "self inflate" to make the seal...and they look great.
 
Mike, increased surface area of hot/warm metal (scouring pads) along with slower air movement technically should result in more heat absorbed by the air flowing through the heat muff.

Check on whether you need copper or stainless. One is reportedly bad (disintegrates?).
 
Two heat muffs

I added a second heat muff connected in series with the first one, which made a big difference. Sealing up air leaks is also made a difference.
 
mufflers

Vetterman offers a system with mufflers. I was interested for noise reduction, when I spoke to him he said that they also provided substantially more heat than the muffs. I am sure you could add them to an exisitng system (some mods required).
No PIREP as I'm not flying yet, but they fit very nicely.
Bill Brooks
Ottawa, Canada
RV-6A finishing kit
 
SS scouring pads

I added the SS scouring pads and had no increase in heat but ended up with a smell of burnt something, that took quite awhile to trace back to the muffs. Took it back out and the smell disappeared. Smelled like burnt wiring. Only smelled on taxi and startup. But scares you.
Now I am blocking the aileron hole.
 
Last edited by a moderator:
Did the scour pads, helped quite a lot, though don't get too aggressive with limiting airflow as it may be OK when really cold, you may have an issue in summer even though you are dumping the air.

Yep - I do my 30%ish reduction with a bit of aluminum tape over the inlet (above cyl #3). I put the tape on in winter and take it off the rest of the year.
 
Vetterman offers a system with mufflers. I was interested for noise reduction, when I spoke to him he said that they also provided substantially more heat than the muffs. I am sure you could add them to an exisitng system (some mods required).

Yep - If I was building now I'd definitely get the muffler version (wasn't an option when I was building). Two good reasons:
  • Better heat
  • Protects my airport from noise complaints (good for neighbors and good for me)
 
Apart from the usual heat coming from the exhaust, is there a heating solution which would come from oil, of the actual heat from the engine? Maybe picking up heat from the oil cooler or something?
 
I have not hooked up my heat muff yet, but how does limiting air going into the heat muff help make more heat.

Slow down the speed at which air flows thru the muff to give it more time to pick up heat. If air flows thru too quickly, it won't absorb much heat.
 
Muffler

I've had a muffler/heat exchanger on all of my RVs. Decided from the start that I didn't want straight pipes and did want good cabin heat. I had intended to make these to sell but other projects got in the way and it's just too labour intensive to manufacture these on your own. The muffler is more of an expansion chamber than muffler as there is nothing inside but it does serve the purpose of changing the sound and giving plenty of surface area for cabin heat. Performance seems fine with all of the numbers what they should be. Doubt it very much but if there's anyone ambitious enough to build there own and want the parts list and some info on this exhaust just send me a note. I won't build you one but your welcome to try. Will not fit on a 4, I've had them on 6 6A and 8s.
Jerry
wivpsz.jpg
[/IMG]
2rm2gzq.jpg
[/IMG]
 
My heat is good above 40 degrees, when I see 35 degrees or below, It really doesn't do much.

I ordered 2" to 1.5" reducers from "Plane Inovations LLC" and 1.5" ducting from Spruce.

I've heard this helps and will give it try.
 
Instead of pulling cold air from the outside and route it trought the exhaust muff, wouldn't it be better to pick up the air from inside the CABIN (edit) and simply use an electric fan to push it along?
 
Last edited:
Instead of pulling cold air from the outside and route it trought the exhaust muff, wouldn't it be better to pick up the air from inside the cowling and simply use an electric fan to push it along?

I don't think I'd want the little bits of oil vapor (and possibly exhaust) in my lungs.
 
Instead of pulling cold air from the outside and route it trought the exhaust muff, wouldn't it be better to pick up the air from inside the cowling and simply use an electric fan to push it along?

Modification. Duct the air inlet from the cabin. You would need a small fan to move the air.
 
My mistake, I meant "cabin" not "cowling" !! :D

I wouldn't want to inhale any of it either by the way!

Same principle as the air re-circulation on a car... Anyone did it?
 
Here are a few things, all of which are in the archives:

1. Too much air = not enough heat. Too little air = not enough heat. Experiment with blocking air source inlet as others on this thread have suggested.
2. Set up the heat muffs so that the air to be heated goes the opposite direction from the exhaust. This is heat exchanger design 101, called counter-flow. I.e., pipe the supply air to the aft hole, heat out the forward hole. This maximizes the temperature difference across the pipe wall, maximizing heat transfer.
3. I experimented with putting a heater on a crossover pipe, figuring it might work better due to hotter pipes nearer the jug. Problem is only one cylinder is feeding the crossovers, and the heat was noticeably less than when heater mounted on the tail pipe being fed from two jugs.
4. For the side by sides, build some sort of air dam from a towel on the outboard sides of each seat. Cold air from the baggage area will spill through. Same for middle if you don't have electric flaps.
5. Aileron pushrods should be sealed somehow. I used ripstop nylon fabric and made some.
6. Use two heaters if you plan to fly below about 20F or so. The sun makes a ridiculous difference in heating needs, so ymmv.
7. 1.5" scat diameter is more than enough. I might be tempted to use 1" to see, but I'd guess it would work fine. I've got about 80% of the inlet blocked on the 1.5" one.

I can fly down to about 0F in comfort with this setup, and when below zero, I might need to keep my coat on and wear cotton gloves.
 
If I remember correctly, I have a full 2" scat feeding my heater, and from what I've seen so far, I thing it lets in way too much air... I'll probably try to tape 50% of it and give it a try. I also might think of putting something to slow the air down a bit, to give it a chance to warm up better... A screen or a foam at the inlet... something heat resistant of course.

I'd be curious to see how some of you guys plugged up the aileron pushrods holes... I know there's someone selling a kit of boots to seal them, but I just can't figure out how they could install... Haven't had a chance to look at that anyway...
 
Warmer cockpit

Gents

Living and flying my 7A in Colorado means I start each flight at 5000' and things tend to get quite chilly. I agree the one heat muff lacks heat capacity but I added some insulation and a slider canopy seal that helped drastically.

I have carpeting covering the main gear truss structures and then packed the open area in the truss with lots of 6 x 6 x 1" deep foam blocks that are easily removed for inspecting the truss and wing attach bolts.

I also removed the covers held in place with pop rivets at each side of the cockpit the width of the spar extending from the spar to the top longerons. The area where the spars bolt to center section at the bottom of the covers described above always leak cold air into the cockpit. I stopped the leaks by using adhesive backed 1 1/2" wide insulation to pack the area under the rudder cables. I then fabricated a simple tunnel for the rudder cables to pass though, filled the cavity under the covers with lots of light foam, reinstalled the covers and moved on to the next task.

I then plugged up the small spaces between the two seat belt attach points with foam for each seat. I also glued foam insulation on the inside of each of the flap motor housing covers and the rear vertical channel of the same assembly. I carefully cut the foam insulation in a way that formed small foam flanges that fit under the side cover edges which are then held tightly place when the screws are reinstalled. No chance foam can interfere with the motor operation.

The sloped front channel was covered with the same carpeting materials as was installed on the floor.

I then turned to the rear removable bulkhead behind the baggage area. I covered the entire rear of the panel with 1" foam using upholstery adhesive. I then very carefully installed strapping made from light duty ratchet strap material over the foam. The straps were fastened to the bulkhead top and bottom with screws and nylon lock nuts to be absolutely sure nothing can come loose and interfere with the elevator bell crank.

The next task was sealing the slider canopy. I came up the idea of using sheepskin with approximately 1" long wool. I cut 2 strips 24" long x 1" wide and using double sided tape installed them on the outside vertical surface of the canopy rails. This works great. No leakage at all.

Using scissors I trimmed the wool so it cannot be seen when the canopy is closed. With the canopy open the wool is visible but I will remove it each spring and install new each winter.

Sheepskin is inexpensive and easy to find. I found some scraps at a local upholstery shop.

I now have to reduce the amount of heat coming into the cockpit on cold days.

Sorry for the length of this post.

Ron B
 
Gents

I failed to include in my last post that the total weight add of everything added was approximately 2.5 pounds at the most.

Ron B
 
I'd be curious to see how some of you guys plugged up the aileron pushrods holes... I know there's someone selling a kit of boots to seal them, but I just can't figure out how they could install... Haven't had a chance to look at that anyway...

The boots are split to allow installation, and held together with velcro, and the base of the boot itself is held to the inside fuselage skin around the pushrod hole via a ring of velcro. It works very well.
 
2" duct but only a 1" hole

From Danny King, via Don McNamara, I was informed that a 1" hole in the rear baffle was the correct size for the heat duct. This is only 25% of the area of a 2" hole. It is not just the speed of the air flowing through but the amount of heat being transferred vs air volume. If the same amount of heat is transferred to 4 times the amount of air volume the air temperature increase will only be 25% as much.

I can attest that one heat muff is very comfortable down to 20 degrees with my collar up for a draft I have from my canopy. From 10 to 20 degrees I need a scarf and a sweater and I am still comfortable. I do not have any interior panels on the walls or carpet in my -6. I do have aileron push rod boots but not very good seals on the sides or back of my sliding canopy. I did plug the the gaps in the baggage compartment panel ribs.

Another note, when I started to fly in cold weather below 20 degrees (F) I had a regular headset with ear muffs. This and a baseball cap kept my head and ears comfortable. Later I switched to the Halo headset and it took me a while to understand why my ears were getting cold, there were not covered by the ear muffs. Now in cold weather with the Halo I wear a sock hat.
 
Back
Top