What's new
Van's Air Force

Don't miss anything! Register now for full access to the definitive RV support community.

Rework on ASA "Nose-Job"

PerfTech

Well Known Member
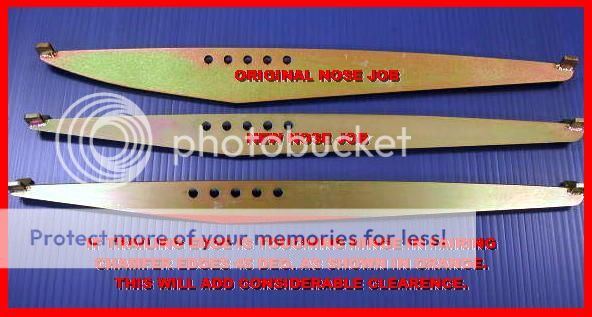
....We have created a new model of "The Nose Job" by popular demand and now have them available. We now have a version of this very popular product that fits inside the stock Vans nose gear fairings, thus eliminating the retro fitting of a new fairing, hinges, glass work, filling and painting Etc.
I never really gave it a lot of thought, but we were continually asked if it will fit in the original fairing? I guess if I had my airplane all finished, painted and flying with the countless hours of work involved I would be reluctant an resistant to changing it. So, here it is, no modification necessary and it takes only a few minutes to install. Now the best part, IT'S CHEAPER!, yes CHEAPER! About $40 less and hours less work to install as well. I am sorry we didn't offer this sooner, I guess I wasn't listen well enough. You guys need to remember, I'm getting old, you need to complain loudly. Thanks all, Allan ..:D
 
Last edited:
Photos?

Allan,

Do you have photos? I didn't see an update on your website.
 
Fits Good!

Allan modified a Nose Job for me last summer like he describes here. It still looks plenty strong and does fit inside the stock fairing. I bought my plane, so I did not have all the builders stuff to make a new fairing. Great product!
 
Allan,

Do you have photos? I didn't see an update on your website.

I haven't posted any photos yet, but it looks pretty much the same. I have both in stock. They are each somewhat overkill for the task at hand and the new version I am sure will appeal to a lot of guys. Thanks Allan.. :D
 
Doesn't fit my stock fairing (?)

Allan (and all),

I just installed the new style Nose Job on my gear leg. That all went well, except now I'm a bit baffled, as my stock fairing doesn't appear to fit over it. Not even close.

The apex of the brace does fit within the chord length of the fairing, i.e. it doesn't stick out through the trailing edge. So that's fine.

But it's the girth of the installation that is causing a fit problem. It is substantially bulging out the fairing in the middle, by the clamp hardware, and thereby not allowing the fairing to close at the trailing edge (forcing it open about a 1/4 inch).

The first limiting factor, what I'm seeing is forcing the fairing open, are the five nuts and bolts. They are making the installation much wider than the fairing at that location, thereby holding it open.

If the interference with the nuts and bolts could be alleviated somehow (lower profile hardware?), then it would help. But even with that interference eliminated, I'm not sure if it would all fit. It looks like the thickness of the clamp would still cause some bulging (though maybe not enough to cause a problem, don't know). And likewise, it looks like the thickness of the brace might still also interfere with the fairing near the apex, as the fairing becomes thin toward the trailing edge (again, not sure if enough to cause a problem).

Anyhow, so at this point I'm just a bit puzzled. I believe the fit of my stock fairing is per Van's drawings, and I presume that AntiSplat has tested the fit with a stock fairing installation. So I'm wondering if there is something unusual about my installation that I'm not aware of, or... what?

Has anyone else installed the new style Nose Job yet with Van's stock fairing? Fit? No fit? Any thoughts?

Thanks,
-Roee

...I don't know what is going on? Can you send me some pictures? These are the same bolts & nuts we use on all "Nose Jobs" from the very beginning with both fairings. The Anti Splat Aero fairing is exactly the same thickness as the stock one. We have cut down about 75 of the original braces to allow use of the stock fairing and this is why we decided to make a run of them to this dimension since people ask for them. Some of the hinges are a little thicker and take up some space, requiring a small radius be ground on the back, thickest point on the brace. When I return on Monday I will send a picture of the area. Something is different about your installation but I am sure we can figure it out. Best, Allan...:confused:
.
 
Last edited:
Thanks, Allan. I'm sure we'll figure it out. I took a few photos and a bunch of measurements, and identified a possible suspect.

The chord line of the fairing measures 3.4" long. From Van's drawing C1 I get about 3.6" for that dimension (1.8" on the 1/2 scale drawing). So there's a potential culprit. The slightly shorter chord on my fairing would work against me here, causing it to narrow slightly faster moving aft toward the trailing edge. But the fairing is as it came from Van's (no substantial trimming along the trailing edge), so I suspect most are like mine rather than the drawing (can anyone please measure theirs)? And the taper angle at the trailing edge is also very shallow, so 0.2" more length added at the trailing edge would add very little width at any given station, unlikely to make the difference for as much interference as I'm seeing (but maybe???).

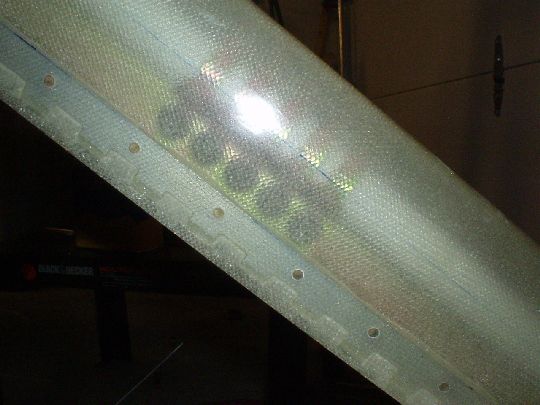
The blue line on the fairing (see photo below) marks the center of the gear leg, and is approx 1.3" from the leading edge of the fairing, and 2.1" from the trailing edge of the fairing (linear measurements along the virtual centerline, not along the fairing contour).

The apex of the Nose Job brace is approx 1.7" from the center of the gear leg, and 0.5" from the trailing edge of the fairing. The fairing is quite narrow that far aft, so further trimming of the brace might be required to make it fit. But let's set that aside for the moment.

With the fairing off the airplane, trailing edge closed, and under no stress, the inner width of the fairing is 1.2" at its widest point, which is approximately where the gear leg is centered. The outside diameter of the Nose Job clamp, fastened to the gear leg, measures about 1.14". So from those dimensions we can conclude that the clamp itself should not cause any interference. Good.

Now, further aft toward the trailing edge of the fairing in the area where the Nose Job bolts are located, the inner width of the fairing is approx 0.9". The Nose Job bolts are 1.0" long. Hence the interference. (And note that the nuts are slightly taller than the bolt heads, so the interference is asymmetric, more pronounced on the nut side.)

Thanks, Allan, for working with me to get to the bottom of this issue. I'll also send you my contact info via email in case you'd like to discuss off-line.

Thanks!
-Roee

20130510_07.jpg
 
I plan to install the new "Nose Job" on my finished 9A Monday or Tuesday depending on UPS and I will report my results.
 
Nose Job clearence!!!!!!

Thanks, Allan. I'm sure we'll figure it out. I took a few photos and a bunch of measurements, and identified a possible suspect.

The chord line of the fairing measures 3.4" long. From Van's drawing C1 I get about 3.6" for that dimension (1.8" on the 1/2 scale drawing). So there's a potential culprit. The slightly shorter chord on my fairing would work against me here, causing it to narrow slightly faster moving aft toward the trailing edge. But the fairing is as it came from Van's (no substantial trimming along the trailing edge), so I suspect most are like mine rather than the drawing (can anyone please measure theirs)? And the taper angle at the trailing edge is also very shallow, so 0.2" more length added at the trailing edge would add very little width at any given station, unlikely to make the difference for as much interference as I'm seeing (but maybe???).

The blue line on the fairing (see photo below) marks the center of the gear leg, and is approx 1.3" from the leading edge of the fairing, and 2.1" from the trailing edge of the fairing (linear measurements along the virtual centerline, not along the fairing contour).

The apex of the Nose Job brace is approx 1.7" from the center of the gear leg, and 0.5" from the trailing edge of the fairing. The fairing is quite narrow that far aft, so further trimming of the brace might be required to make it fit. But let's set that aside for the moment.

With the fairing off the airplane, trailing edge closed, and under no stress, the inner width of the fairing is 1.2" at its widest point, which is approximately where the gear leg is centered. The outside diameter of the Nose Job clamp, fastened to the gear leg, measures about 1.14". So from those dimensions we can conclude that the clamp itself should not cause any interference. Good.

Now, further aft toward the trailing edge of the fairing in the area where the Nose Job bolts are located, the inner width of the fairing is approx 0.9". The Nose Job bolts are 1.0" long. Hence the interference. (And note that the nuts are slightly taller than the bolt heads, so the interference is asymmetric, more pronounced on the nut side.)

Thanks, Allan, for working with me to get to the bottom of this issue. I'll also send you my contact info via email in case you'd like to discuss off-line.

Thanks!
-Roee

20130510_07.jpg

....I set up one of our fixtures today and tried to duplicate the problems as seen in your photo above and took a couple of pictures of our findings. It appears to me that your fairing is mounted too far forward and possibly trimmed in a way that affords less clearance. Or there is some variation in the fairing, hing, rivets on something you received from vans. I have several new stock fairings here and when trimmed and clamped in place with the lower hose clamp mounting they all look just like the one i have pictured below. I can't find more that about .060" variation in any of them. We did find some hinge that I believe came from Vans that was wider and will definitely hit the back edge on the nose job. We sanded a 45 Deg. bevel in the area shown in the pictures and that issue was gone, then all was well. We have some shorter bolt and nut assemblies and I will send you some of those tomorrow. This will give you another .187" clearance at the bolts, Thus eliminating that portion of the problem. I am not saying you don't have a problem with what we see in your photo, but we have not seen it before. We have had a couple of customers say they beveled the trailing edge a little bit to gain extra clearance. If possible, please give me a call so we can try to solve this issue. I can send you a new stock fairing if you would like or, I see you haven't done your paint work as of yet. I will send you one of our ASA fairings (no charge) to affix to your plane. What ever it takes to get you past this is our pleasure
. Just let us know. Thanks Allan... :)

.
 
Thanks, Allan!

Thanks again, Allan, for all your help toward sorting this out. Sounds like the cumulative effect of tolerances on a few different dimensions on the fairing just conspired against me here. But between everything you've suggested and offered, I'm sure we'll have this solved quick and easy.

So, as we discussed, let's start with the shorter bolt/nut assemblies which should alleviate that interference. Then we'll see how things look at the trailing edge, and go from there. If I can make it work with the existing fairing by chamfering the edge of the brace as you suggested, then that's the best all-around solution. Otherwise, I may take you up on your generous offer for another fairing. I'll report back as soon as I've tried the fit with the new bolts and chamfer.

Thanks again!

-Roee
 
Nose Job

Just installed the "Nose Job" (new one). Took about 30 minutes, fits nicely in the stock faring and snapped together as described. Also purchased the gust lock and it looks like the best RV solution on the market.

Keep up the good / innovative work. I will be watching for more.

RV7A flyer
 
I also just received and installed a new model ?Nose Job? on my finished RV9-A without any real problems. I did bevel the trailing edge of the bar near the apex to allow a little extra clearance for the fairing hinge as Allan Nimmo mentioned others have done but other than that, the installation went without a hitch. I also installed the nose skid and now waiting for my wheel to come back with the bearing mod installed.

I?m looking forward to flying with a little more piece of mind knowing if I do have to make an off-field landing or if I botch a landing, I?ll have a bit more insurance to keep me right side up, no guarantee expected just a bit more insurance.
 
Great improvement!

After just installing the older style unit, this will be a huge time saver. Fitting and finishing the new fairing was by far the biggest part of the job. In our case, it was OK because our old one was beat up and needed attention. Anti splat, keep the great ideas coming!
 
I haven't posted any photos yet, but it looks pretty much the same. I have both in stock. They are each somewhat overkill for the task at hand and the new version I am sure will appeal to a lot of guys. Thanks Allan.. :D

Dear Allan, considering that builders will fit their standard nose leg fairings differently it might make it easier for your potential customers if you were to provide a couple of product dimensions on your newest brace.

In particular the dimension from the centreline of the clamp (thus centreline of the nose gear) to the most rear point of the brace (apex) would be very helpful. With that information, builders with installed standard fairing could easily check to ensure that your new product will fit inside their existing fairing. ;)

You might also like to consider providing a radius at the rear apex of the brace as a standard feature. Builders can, of course, grind this area themselves, but that will remove the corrosion protection afforded by the zinc electroplating.
 
As someone who has had the opportunity to install these for others, I can't say if the new design is any better. It's definitely less work for me. That's not good. I need new shoes.

:D

Tongue firmly planted in cheek
 
Modification completed!!!!!

Dear Allan, considering that builders will fit their standard nose leg fairings differently it might make it easier for your potential customers if you were to provide a couple of product dimensions on your newest brace.

In particular the dimension from the centreline of the clamp (thus centreline of the nose gear) to the most rear point of the brace (apex) would be very helpful. With that information, builders with installed standard fairing could easily check to ensure that your new product will fit inside their existing fairing. ;)

You might also like to consider providing a radius at the rear apex of the brace as a standard feature. Builders can, of course, grind this area themselves, but that will remove the corrosion protection afforded by the zinc electroplating.
.
:D... We took all 277 pcs. of the new type we have in stock, set up the mill and did the mod on them just today. It is virtually impossible to make them hit now with this material removed. All future runs of this product will be this way. These will need to go to the plating shop tomorrow, get stripped and re-plated. We will be shipping them again in a few days with all mods and plating finished. Thanks guys, Allan:D

Good on you Allan....you're on the ball. However one of the problems I see with retrofitting the new brace into existing fairings is that builders tend to be arbitrary in the placement of the fairing's rear piano hinge. Some builders tend to move it forward to ensure that there is absolutely no gap at the rear of the fairing. Obviously if they move it too far forward it could conflict with the brace, even if it is radiused. In other words the "standard" fairing is not really standardized.

Would you please provide a precise dimension from the centreline of the clamp (hence centreline of the nose gear) to the rear apex of the brace so that I can check whether your brace will fit inside my "standard" fairing.
 
Would you please provide a precise dimension from the centreline of the clamp (hence centreline of the nose gear) to the rear apex of the brace so that I can check whether your brace will fit inside my "standard" fairing.

Is this dimension a secret ??? It would certainly make it easier for prospective customers with standard nose fairings if Anti-Splat made it available.
 
Is this dimension a secret ??? It would certainly make it easier for prospective customers with standard nose fairings if Anti-Splat made it available.

Why don't you contact them directly instead of expecting Allan to watch this site every minute....

Contact info.... For payment information or to e-mail us: [email protected]
 
Last edited:
Yesterday we installed the Nose Job{slim model} on our Rv9A.We had no problems fitting the standard Vans front fairing.

No modifications required.

Regards

Peter Edney
 
Last edited:
Why don't you contact them directly instead of expecting Allan to watch this site every minute....

Don't be absurd. Allan started this thread himself to promote a new product. Of course he's monitoring it.

I'm asking Allan to make a product dimension available in a public forum so that ALL prospective buyers have that relevant information. It's not just for me. Consumers shouldn't have to buy the product and take delivery of it to ascertain whether it will fit in their unique fairing installation....that's just common sense.

Best of all would be that he provides the dimension here and then incorporates it in the product specification on his website.
 
Good on you Allan....you're on the ball. However one of the problems I see with retrofitting the new brace into existing fairings is that builders tend to be arbitrary in the placement of the fairing's rear piano hinge. Some builders tend to move it forward to ensure that there is absolutely no gap at the rear of the fairing. Obviously if they move it too far forward it could conflict with the brace, even if it is radiused. In other words the "standard" fairing is not really standardized.

Would you please provide a precise dimension from the centreline of the clamp (hence centreline of the nose gear) to the rear apex of the brace so that I can check whether your brace will fit inside my "standard" fairing.

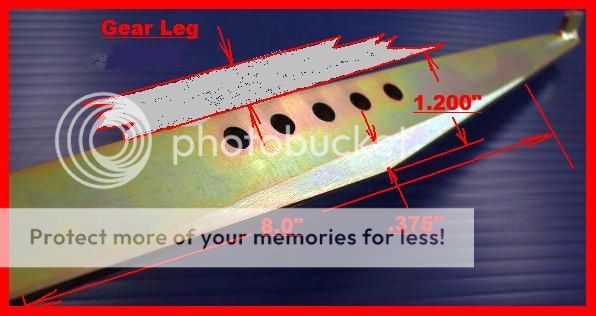
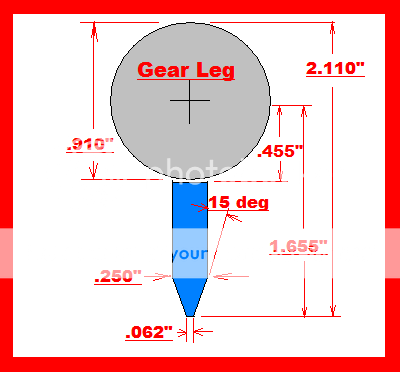
....Sorry for the delay, as I just revisited this thread and discovered your request. I looked back through our records and found that we had only one installation that we had modified, with the taper, that had a stock fairing interference problem, (not bad out of well over 200 modified units). This hardly seems an issue, but, here are the dimensions you requested. Thanks, Allan... :D
.

.

.
 
Last edited:
Allan,

Its good to see the product improved in this regard. The original unit has the potential to impact spin recovery. I personally don't spin my aircraft but others do and no doubt many non builders have purchased and installed your kit. So it just goes to show minor modifications can have an impact on your aircraft.

I'm including a quote from Vans below.

"One simple and commonly applied modification which is likely to impact spin recovery qualities is the use of wide gear leg fairings (wider than supplied by Van?s Aircraft) on the nose gear leg, or the main gear legs of the tail wheel RV-7. Wider (than supplied by Van?s Aircraft) gear leg fairings add to the overall side area of the airplane, and any side area which is forward of the center of pressure of the airplane has a directionally destabilizing effect and has been shown to degrade spin recovery characteristics."

http://www.vansaircraft.com/pdf/sb02-6-1.pdf
 
Spin Recovery

... When this issue was tested extensively by us in the infancy of this product we found it to be a non-issue. We tried old fairing, new fairing, wheel pant, no wheel pant and combinations of all the above. We even extended the surface area to a ridiculous size (174 sq.in.) in an attempt to see some effect. We never were able to measure any effect at all, even with the extended unit pictured below. From this we could only conclude that the addition of eleven square inches was a non issue. Thanks, Allan...:D
.
 
Nose Job on 8A

Installed the new nose job yesterday on my 8A. Fit was snug but no problems with standard fairing. Now it's time to fly and try it out.
 
.... This hardly seems an issue, but, here are the dimensions you requested. Thanks, Allan... :D

Allan, thanks for those dimensions. I used them to check on available space inside my "standard" fairing and calculate that I should have 0.080" of clearance. Of course I do not know about conflict with the bracket bolts because I have no dimensions there but hope that it will work in that area.

In reality Vans provides no real dimensional data on the installation of the nose gear leg fairing and you can be sure that the composite product they supply will vary in dimensions from batch to batch (it's a Van's tradition). Therefore there is probably no "standard" nose fairing.

At any rate builders will now be able to check to ensure that your product will fit inside their fairing and all will be well.
 
Recently fitted the old style, can I grind it down to the new dimensions?

That would be 1.2 inches at the apex and tappered to the ends?
 
Recently fitted the old style, can I grind it down to the new dimensions?

That would be 1.2 inches at the apex and tappered to the ends?

If you pay the freight, I will exchange it for you. Just send me the brace only with a note and a phone number to contact you. Allan... :D
 
Just wanted to give everyone a quick update on my fit issues.

There were several dimensions in my stock fairing that ended up on the bad side of typical. I say "typical" rather than "normal" because there appears to be a lot of variation in the dimensions of the stock fairing installation from one airplane to the next. But anyhow, the most significant dimensional variation was the fore-aft position of the fairing relative to the gear leg. In my case, the fairing was further forward than most, and therefore there was less space inside the fairing behind the gear leg to accommodate the brace.

Interestingly, that dimension on my installation actually matches very closely to that shown on Van's scale drawings, more closely than most, apparently. Back when I installed the fairing, I had to re-work the bottom leading edge for unrelated reasons, and in doing so, I made it match Van's drawing. Whereas, it seems that most folks have the fairing positioned much further aft, dictated by the shape of the bottom leading edge as it comes from Van's, which doesn't match Van's drawings, but incidentally is advantageous in making room for the Anti-Splat brace.

So, it looks like, unfortunately for me, I'll need to re-fit or replace my fairing to make it work. But it sounds like my situation is unusual, and most folks shouldn't have this problem.

I also wanted to again acknowledge and thank Allan for being very responsive and helpful in working through the problem. Excellent customer service!
 
It fits

Further to my previous post #30 on this thread I have received a "standard fairing" nose job from Anti-Splat and it fits OK inside my standard fairing. It's tight but it fits. And it was delivered very promptly.

Of course there is no way of knowing if the brace actually works, and there may be a lot of flyers out there with one who are benefitting only from the "placebo effect" (they feel good because they THINK it's working).

My attitude is that it probably can't do any harm (apart from lightening my wallet) and it MIGHT work. There's probably many hundreds of them flying now because a lot of purchasers would have retrofitted them to flying aircraft. And there doesn't seem to be any adverse feedback to date on VansAirforce. I've only heard of one nosegear failure with the brace and that was probably more of a crash than a bad landing.... so no news is good news.
 
Back
Top