
Van's Air Force
You are using an out of date browser. It may not display this or other websites correctly.
You should upgrade or use an alternative browser.
You should upgrade or use an alternative browser.
longeron 5.4 deg
- Thread starter tomkk
- Start date

Taper
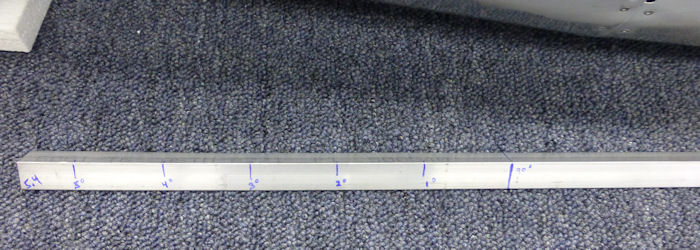
Ideally, you want to start at 5.4 degrees and taper to 0 at "end of twist and open". The instructions suggest a gradual taper if I recall ... which I missed at first.
My flair goes most of the way before I caught that. Still works but a critical eye you can see where the flair stops.
Happy building,
Rick_A
Well Known Member
Did mine not too long ago. It's 5.4 deg for most of the way and then gradually taper as you get to the last 6 - 8 inches.
A few of the things I learned while doing this.
1. I was not able to get the "hammer method" to work at all.
2. Tried using an 1-ton arbor press but it didn't produce enough force.
3. The cheap HF 6-ton hydraulic press worked great.
4. I did not use a piece of pipe under the angle while pressing down - I should have.
The reason I didn't use the pipe, is because it rolled while I was pressing down so I could not keep it centered. Find a way to secure the pipe in place or flatten one face so that it doesn't roll.
Without the pipe, the faces of angle develop a curve. I had to go back and re-flatten the faces.
When you get to the next step of twisting 2.7 deg, the point is to get the top face back to being flat along the entire length. The 5.4 deg change will all be in the vertical plane.
joedallas
Well Known Member
This worked fine for me
Take a look at this Page
http://www.joesrv12.com/Builder Log/bl_23_02.htm
Take a look at this Page
http://www.joesrv12.com/Builder Log/bl_23_02.htm
Is the idea to start with a 5.4 deg opening and gradually taper that to zero at the "End of Twist & Open point (12 11/16") or to have a constant 5.4 deg from start to end of the Open section?
Did mine not too long ago. It's 5.4 deg for most of the way and then gradually taper as you get to the last 6 - 8 inches.
Actually it is 5.4 degrees open at the fwd end and then gradually tapper to nothing, over the entire portion of the angle.
tomkk
Well Known Member
Thanks for all the replies. It actually wasn't (quite) as bad as I'd feared. My ancient vice along with an old 17 mm socket with a flat ground on one side and a pipe on the vice handle did the trick with the open. The curve and bends worked out as well.
I have no idea, though, whether the combination of the open, twist and the curve further down the longeron resulted in all the correct angles in the right spots. At what point will I be certain I didn't mess something up with all that? In other words, what doesn't fit, or fit as well as it should, if I didn't get it quite right?
I have no idea, though, whether the combination of the open, twist and the curve further down the longeron resulted in all the correct angles in the right spots. At what point will I be certain I didn't mess something up with all that? In other words, what doesn't fit, or fit as well as it should, if I didn't get it quite right?
Get it as close as you can, especially the curve for the canopy decks. After that, I did numerous trial assemblies, tweaking a little at a time until the panel base and decks fitted as well as I could make them fit. You don't need the fuselage side skins on. The uprights are all you need. I found the more I played around with the aluminum angle, the easier it got. It really is not difficult stuff to work with once you get used to it. A dead blow plastic hammer and a 12" shifter (adjustable wrench), a solidly mounted vice with decent soft jaws is all I used. Preload and hit, and don't hit very hard. Don't drill any holes until you are happy that you can't get it any closer. For the record, I probably did 8 or so trial assemblies before I was happy.
Have fun, good luck.
Cheers,
Dave Hastwell
120485
Have fun, good luck.
Cheers,
Dave Hastwell
120485
tomkk
Well Known Member
Thanks, now that I have them clecoed to the uprights I can see where all the angles fit. The curve for the canopy decks turned out good. I was mostly concerned with the open/twist. It looks like the keys there are making sure the top is horizontal for the panel base and the sides the correct angle for the skins to fit smoothly.
kevinl4000
Active Member
Opened angle too much
Oopsies. I misread the instructions and opened up the front of the left longeron to 95.4 +/- 0.5 through the first 12 inches. Now it looks like I need to close it back up some (or maybe buy some more material & start over?). How do people close the angle when it's been opened too far? Bench vise? Vise grips?
Actually it is 5.4 degrees open at the fwd end and then gradually tapper to nothing, over the entire portion of the angle.
Oopsies. I misread the instructions and opened up the front of the left longeron to 95.4 +/- 0.5 through the first 12 inches. Now it looks like I need to close it back up some (or maybe buy some more material & start over?). How do people close the angle when it's been opened too far? Bench vise? Vise grips?
kevinl4000
Active Member
Opened angle too much
Okay, Plan B: I'm going to salvage the piece by making what was to be the left-front longeron the right-rear longeron and start the left over using the angle set aside for the right side. Thank you Joe for this very helpful photo:
Okay, Plan B: I'm going to salvage the piece by making what was to be the left-front longeron the right-rear longeron and start the left over using the angle set aside for the right side. Thank you Joe for this very helpful photo:
BobbyLucas
Well Known Member
So far, this step has been infuriating. I destroyed my Hazard Fraught vice and a set of soft jaws, so I went back and bought the 6-Ton A-frame press that I would otherwise never need. Plenty strong enough, but no feel to it so a little hard to finesse, have to go by sight, but fine it's workable....
The issue I'm having now is that opening the angle is imparting quite a curve to the longeron. Is this normal?

The issue I'm having now is that opening the angle is imparting quite a curve to the longeron. Is this normal?
Kyle Boatright
Well Known Member
The issue I'm having now is that opening the angle is imparting quite a curve to the longeron. Is this normal?
It imparts some, that's for sure. And you get to work it out. ;-)
This is one of those opportunities for Van's to spend a few bucks on tooling and pre-bend these longerons as part of the kit. I think most people would pay the premium to avoid the hassle of bending 'em.
BobbyLucas
Well Known Member
It imparts some, that's for sure. And you get to work it out. ;-)
This is one of those opportunities for Van's to spend a few bucks on tooling and pre-bend these longerons as part of the kit. I think most people would pay the premium to avoid the hassle of bending 'em.
You got that right! They have to do it for the factory built planes anyway, so why not for the kits? I would definitely pay a premium for this step to be completed. It's already cost me a vice, soft jaws, a 6-ton press, and a fifth of vodka.

The first longeron I did with the vice is not pretty to be sure. Had to work out quite a bit of curve and it's still wavy on a small scale. I have no idea if it will be good enough. Should've used soap!
The second one I'm working on is a little smoother so I guess we'll see. Trying hard not to be a perfectionist here.
It imparts some, that's for sure. And you get to work it out. ;-)
This is one of those opportunities for Van's to spend a few bucks on tooling and pre-bend these longerons as part of the kit. I think most people would pay the premium to avoid the hassle of bending 'em.
The longerons for the RV-12iS are pre-bent (they have all of the curve shape that builders previously had to do, already formed). That was one of the many improvements made when the iS kit was introduced.
The only part not done is the opening of the extrusion angle at the fwd end.
Builders have typically not had any difficulty doing that when using the socket method.
I am not sure what is happening in this case. I have never seen one curved like that.
E. D. Eliot
Well Known Member
Easy on the end cut
I cut my longeron as per the KAI instructions and when I installed the tailcone to the tub I wished that I had cut the longeron an inch or so longer. When you get to the stage of installing the tailcone then you can make a final cut to suit yourself. I would have preferred another 1/2" or so longer. as usual YMMV.
I cut my longeron as per the KAI instructions and when I installed the tailcone to the tub I wished that I had cut the longeron an inch or so longer. When you get to the stage of installing the tailcone then you can make a final cut to suit yourself. I would have preferred another 1/2" or so longer. as usual YMMV.

