Well I'm at that point where I'm trying to figure out how to rivet those final few rivets on the bottom rudder skin-to-rib. The plans say it is acceptable to use pull rivets here, but most of the RVs I see seem to have used flush rivets. How are you guys doing this? I tried to make a thin bucking bar, but when I ground the metal thin enough to fit in that tight space, it bent when I bucked it.

Van's Air Force
You are using an out of date browser. It may not display this or other websites correctly.
You should upgrade or use an alternative browser.
You should upgrade or use an alternative browser.
tight space rivet techniques
- Thread starter diamond
- Start date

I used the indirect riveting method. Put a rivet in the hole, tape it down, place the piece face down on a back-rivet plate, take a 3-4 inch piece of thick flat stock or a discarded wood chisel blade, put one end on the tail of the rivet and the other end on the back-rivet plate and then hammer away at it with your flush-set. It works like a lever and will set a 3/32 rivet nicely as long as you turn up the pressure a bit.
John Courte
Well Known Member
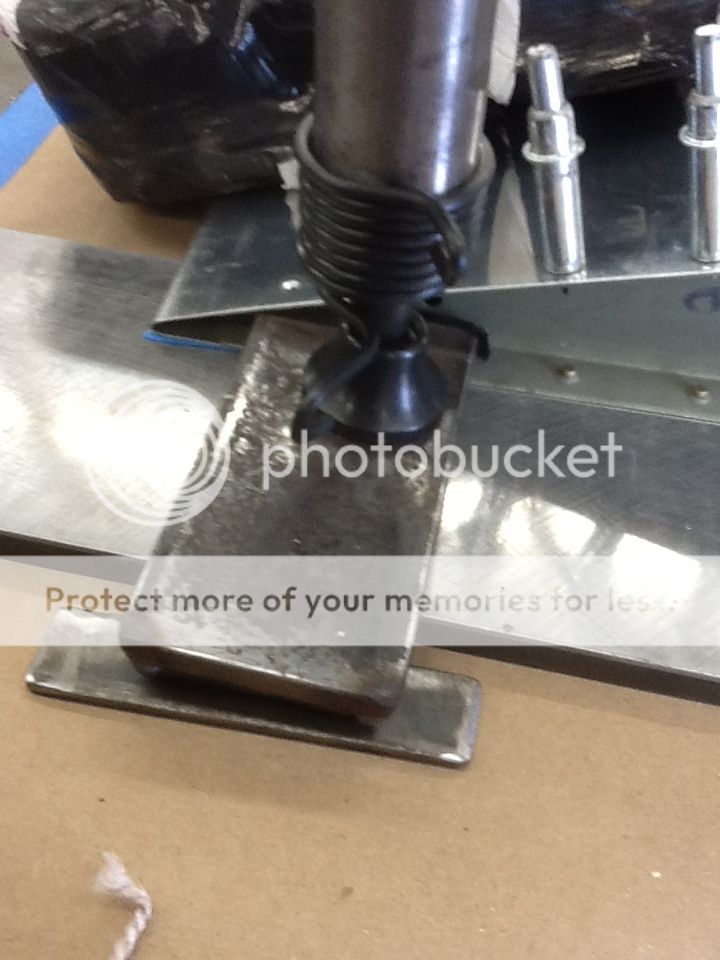
Pneumatic squeezer with the solid, thin-wedge-ended yoke. That's how I did mine. Dimpling them, that was another puzzler. I had to tape one side of the nail-pull dimple set to my ground-off yoke and a 3/32 dimple die in the piston.
Like so:
http://stjohn.openbar.com/airplane/?p=156
I would guess that it's highly unlikely that any bucking bar that thin will have the mass needed behind the rivet to buck effectively, unless it's made of neutronium.
Like so:
http://stjohn.openbar.com/airplane/?p=156
I would guess that it's highly unlikely that any bucking bar that thin will have the mass needed behind the rivet to buck effectively, unless it's made of neutronium.
I used the indirect riveting method. Put a rivet in the hole, tape it down, place the piece face down on a back-rivet plate, take a 3-4 inch piece of thick flat stock or a discarded wood chisel blade, put one end on the tail of the rivet and the other end on the back-rivet plate and then hammer away at it with your flush-set. It works like a lever and will set a 3/32 rivet nicely as long as you turn up the pressure a bit.
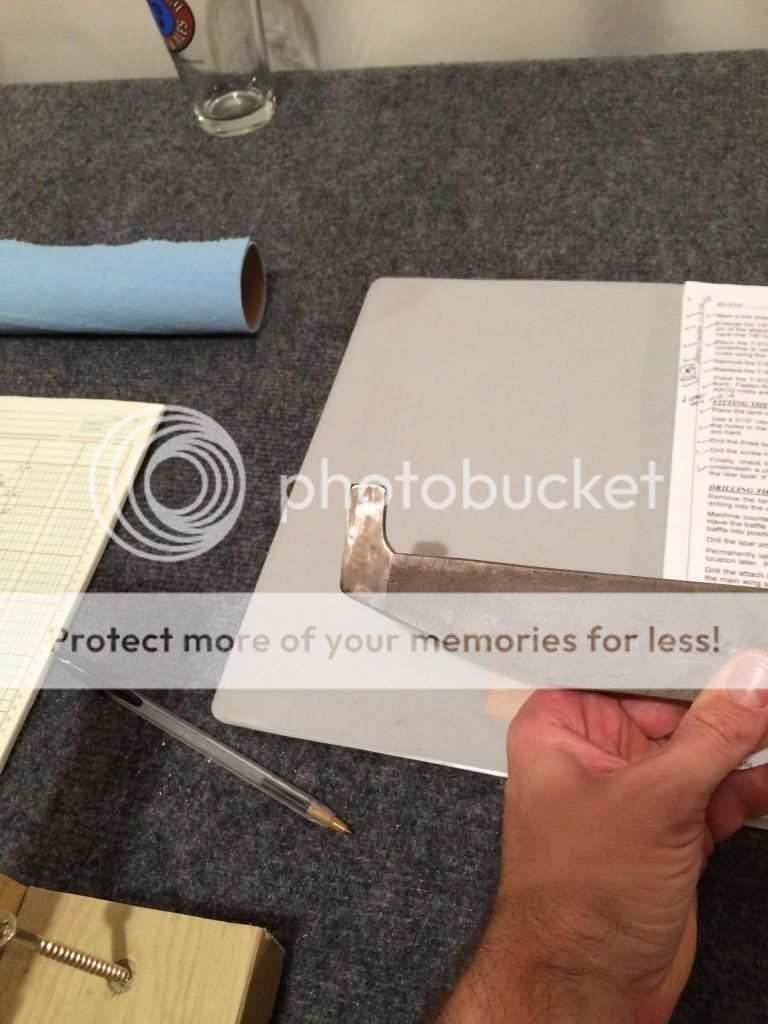
Here's a photo of the indirect method...
aarvig
Well Known Member
Mark,
Those are frustrating. I did manage to get all of them although the very inner corner is not what I would call perfect?its close but not perfect. I went to some A and P surplus store online and bought this bugger for $10
If you want to borrow it I could bring it down the next time I'm at my sisters house otherwise if you're up this way, you're welcome to it.
Similar technique
Take a look at the builders tips. Image at the bottom of the screen shows my technique. Works great.
http://www.experimentalaero.com/Builders Tips.htm
Take a look at the builders tips. Image at the bottom of the screen shows my technique. Works great.
http://www.experimentalaero.com/Builders Tips.htm
Thanks folks for the great advice. I stopped by a scrap yard on the way home from work today and picked up some metal to fabricate a bar as shown on the experimental aero site. I shaped the end into a wedge and it worked great with a few sharp blows from a hammer. Got to be careful that the hammer doesn't come down on the edge of the skin, so I just put a 2X4 block over the skin to protect it in case my aim was off. I think I'll have to pop rivet the aftmost rivets on the top rib though. Just too tight to get any metal in there that is thick enough to shape the rivet. Thanks for the great tips.
mikehoover
Well Known Member
After less than stellar results on my rudder and elevators, I vowed to just use pop rivets in places like this. No regrets. ")
I'm sure I will encounter bigger challenges than this along the journey, but this is the first challenge I've come to that has slowed me way down.
OK, so I got one pop rivet in on the aftmost hole in the rudder top skin-to-rib location, but now the rivet I just set prohibits me from getting another pop rivet into place from the opposite side. Very tight space there. All of the techniques mentioned thus far have worked great on the rivets forward of this last one, but this last one will require some more head scratching.
OK, so I got one pop rivet in on the aftmost hole in the rudder top skin-to-rib location, but now the rivet I just set prohibits me from getting another pop rivet into place from the opposite side. Very tight space there. All of the techniques mentioned thus far have worked great on the rivets forward of this last one, but this last one will require some more head scratching.
TedsNumberOneSon
Active Member
Wish I'd known about this four weeks ago doing my rudder bottom rib. I fought it for two hours and got it but it sure is ugly. Now I know about so when I get back around to redoing my rudder skins I'll have it in the back of my mind. I'll have it for the elevator in a few weeks at least and maybe I'll get those right the first time.
Blind Rivets
Hi Guys
Sorry to bring up an old thread, but whilst researching I came across this thread.
I have riveted my rudder together and am struggling with the last holes in the ribs. I am planning on putting blind rivets in them, but here is my noob question.
The holes are #40 and I will obviously need to open them to #30, but how do you then dimple the skin and rib after you have enlarged the hole, as they are now riveted together?
Also if I put one CS4-4 in the one side, then another CS4-4 won?t fit in the other side as the gap is to small and the rivets hit each other, so do we get shorter pull rivets that aren?t cherrymax?
Thanks in advance
Kyle Boatright
Well Known Member
Hi Guys
Sorry to bring up an old thread, but whilst researching I came across this thread.
I have riveted my rudder together and am struggling with the last holes in the ribs. I am planning on putting blind rivets in them, but here is my noob question.
The holes are #40 and I will obviously need to open them to #30, but how do you then dimple the skin and rib after you have enlarged the hole, as they are now riveted together?
Also if I put one CS4-4 in the one side, then another CS4-4 won?t fit in the other side as the gap is to small and the rivets hit each other, so do we get shorter pull rivets that aren?t cherrymax?
Thanks in advance
Take a look at the Aircraft Spruce website. Also, Chapter 5 of the build manual. There are several 3/32" countersunk pop rivets available - both with steel and aluminum heads. One or more of those will work fine without having to open up and re-dimple.
wirejock
Well Known Member
MK-319-BS
Ryan.
Look in your inventory for MK-319-BS pull rivets. They fit the #40 dimple. You do have to drill the hole up a tiny bit.
Hi Guys
Sorry to bring up an old thread, but whilst researching I came across this thread.
I have riveted my rudder together and am struggling with the last holes in the ribs. I am planning on putting blind rivets in them, but here is my noob question.
The holes are #40 and I will obviously need to open them to #30, but how do you then dimple the skin and rib after you have enlarged the hole, as they are now riveted together?
Also if I put one CS4-4 in the one side, then another CS4-4 won?t fit in the other side as the gap is to small and the rivets hit each other, so do we get shorter pull rivets that aren?t cherrymax?
Thanks in advance
Ryan.
Look in your inventory for MK-319-BS pull rivets. They fit the #40 dimple. You do have to drill the hole up a tiny bit.
You do have to drill the hole up a tiny bit.
You can use a # 34 drill purchased at the local hardware store to final drill for MK-319's.

