
Van's Air Force
You are using an out of date browser. It may not display this or other websites correctly.
You should upgrade or use an alternative browser.
You should upgrade or use an alternative browser.
SkyView ADAHRS mounting
- Thread starter skyyking
- Start date

[email protected]
Well Known Member
from angles across the longerons
mounting mine today... plan is to use a couple of pieces of .063 angle across the longerons, single lug #8 nutplates in the ends of the angle, holes in the longeron... #10 stainless mounting hardware for the adahrs.
mounting mine today... plan is to use a couple of pieces of .063 angle across the longerons, single lug #8 nutplates in the ends of the angle, holes in the longeron... #10 stainless mounting hardware for the adahrs.
Last edited:
Been searching for that ideal spot.
I am also considering where to mount mine. If you provide one foot of clearance from the rudder cables, shoulder harness cables, mechanical elevator trim cable, and pitch autopilot servo you will quickly realize there is not an ideal spot. My desire is to keep close behind the baggage bulkhead for access for future maintenance. Mount very high is one option (gets you close to a foot of clearance). Another I'm considering is replacing Van's shoulder harness cables with stainless cables. I can buy the cable and end fittings from Genuine Aircraft Hardware, but do not have the ability to swage. Anybody know a source of made to order cables? This would allow mounting near longeron height. You could use a couple of 3/4" x 3/4" x .062 angles with a brace off the center vertical baggage member to stiffen it. Anybody see anything wrong with that idea?
Alan Jackson
Hartselle, AL
apkp777
Well Known Member
I am not sure what "future maintenance" everyone is planning to do. Maybe replace the unit in 10-20 years. Access is not too difficult from this position. Here it is clear of interference. Protected from the elements and perfectly level. As well as simple to install and room for a second unit

Access difficult at current build stage
Tony
I had seen pictures of your installation. Didn't mean to slam it. I already have that top skin riveted on and do not relish the thought climbing to the tail to fabricate / align / install bracket and unit.
Alan Jackson
Hartselle, AL
Tony
I had seen pictures of your installation. Didn't mean to slam it. I already have that top skin riveted on and do not relish the thought climbing to the tail to fabricate / align / install bracket and unit.
Alan Jackson
Hartselle, AL
Brantel
Well Known Member
I already have that top skin riveted on and do not relish the thought climbing to the tail to fabricate / align / install bracket and unit.
Yes, Pain! much Pain!
N941WR
Legacy Member
Put it where a good number of us put the old unit. That keeps it away from any ferious metal and far enough away from the baggage compartment so nothing in there will impact the compass. Plus it helps keep the weight out of the tail.
(That shelf had a support running from it up to the longitudinal rib on the top skin as seen in this picture.)
(That shelf had a support running from it up to the longitudinal rib on the top skin as seen in this picture.)
apkp777
Well Known Member
I didn't take it as a "slam". Yes, once the aft skin is installed it woulbe be tough. Clearly the ADHRS installation is a pain. Someone needs to come up with a kit and good instructions. You'd sell a bunch. I looked at a install position just aft of the bag area bulkhead and found it a pain to get level. Plus quite a bit of fab work.
[email protected]
Well Known Member
adahrs mounting
it is quite a bit more effort to fit with the top skins installed... here i could just reach in with long arms to fit, position, and drill the fabricated assembly to the longerons.

it is quite a bit more effort to fit with the top skins installed... here i could just reach in with long arms to fit, position, and drill the fabricated assembly to the longerons.
I will need shortly to mount ADAHRS, too.
I looked at the longerons side-by-side solution, as it was experimented by the RV8 Beta-tester (more on Dynon forum). But the side-by-side solution may be good for an RV8, which has a shorter lateral section than an RV9.
I am worried about the extra-weight that this will mean on an RV9.
So, I am thinking on using longerons only as a reference for alignment, hanging ADAHRS unit from the top stiffener (and maybe a diagional bracket for better grip). Maybe just in the middle of the aft section immediately aft of the baggage compartment (some 10'' down the top longeron).
[email protected]
Well Known Member
seat belt cables
the seat belt cables pass through the baggage bulkhead above the elevation of the longerons and do not interfere.
the seat belt cables pass through the baggage bulkhead above the elevation of the longerons and do not interfere.
apkp777
Well Known Member
the seat belt cables pass through the baggage bulkhead above the elevation of the longerons and do not interfere.
I figured. Looks good!
That's what I did
After reading Dynon instructions and Vansairforce, I decided to go as follows.
I was tempted to use alternate locations, but everyone had some negative aspect:
- the longeron to longeron solution had the problem of being too heavy, of reducing access to the most aft tail cone and to be too close to strobe power pack and belt cables;
- the on-longeron mount had the problem to be too close to power pack and belt cables.
Finally, I made a U-shaped bracket from 0.032'' Van's stock bundle which came with empennage, if I well remember. It was bent 2 times at 90?. Installation has almost 2' from power pack. The issue is only carefully calculating the right angle on three axis. I used a Smart Tool and replicated the angle of the airplane on two axis (longeron and side-by-side): the third axis came aligning the bracket with the rib where it is installed.
Build9A
Well Known Member
maintenance/inspection
The installations that have been pictured look pretty good to me. Please don't take this as criticism, but I have been flying my RV for about 4.5 years and I dread each time I need to inspect behind the baggage compartment. It is literally a pain the the %&*, neck and stomach. If you are skinny and have long arms you might be ok, but in my opinion I would move those installations as close to the baggage bulkhead as possible, maybe even in front.
Keep in mind that I don't know the requirements for installation, maybe there is some electronic reason to keep them that far back. If that's the case consider the source of this post and ignore it. my 2 cents. By the way, I want one of those gadgets in my plane someday. But I just spent my last 2 cents. take care
ron sterba
Well Known Member
I'am at a aviation trade show,Dynons here.I'll ask!
I'll ask the rep from Dynon as well as two avionics vendors and a RV self help build clinic. I just bought my two servos from Dynon last week so I got to see the demo of the SKYVIEW (10") today. Pretty cool. Now i have been told that mounting that unit in the wing root would be a good place but I'll check tomorrow.. I won't be able to post until monday because I have a 5 hr drive home from here. Its only a 50 min flight with a RV9A I'am told. ron in Washington State aviation Fair outside Seattle.
I'll ask the rep from Dynon as well as two avionics vendors and a RV self help build clinic. I just bought my two servos from Dynon last week so I got to see the demo of the SKYVIEW (10") today. Pretty cool. Now i have been told that mounting that unit in the wing root would be a good place but I'll check tomorrow.. I won't be able to post until monday because I have a 5 hr drive home from here. Its only a 50 min flight with a RV9A I'am told. ron in Washington State aviation Fair outside Seattle.
The installations that have been pictured look pretty good to me. Please don't take this as criticism, but I have been flying my RV for about 4.5 years and I dread each time I need to inspect behind the baggage compartment. It is literally a pain the the %&*, neck and stomach. If you are skinny and have long arms you might be ok, but in my opinion I would move those installations as close to the baggage bulkhead as possible, maybe even in front.
Keep in mind that I don't know the requirements for installation, maybe there is some electronic reason to keep them that far back. If that's the case consider the source of this post and ignore it. my 2 cents. By the way, I want one of those gadgets in my plane someday. But I just spent my last 2 cents. take care
Last edited:
For the guy who wanted to swage a cable , any sailboat rigging shop can do that.
As far as mounting the unit in the wing, my understanding is that won't work because the turns will precess differently.
I am having difficulty finding a mounting place in my RV10 because I am also installing an A/C package on an upper shelf in behind the bulkhead.
The best hope is if they split out the magnetmeter of the ADAHRs unit as they have talked about doing. Then the mag unit can go in the wingtip and the ADAHRs can go anywhere on the center axis because it is only the mag sensor that is sensitive to interference.
N941WR
Legacy Member
There is one other problem with mounting that thing in the wing, you still have to run a static line to it, so you will have to take that all the way out to the end of the wing.
The other challenge is it has to be mounted away from any steal objects. Camillo's location is about the best.
Granted, getting back to it later on is a real pain but with luck, you will not have to mess with it later on.
I really wish Dynon would have made two units, one a remote compass that can be mounted back there with only electrical connections and a second one that only has fittings to the static, pitot, and AoA lines that could be mounted under the panel. I hope they come out with such a thing, I don't really know if they have even given that a thought. It would sure make retrofits easier.
Dynon's installation manual at http://www.dynonavionics.com/downloads/Install_Guides/SkyView Installation Guide.pdf page 2-4 says the ADAHRS should be mounted within 6 feet laterally of the center of gravity. That rules out the wing tip but leaves open the possibility of mounting near an inboard access panel.
Last edited:
ron sterba
Well Known Member
Hey Charlie you are right! I did talk to the DYNON rep this weekend at the northwest air fair outside Seattle and when i asked him he said to keep it with in 6 feet of the main unit. There was other RV builders at the stand looking at the NEW Skyview unit and we confirred that behind the the baggage panel half way up the center post on a make shift shelf would be a good location. At least 1 foot away from other electrical wiring. The rep said exactly like you said the DYNON manual has a download on the installation. The DYNON booth always had somebody checking out the 10" Skyview which is what I'am getting with the 2 axis auto pilot. Sun-n-fun should have the new next generation auto-pilot combo Dynon software unit ready at sun-n-fun. Dynon is expected to release something new to the public within 3 months but couldn't say a word. We builders were like guys at VANS factory or kids in a candy store. Ron
Jamie Aust
Well Known Member
I did it like this.
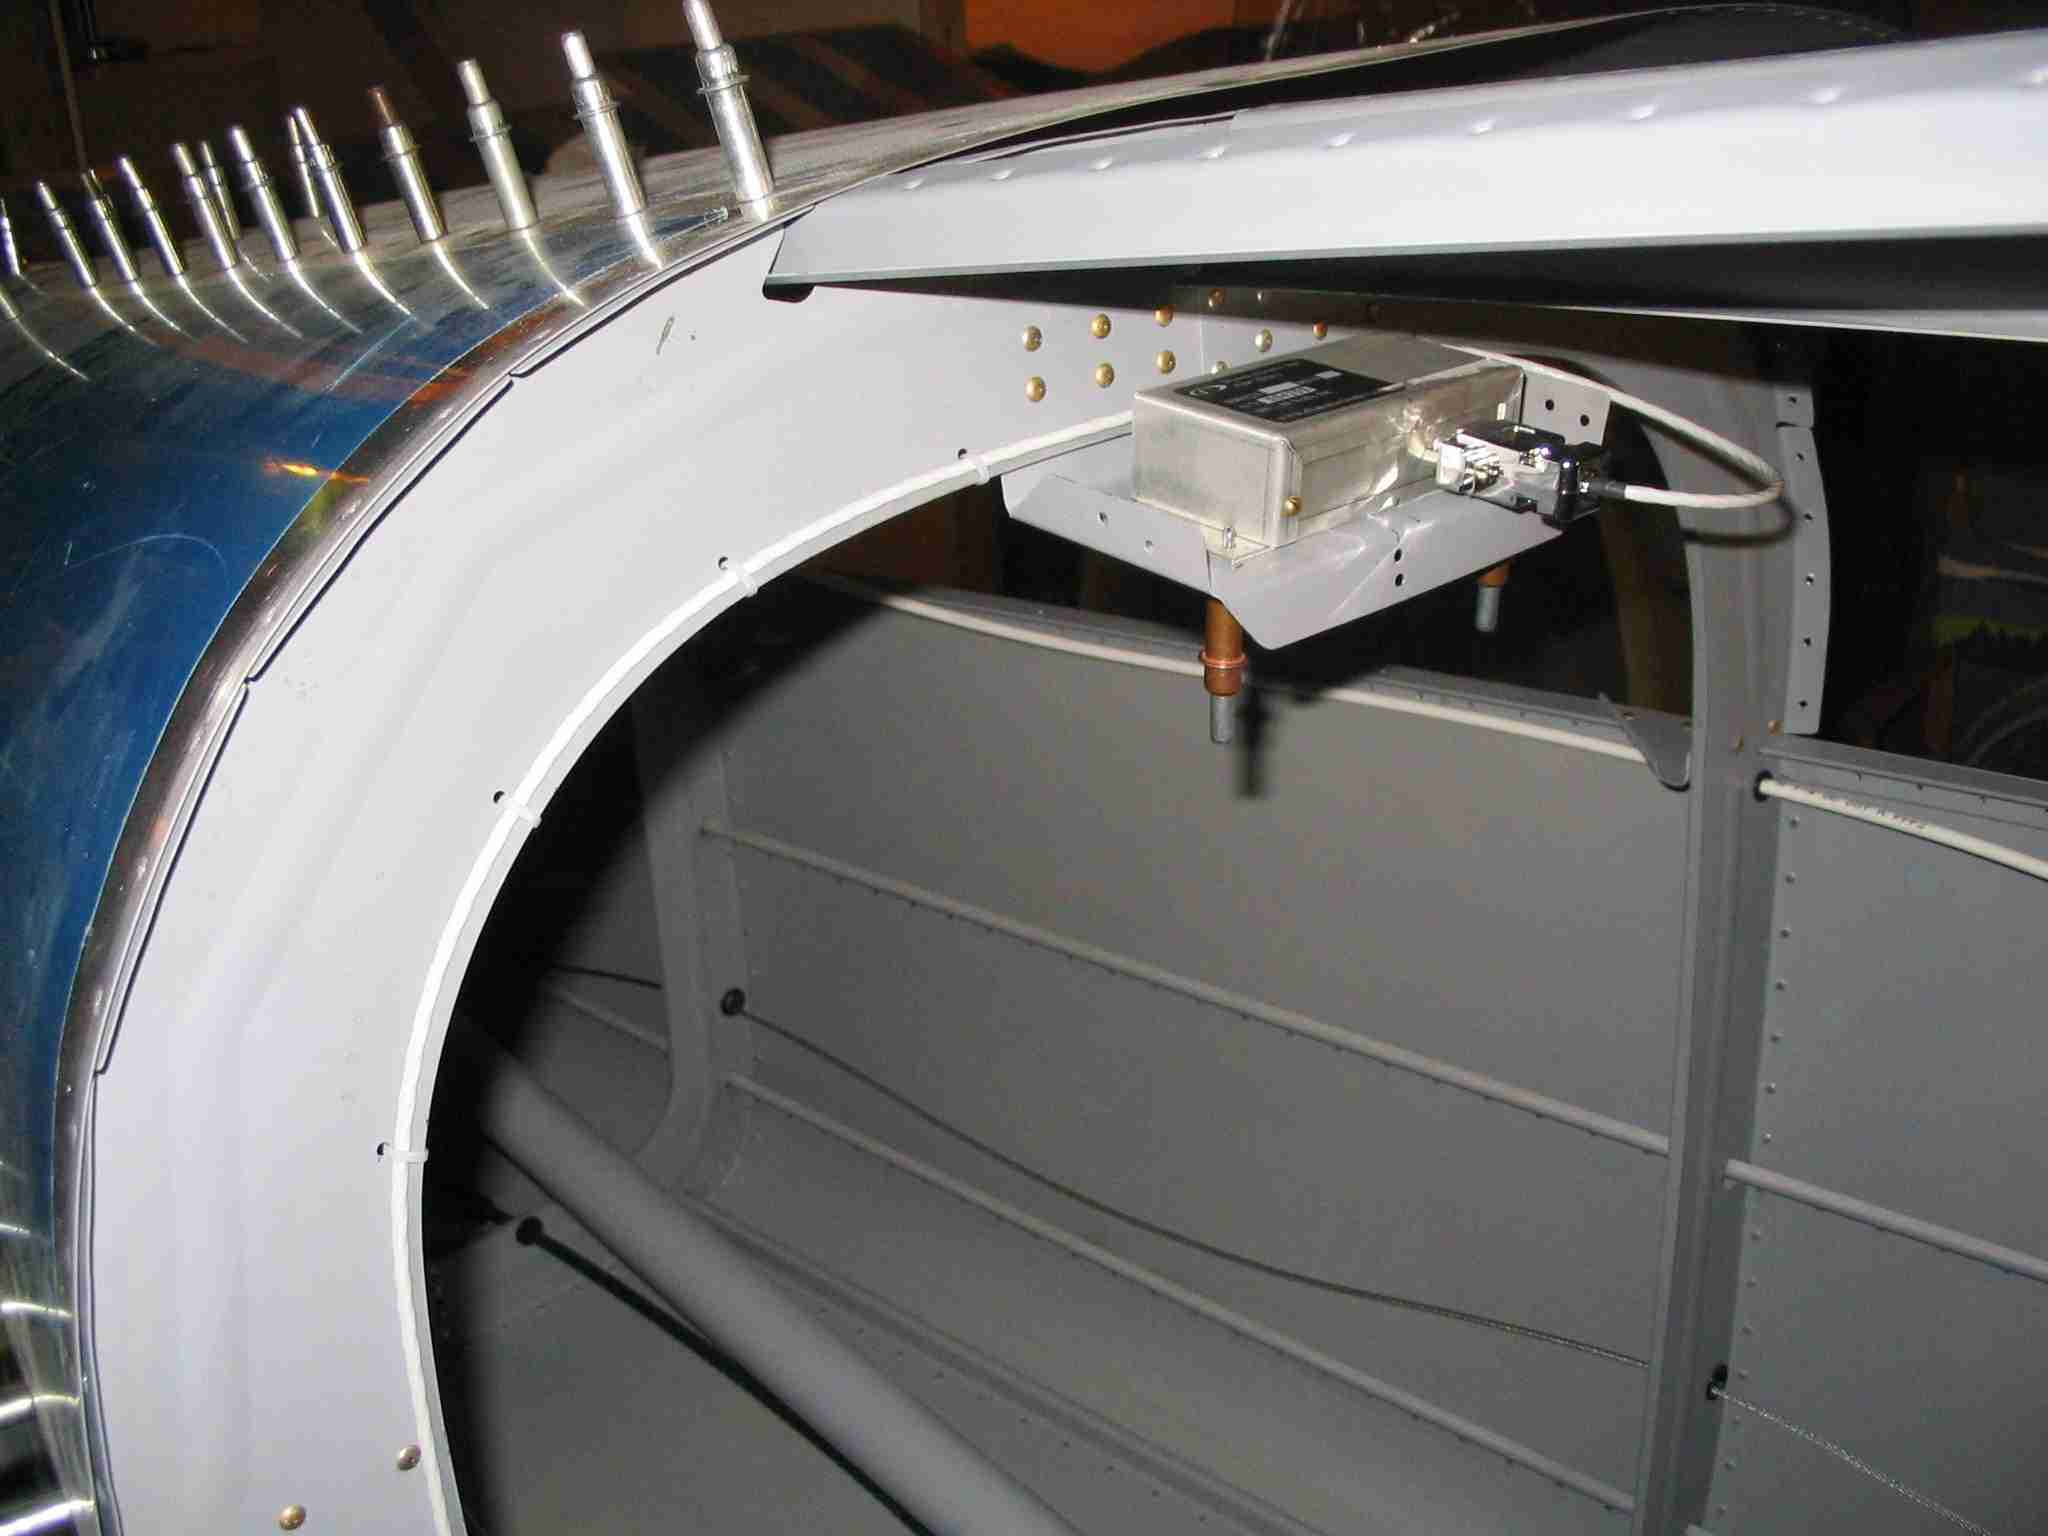
Skyview ADAHRS mounting.
After weeks of looking for a better place, this is where I decided that it would be best for me ( Vans RV-7A). As I already had the aft deck top skins riveted on, and I wanted as much room as I can back in the aft area when crawling around. I must note that the credit for this location goes to another fellow member of VAF (Camillo ), im just showing some more picture of my install.
This is half way between the baggage rib bulkhead ( F706) and the next rearward rib( F707) looking aft.

Here is a better picture showing the two rib locations.

Here is the co-pilot side view, also looking Aft.

Now , here it is primed and ready to rivet in.

Some measurements for you. Note the 9 pin connector faces rearward once installed. Also you have to put a slight down ward angle on the verticals, as the aft deck runs downward to the tail.
The base is 6 12/32 inch long. On the left side vertical near the 9pin, its height is 2 10/32 ( rear ) and the front is 2 30/32 ( forward side ) I made the width the same size as the ADAHRS. It was made out of 032.
Skyview ADAHRS mounting.
After weeks of looking for a better place, this is where I decided that it would be best for me ( Vans RV-7A). As I already had the aft deck top skins riveted on, and I wanted as much room as I can back in the aft area when crawling around. I must note that the credit for this location goes to another fellow member of VAF (Camillo ), im just showing some more picture of my install.
This is half way between the baggage rib bulkhead ( F706) and the next rearward rib( F707) looking aft.
Here is a better picture showing the two rib locations.
Here is the co-pilot side view, also looking Aft.
Now , here it is primed and ready to rivet in.
Some measurements for you. Note the 9 pin connector faces rearward once installed. Also you have to put a slight down ward angle on the verticals, as the aft deck runs downward to the tail.
The base is 6 12/32 inch long. On the left side vertical near the 9pin, its height is 2 10/32 ( rear ) and the front is 2 30/32 ( forward side ) I made the width the same size as the ADAHRS. It was made out of 032.
Last edited:
Fearless
Well Known Member
I put this in but ended up not needing
Vans sells a AHRS mount for the 7/9 for a Garmin 900 and GRT EFIS system. I put one in mine but later found out I didn't need it for the GRT Sport model. I put the nutplates in for the GRT EFIS. If I upgrade to a Horizon later on - I quess I'm set. If you go this route it's better to do it while building the fuselage because there are a lot of rivets.
http://vansaircraft.com/cgi-bin/catalog.cgi?ident=1267012754-180-12&browse=airframe&product=AHRS-mount
Vans part # IF AHRS MOUNT
Jamie,
I will probably put my magtometer in that location. I really don't want it at the wing tip.
Just an FYI...that's a fine location for a AHRS, but really a poor location for a compass/magnetometer. Since the Dynon AHRS has the magnetomter/compass built in it, that would not be a good place to mount that particular unit, in my opinion. You've got a big swinging/moving item there with steel rod ends that won't play nicely with compasses/magnetometer. At least that's been our experience and the aft fuse behind the baggage bulkhead is where we've seen the most success. As far as I'm aware, Dynon is the only one to combine the AHRS and remote compass, so you need to plan accordingly and can't treat it just like a stand alone AHRS.
Camillo and Jamies installations look fine but with Camillos I'd do something to give that bracket a bit of lateral support (side to side).
Just my 2 cents as usual.
Cheers,
Stein
Last edited:
Rainier Lamers
Well Known Member
As far as I'm aware, Dynon is the only one to combine the AHRS and remote compass, so you need to plan accordingly and can't treat it just like a stand alone AHRS.
Stein
Foolish as we where (are?), we used to do this as well (the SP-3HC, discontinued a few years back).
We stopped this and split the AHRS and compass into two units for the exact reasons you suggest.
I kind of suspect Dynon will be doing the same real soon or you may have to use a seperate compass module in many aircraft installations (in particular those using steel frames (alloy or otherwise)).
Rainier
CEO MGL Avionics
Fearless
Well Known Member
Wouldn't you have same problem mounting at aft bulkhead?
Stein,
Wouldn't you have the same problem mounting at the aft bulkhead where the elevator pushrod is swinging as well? I plan to mount the magnetometer up high behind the baggage bulkhead off the top ribs at the top skins like Jamie showed his AHRS unit. But the point is well taken.
Stein,
Wouldn't you have the same problem mounting at the aft bulkhead where the elevator pushrod is swinging as well? I plan to mount the magnetometer up high behind the baggage bulkhead off the top ribs at the top skins like Jamie showed his AHRS unit. But the point is well taken.
Stein,
Wouldn't you have the same problem mounting at the aft bulkhead where the elevator pushrod is swinging as well? I plan to mount the magnetometer up high behind the baggage bulkhead off the top ribs at the top skins like Jamie showed his AHRS unit. But the point is well taken.
You do have to be carefull about the aft bulkhead, but truth the told the relative movement of steel parts along with other electrical interference is much less near the aft end of the airplane than it is at the front.
We've spent many hours at different times doing magnetic mapping of some airplanes. Garmin has spent untold hours doing this for most RV's and if you use a specific computer program you can map out locations before you physically mount it.
Anyway, I ran off on a tangent again! I didn't specifically advocate the aft shelf, but I know for a fact that in some installtions that are has worked fine. Again, my preference is what Jamie/Camillo did - or at least in that general area. We've had good luck with almost all brands of compasses in that area.
Cheers,
Stein
Last edited:
Jamie Aust
Well Known Member
Hey Jamie,
Do you have any pictures of how you are running the cables/wires to that unit? I'm curious as to what route you took.
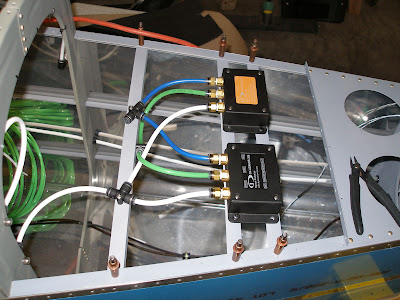
I have not put those in just yet. My plan is to have them all down the pilot side, just under the longerons. That will be Pitot, AoA and the serial cable for the skyview. You can see in the second photo that I have used the safeair kit for all my static/pitot/AoA lines. I will get a photo when they are in and post it here.
Other things im doing are, remove steel rods/nuts/bolt/screw and replace with brass in areas that are ok to do this.
To fine tune the ADAHRS position, im going to use plastic washers under the unit.
Jamie did an improvement of my installation, which in turn is - I must admit - a variation of another builder installation in a proxime area (can't remember now the name of the builder).
Maybe Stein is right suggesting more strenght on the side to side movement. But touching the unit, it needs quite a bit of force to be slightly moved on one side. I will see if vibrations will determine problems.
I would also like to add that I put a bit of soundproof 4/32'' material between the bracket and the ADAHRS. I did the same with my engine monitor module on the firewall. I hope this will reduce some vibration.
I hope to be able tomorrow to post some photos of wiring installation. I did manage to join both servos in a custom made harness using the Steinair 7 wire left from wing servo wiring. I spliced both servo wire together in an AMP-MOLEX and then I connected a simple 9-DSUB to join the splitter I bought.
I can't tell you if servos work well, since SkyView still doesn't support them, but I hope they will.
My version
Here's how I did it:
Pretty much copied Tony's install.
I have an autopilot servo in the center section and wanted to be well away from that. I bought the Van's ADAHRS mounting kit, but decided it would be too close to the servo. I think I'll be able to access this location reasonably well if I take the empennage off. The closest moving metal are the rudder cables, but the relative position isn't changing, don't see them as a problem. The elevator pushrod ends are 2 feet further aft.
I think the top, like Camillo has done is a reasonable way to go, and it's not too late to change my design.
Since I had to tee the plumbing lines, I put in a third angle to firmly attach the tees. How does the plumbing look? If this isn't going to work, I'm open to suggestions!
Last edited:
dedgemon
Well Known Member
Alternative position
After recently retrofitting a Skyview into my '8 I have an alternative position for consideration. (And it works great).
Consider the inside inspection plate under the left wing. It already has pitot and AOA lines. No steel anywhere around. Easily removable. Big enough. etc....
Certainly was easy for the retrofit, compared to climbing back into the tailcone.
dedgemon
Well Known Member
Not sure I've got a picture
However its really simple.
Pop the inside left inspection plate off of the wing.
Using 4 brass screws mount the adhars to the inside of the inspection plate.
I shimmed it to level with roughly 1/4 inch worth of washers on the inside edge.
I also rivetted a 3/4 angle across the wing bay just behind the inspection plate opening for increased stiffness (piece of cake even after wing closeout, includes rivets through the rib flanges).
Then its just a matter of running wires and tubes.
I've been flying this and the Skyview for about 20 hours now and it works really well, even during rolls.
If I was building a new airplane I'd probably look harder at putting it in the baggage area or somewhere, but for a retrofit this was super.
mikehoover
Well Known Member
However its really simple.
Pop the inside left inspection plate off of the wing.
Using 4 brass screws mount the adhars to the inside of the inspection plate.
I shimmed it to level with roughly 1/4 inch worth of washers on the inside edge.
I also rivetted a 3/4 angle across the wing bay just behind the inspection plate opening for increased stiffness (piece of cake even after wing closeout, includes rivets through the rib flanges).
Then its just a matter of running wires and tubes.
I've been flying this and the Skyview for about 20 hours now and it works really well, even during rolls.
If I was building a new airplane I'd probably look harder at putting it in the baggage area or somewhere, but for a retrofit this was super.
David,
Interesting location for the ADAHRS. Are you still happy with this location? Thanks!
bruceh
Well Known Member
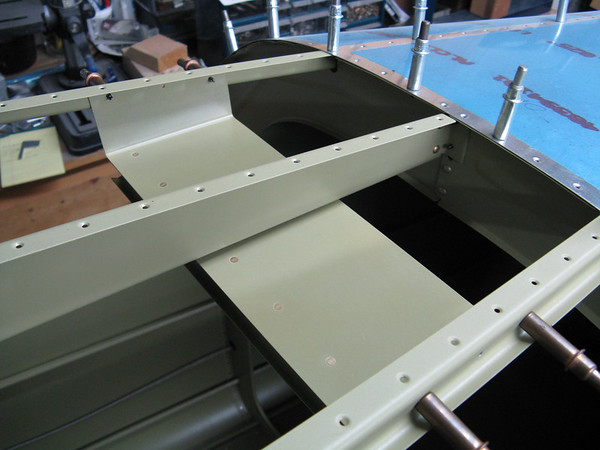
Here is what I'm planning on using as a shelf.
Initially, there will be just a single unit, but room for expanding to 2.
This was built from the scrap bundle. The bends on each side are angled to match the stringers that it hangs from. The shelf angle is matched to the angle of the longerons. A brass screw will tie the shelf to the middle support piece at the aft end. A scrap of J-stringer is riveted to the forward edge for stiffness. It is very solid. Cost was nothing but time. I will probably just pop rivet this in after the top skins go on.
lorne green
Well Known Member
A question for Stephen / others
I'd like to install my Skyveiw ADHARS mount bracket here as well. Any issues magnetically? I'm thinking of the stainless steel shoulder harness cables passing 10" or so from the unit.
it is quite a bit more effort to fit with the top skins installed... here i could just reach in with long arms to fit, position, and drill the fabricated assembly to the longerons.
I'd like to install my Skyveiw ADHARS mount bracket here as well. Any issues magnetically? I'm thinking of the stainless steel shoulder harness cables passing 10" or so from the unit.
Sylvainsting
Active Member
ADAHRS lining up
Hello,
I just created the rack for my ADAHRS. Riveted leveling with the pitch and roll axis. But I have some difficulties to line up the ADAHRS with the plane. Any suggestion to be sure it lined up ?
In advance thank you
Sylvain
Hello,
I just created the rack for my ADAHRS. Riveted leveling with the pitch and roll axis. But I have some difficulties to line up the ADAHRS with the plane. Any suggestion to be sure it lined up ?
In advance thank you
Sylvain

