What's new
Van's Air Force

Don't miss anything! Register now for full access to the definitive RV support community.

Dual display setup in an RV-6

gjh22

I'm New Here
Friend
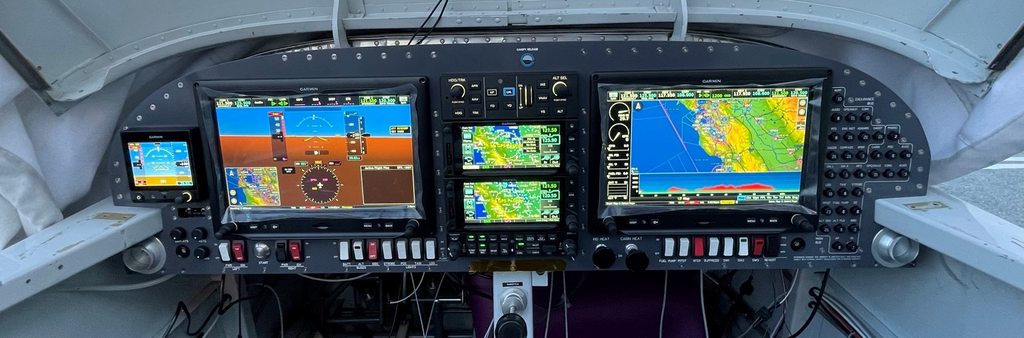
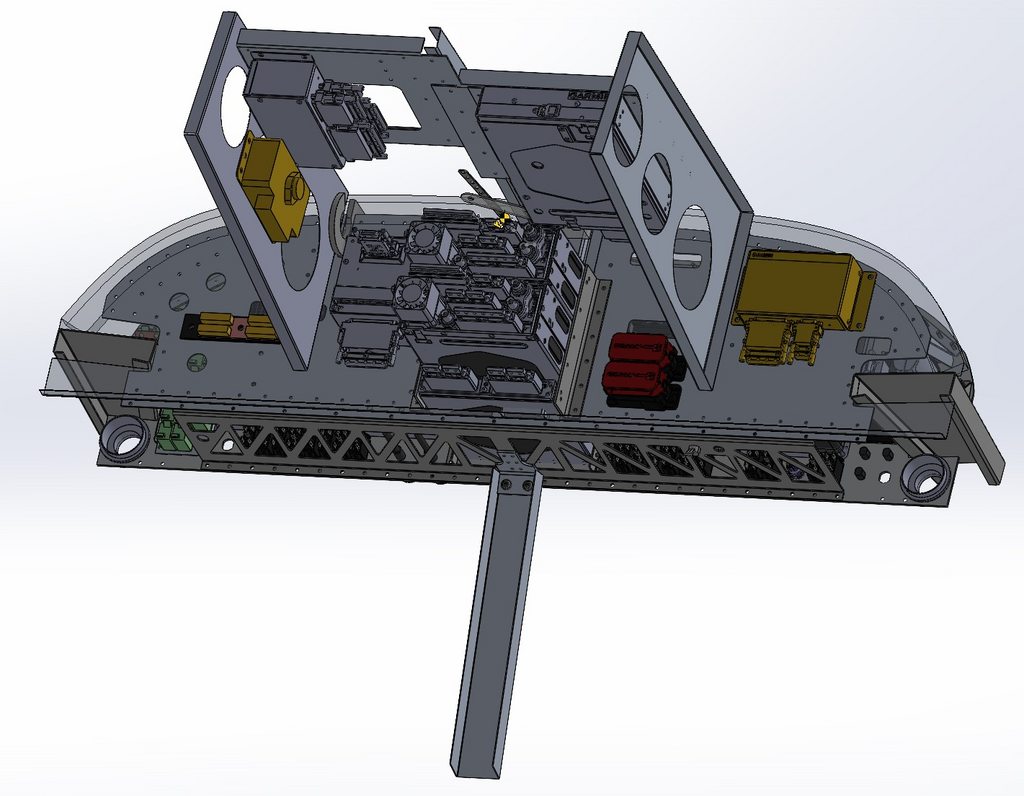
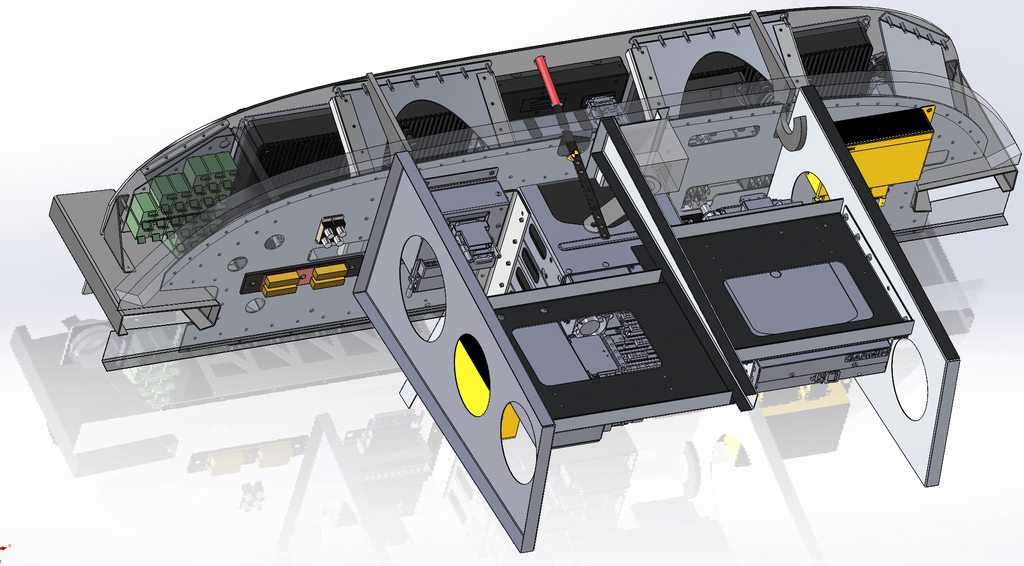
I recently finished designing and installing a dual display setup in my RV-6. The normal panel installation has two formers supporting the panel which perfectly interfere with where the displays would go in a dual setup, so some creative bracketry was required - the RV-7 structure is significantly different in this area from what I can tell, and not so much suffering is required.

It isn't clear to me how common an installation this is, so I wanted to share in case anyone else is thinking of doing something like this and is curious about what is entailed.

To make sure everything fit I made extensive use of CAD and had the metal fabricated from drawings by a sheet metal service. This was an extremely good allocation of time as the metal fabrication costs for this project were under $2000, including bending, the engraved and powder-coated main panel, and conversion coating on the bracketry.

I am happy to answer any questions.

Some pictures:

5Fv7giTh.jpg


b4XPekJh.jpg


LRoOW2Th.jpg


W96fcszh.jpg
 
Last edited:
Very nice.

Did you replace your sub-panel as well as the instrument panel?

Is the new instrument panel further forward? Meaning closer to the sub-panel than before? I see two unpainted rectangles on the canopy rails that might be where a couple panel mounts were.

I'm in the final wiring phase of a similar but a little less extensive upgrade. I just moved the left F-645 brace about 4" outboard to accommodate the 460, and worked around the rest of what was already there. That meant I could only fit a 470 on the right I didn't want to change the sub-panel.
 
Very nice.

Did you replace your sub-panel as well as the instrument panel?

More or less. I added a doubler rather than removing it for simplicity but there was relatively little left of the subpanel. In the CAD images, what's visible in the subpanel location is actually that doubler - the subpanel is set to transparent.

Is the new instrument panel further forward? Meaning closer to the sub-panel than before? I see two unpainted rectangles on the canopy rails that might be where a couple panel mounts were.

Exactly right; I moved it forward 1.5". The eye-to-screen distance on the other airplane I fly (a DA40) is around 4" more than the -6 was originally, so I split the difference.

At some point I'll repaint the interior (it would have made sense to do before this project, rather than after, but timelines did not permit).

I'm in the final wiring phase of a similar but a little less extensive upgrade. I just moved the left F-645 brace about 4" outboard to accommodate the 460, and worked around the rest of what was already there. That meant I could only fit a 470 on the right I didn't want to change the sub-panel.

Much more reasonable choice, overall. If I had been able to keep the panel and attached equipment lighter, this would have been a more viable option.
 
Nice panel.

Here is a tip on scaling "imgur" pics: Add one of the scaling characters listed below before the ".jpg" in the image address.

Here are all the dimensions and letters to choose from:
s = Small Square (90×90)
b = Big Square (160×160)
t = Small Thumbnail (160×160)
m = Medium Thumbnail (320×320)
l = Large Thumbnail (640×640)
h = Huge Thumbnail (1024×1024)

Ex: Your panel:

5Fv7giTh.jpg
 
Last edited:
Nice job!
One thing you ought to think about is the sharp edge at the bottom of the panel. If you were to crash (heaven forbid!), you might severely cut your legs on that edge. The factory panels have a bend down there with somewhat of a radius.
 
Love the panel!

I plan on updating my panel and am trying to get as much information as I can. What CAD program did you design that with and could you possibly share the file you created with me? Also what company did you have fabricate the panel/parts?

Thank you!
 
I used SolidWorks, though unfortunately used the "Maker" version which means I can't share the native files. There's a STEP file of the whole assembly as well as patterns for the individual components here:

https://github.com/ghansel/rv6-panel

The bent parts were fabricated by SendCutSend and the panel was fabricated by Front Panel Express.

This is amazing! Thank you so much for sharing this. I'm starting to plan my RV-6 panel update with mostly Dynon equipment but very similar to your setup. Have you enjoyed flying with the panel forward 1.5"?
 
This is amazing! Thank you so much for sharing this. I'm starting to plan my RV-6 panel update with mostly Dynon equipment but very similar to your setup. Have you enjoyed flying with the panel forward 1.5"?

Yes - visibility and ingress/egress are all noticeably better.
 
Back
Top