What's new
Van's Air Force

Don't miss anything! Register now for full access to the definitive RV support community.

Machine Countersinking .032?

So this has me a bit baffled. Horizontal elevator plans, Page 09-10, step 4 has you to countersink the rear spar on the holes which are common to the trim tab hinge.

http://www.vansaircraft.com/pdf/revisions/RV-14/09.pdf

The rear spar is only .032 thick. I have not proceeded yet, but under very careful examination, it appears the countersink would be very slightly too deep, causing a knife edge around the inside of the hole.

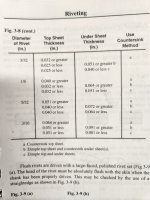
I do realize that section 5.5 does say you can countersink .032 thickness material as shown here:

"For AD3 rivets, a total material thickness between .016 [.4 mm] and .032 [.8 mm] must be dimpled. Material thickness between .032 [.8 mm] and .040 [1.0 mm],should be dimpled, but a countersink may be used if necessary. Finally, for a thickness of .050 [1.3 mm] and above the material must be countersunk."

So .032 is on the very low end.

I am very new at all this, and the only other time I have encountered needing to recess holes associated with hinges was on the tool box practice kit. Interesting, the lid is also .032 thick, and it had you to dimple it and the hinge for the flush rivets.

I hate the thought of going against the plans, but have any other builders entertained dimpling the .032 spar at the hinge rivet holes rather than countersinking, thus avoiding any potential knife edge? Perhaps they don't want us dimpling the hinge causing weakness or misalignment of some kind???

Thanks!
Chuck
 
Last edited:
Special case

Special case here. Like the other RV kits the softer aluminum of the hinge does not dimple well - it buckles a bit and deforms.

Countersinking the spar lets you use simple holes in the hinge for a much better job.

The plans are correct even if you do make a bit of a knife edge in this case.
 
+1 Gil's comment, and the knife edged spar flange is sandwiched between the hinge and the skin.

This is one of the few places that the plans will specify to not follow the recommendation listed in chapter 5
 
The Plans are correct - once again!!!

Excellent info gentlemen! I appreciate it. Countersinking I shall do. Precisely per the plans.
Thank again!
Chuck
 
But!, make sure you have the hinge or other material behind the 0.032 you are countersinking, or the countersink will chatter or wallow in the hole!

Practice on some scrap first.
 
Mike,
Fortunately I followed the plans to a T, and it called for having the hinge clecoed in place while countersinking. I wasnt sure exactly why, but you just explained it. It went great without a hitch.
Thank you!
Chuck
 
Entire wings,HS, and VS have been skinned and countersunk instead of dimpling. If you own an Art Chard built machine, you probably have one. The wing was skinned entirely 032 which also got away from the .025 to .032 transition. However, it requires one to attain a high level of skill to master the technique.
Properly set up an experienced builder could skin a wing much faster as there are fewer operations to perform.
Sadly, rules changed and those builders quit producing airplanes.

Point being, don't be afraid to countersink .032. Practice, back your material, and make sure you have good tools.
 
Mike,
Fortunately I followed the plans to a T, and it called for having the hinge clecoed in place while countersinking. I wasnt sure exactly why, but you just explained it. It went great without a hitch.
Thank you!
Chuck

This one job where you don't want to follow the advice of Tim Allen...

Real men don't use instructions, son. Besides, this is just the manufacturer's opinion on how to put this together.

TIM ALLEN, Home Improvement
 
Sadly, rules changed and those builders quit producing airplanes.

Point being, don't be afraid to countersink .032. Practice, back your material, and make sure you have good tools.

Actually it is not a rule John, just a recommendation based on service experience.
Builders can still mach. C.S. .032 if they choose, but it has been found to not be as durable over the long term.

Couple Examples -
The red RV-6B prototype built largely by Art had the emp. stabilizer skins mach. C.S. After quite a few years there were smoking rivets in the rear spar that had to be repair numerous times until it was retired.
The fwd bottom skins on RV-6's used to be called for M.C'ing because it was .040. Even that thickness would develope smoking rivets over time.

Many times over, a dimpled rivet joint has proven to be more durable than a machine countersunk one (at least on RV's with the light skin thicknesses we use).

So from a static strength perspective mach. C.S. .032 is acceptable (other than small localized applications of a few rivets when necessary), but from a longevity standpoint it is not a good idea.
 
I just went through this in another thread. If you were doing a repair to an aircraft you would need 1.44% more rivets using countersunk rivets to maintain the same strength as a dimpled joint. This information came from one of the older AN repair tech sheets. It makes sense as the two dimples "lock" together. I have also seen more smoking rivets with countersunk surfaces.
 
The red RV-6B prototype built largely by Art had the emp. stabilizer skins mach. C.S. After quite a few years there were smoking rivets in the rear spar that had to be repair numerous times until it was retired.

Is this the RV-6 that's on display in the Evergreen Aviation Museum in McMinnville?
 
Is this the RV-6 that's on display in the Evergreen Aviation Museum in McMinnville?

S/N 001 Proudly sitting under the wingtip of the HK-1 "Spruce Goose".

My picture from 2012 -

rv-6-evergreen_zps131e5c81.jpg
 
Is this the RV-6 that's on display in the Evergreen Aviation Museum in McMinnville?

S/N 001 Proudly sitting under the wingtip of the HK-1 "Spruce Goose".

My picture from 2012 -

rv-6-evergreen_zps131e5c81.jpg

Yup, that is the one.

It began life as a trigear. It was the prototype for the Nigerian Air Beetle project.
It got converted to a tail dragger in the late 90's and served with Mike Seager as a transition training airplane until it was involved in an "incident" at OSH when a new Lancair pilot was a bit behind his airplane. :rolleyes:

It was later repaired enough to allow it to be put on static display.
A lot of people did tail dragger transition training in that airplane... my self included.
 
On the Other Hand......

The red RV-6B prototype built largely by Art had the emp. stabilizer skins mach. C.S. After quite a few years there were smoking rivets in the rear spar that had to be repair numerous times until it was retired.

The .032 VS and HS skins on my RV-6 were machine countersunk and it's been flying for over 21.5 years. There are no smoking rivets.
Red Marron's -6 was built at the same time and by the same method with the same results.

Having said that, I recommend the dimple method because it's easier to accomplish consistent results.
 
So this has me a bit baffled. Horizontal elevator plans, Page 09-10, step 4 has you to countersink the rear spar on the holes which are common to the trim tab hinge.

This thread from 2014 contains the exact question I am attempting to answer (currently). I have been practicing on a scrap spar and have noticed that the hole in the spar enlarges slightly (after I set the countersink cutter .007 less than flush ). I assume this is a case where the hole in the spar can be enlarged a bit and it's ok. It does not seem possible to countersink the .032 Spar properly without enlarging the hole. Since the spar will be sandwiched between the top skin and the bottom hinge, the rivet's factory head and shop head will only contact material with the proper hole sizes. I sent this question to Vans twice but they did not address the oversize hole size issue after countersinking. I am simply trying to figure out if I am correct. I appreciate any input. Thank you in advance.
 
I haven't done the math, but with a 100 degree countersink, it's entirely possible that in order for the outer diameter of the countersink to be large enough to fit the dimple (or rivet), that the inner diameter on 0.032" material would be larger than 0.098" (ie, #40). This is why it's important to have a backer for the pilot in place as you countersink.
 
This thread from 2014 contains the exact question I am attempting to answer (currently). I have been practicing on a scrap spar and have noticed that the hole in the spar enlarges slightly (after I set the countersink cutter .007 less than flush ). I assume this is a case where the hole in the spar can be enlarged a bit and it's ok. It does not seem possible to countersink the .032 Spar properly without enlarging the hole. Since the spar will be sandwiched between the top skin and the bottom hinge, the rivet's factory head and shop head will only contact material with the proper hole sizes. I sent this question to Vans twice but they did not address the oversize hole size issue after countersinking. I am simply trying to figure out if I am correct. I appreciate any input. Thank you in advance.
The info in post # 2 & 3 is as relevant today as it was in 2014.
As mentioned there, this is one situation where the guidance of not machine countersinking .032 is not followed because of the specifics of the part stack-up.
 
The info in post # 2 & 3 is as relevant today as it was in 2014.
As mentioned there, this is one situation where the guidance of not machine countersinking .032 is not followed because of the specifics of the part stack-up.
So does that mean it's ok that the middle piece of metal (spar in this case) has an enlarged hole? I guess that's really the question I am asking. Up to this point in my build I had not encountered this situation so I have nothing to compare. Thanks
 
So does that mean it's ok that the middle piece of metal (spar in this case) has an enlarged hole? I guess that's really the question I am asking. Up to this point in my build I had not encountered this situation so I have nothing to compare. Thanks
Sorry, yes

I thought all of the other posts in the thread made that clear.
 
Another consideration, the wing walk doublers.

Years ago the instructions told you to dimple the wing walk doubler, the rib below it as well as the wing skin. The instructions now say to only countersink the wing skin.

I did not like this for the already listed issues with countersinking 0.032” skins. For the last three builds I just dimpled - I’m very happy with the results.

For the OPs issue you must countersink as discussed.
Carl
 
If my memory works, the head height on a flush head -3 rivet is 0.036". That's more than 0.032, but by such an insignificant amount that it is deemed acceptable. It's difficult to do because of the previously mentioned reasons. Back up the top part with something behind it (usually the underlying part) works quite well.

Generally I try to dimple 0.032 sheet and countersink 0.040 sheet. Gets tricky when a 0.032 sheet is on top of a 0.040 sheet because now the dimples from the top sheet are getting close to going knife-edge through the 0.040 underlying sheet. I have a chart in my shop that explains all this, but I can't find the reference material I used to make it.
From sec 5 CS chart.JPG
 
Yep, there it is!

I found my source while I was in the airplane factory last night. Jeppesen's Standard Aviation Maintenance Handbook. The chart is attached. It covers -3 through to -6 rivets
 

Attachments

  • 20240113_195222.jpg
    20240113_195222.jpg
    1.2 MB · Views: 28
Back
Top