What's new
Van's Air Force

Don't miss anything! Register now for full access to the definitive RV support community.

Baptism in Pro Seal

BigD

Well Known Member
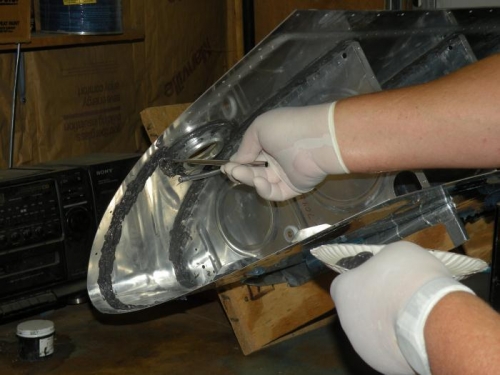
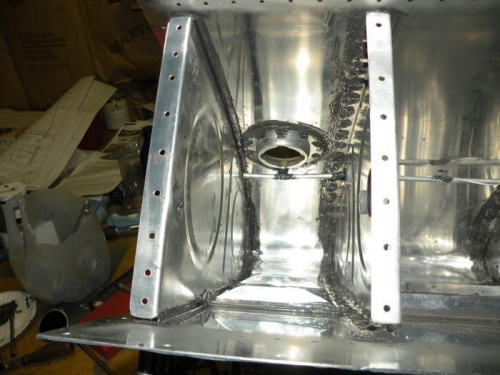
I've now attained a new level in home buildership - applied pro seal (chem seal, actually) (whatever). I did the stiffeners and drains today, and it went fairly well. When assembling the tanks the first time for match drilling, it was impossible to get the ribs in using the cradle. I had to cleco the forward most hole of each rib with the skin peeled open and then wrap it up the ribs. Now that they are drilled and dimpled I think it is going to take the same technique to get the skin on, this time with pro seal to contend with. I suppose a trial fitting before applying sealer is called for. Couldn't be happier with the sealant gun, although I probably should have opted for the smaller tubes/holder. I found that a 50/5 gram mix of sealer did about 8 stiffeners, and a 70/7 did about 12, neither of which came close to filling half of a six ounce tube. I'm guessing about 100/10 for one tank's worth of ribs. Lots of other good advice found here was followed and appreciated - clothes, gloves, tongue depressors, MEK and ready to go cloths, etc. Wooden handled qtips (like those used for gun cleaning) helped get excess sealant off the threads of the drain, moistened with MEK. Goop worked well for hand cleaning (not that much was required...)

34fjoty.jpg


2rm70r5.jpg


29c0xe0.jpg


==dave==
Getting ready to order Fuse...
 
It's been a while but I remember denatured alcohol worked very well to clean up sealant while it's still wet. Much safer than MEK.
 
Pro Seal

Dave,
Looks real clean... I also liked cleaning up the excess Pro seal..I just didn't like the thought of the excess sealant coming loose and creating a problem down the road.. Tanks were not as difficult as the posts made it seem.:)
 
Acetone?

I am getting ready for this step too. Up to this point, I have been using acetone to clean aluminum surfaces before closing things up. Any problems with using acetone to clean surfaces that will get Prosealed?
 
I am getting ready for this step too. Up to this point, I have been using acetone to clean aluminum surfaces before closing things up. Any problems with using acetone to clean surfaces that will get Prosealed?

That's what we used and it worked just fine.
 
Hi Dave,

That sealant gun looks nifty! What brand/model is it? I just glued up my wedge on my rudder using a syringe with ProSeal and was a bit hard to handle.
 
Thanks Andy... Good to know. I've just heard so many people go with MEK b/c... well it seems that's what everyone else uses. Personally, having worked in a lab setting in college, I'd much rather work with acetone than MEK. Even then, I use a respirator. Nasty solvents...
 
ProSeal

Looks good! Nothing like ProSeal in the morning. I'm sitting at work with black on my finger tips as I type.

I have found that the smaller tube for the sealant gun works well. (Usually 100 grams or so) You can recycle the liners though. Let the sealer cure for a couple of days and use a 1/4" air fitting at low pressure to blow the plug out. With a little wiping you are ready to roll again. Also, disposable flux brushes from the plumbing section work well with the bristles clipped off to 1/4 inch in length.

Chuck
 
Very nice Dave. I'm another one who's right at that point. At least this gives me a great idea on the gun to use, and the mixture rates to probably use. Not exactly looking forward to doing the sealing in the dead of winter with the garage door open for fumes. But if I'm able to get seals that look half that nice, it'll be good.
 
Welcome to the "done the tanks" brigade, Dave. I found them to be not nearly as horrible as many people thought they were. I also used a pneumatic gun, but I got some sealant (I think through Aircraft Spruce) that had both parts in one tube. You broke an inner capsule and mixed the two parts together with a power drill. This really cuts down on the mess. The other thing that helped is a method taught to me by my friend Rick Galati. I prosealed all the ribs and stiffeners and then clecoed every hole. I let everything cure for a week, and then riveted the parts together. Riveting dried proseal is way easier because your tools don't slip around and there's no messy cleanup. After riveting, then I went back over the internal parts and put a bead of proseal on the rib/skin joint and some on all the rivet shop heads. The only sloppy mess I had was when I riveted the backs onto them. They then sat for many years, but when I filled them with 100LL, they did not leak. Success!

Jim Bower
RV-6A N143DJ - flying
St. Louis, MO
 
... When assembling the tanks the first time for match drilling, it was impossible to get the ribs in using the cradle. I had to cleco the forward most hole of each rib with the skin peeled open and then wrap it up the ribs. Now that they are drilled and dimpled I think it is going to take the same technique to get the skin on, this time with pro seal to contend with. I suppose a trial fitting before applying sealer is called for. ...

BigD,

Here's an excerpt from my build log (10-03-2012) describing a relatively pain-free technique for clecoing ribs (DRY) into a tank skin(I'm building an RV-7, but this should also apply to the 10...)

1) Cleco the forward top hole of each rib from the inside. This is the only way I can see the holes in both the rib and the skin at the same time.

2) Put the skin in the cradle to compress it closer to the ribs.

3) Finish the top side of all ribs by clecoing every other hole from the nose toward the spar. I complete the middle rib first, then each one toward the ends.

4) Cleco the bottom side starting from the spar and working forward, clecoing every hole until about 2/3 of the way down, then "leapfrogging" every other cleco toward the nose, ending up with every other hole clecoed. The first few clecos on the bottom don't align well, but gradually pop into place as I work my way down. On this side, I also complete the middle rib first then work toward the ends.

5) Move the top forward cleco to the outside, so it can be moved during the drillng/reaming process.


Even after you're done with prep, and ready to seal and rivet the the ribs, you'll install all of the ribs dry using the above method, then remove one at a time for sealing. The wet sealant will act as somewhat of a lubricant, making it easer to install than dry. I found it easiest to start clecoing from th top (aft) end and work my way down (forward). You can spread the skin slightly, and with a cleco through the skin, you can angle it down to the corresponding hole in the rib and wedge it in. After a couple of these, the rest of the dimples will "pop" into place.

Good luck!
 
Chuck - I had considered cleaning out the tubes for re-use, but not using your method...I'll give it a try.

Jim - I read on Van's website that a -10 builder will likely go through 2 quarts of mix-to-use proseal, and figured that would be a lot of 6 oz tubes, esp considering the time limits...I did use one earlier on the project and for a small or single job they are very convenient. I let the proseal get to the point where it is not tacky (24-48 hrs) and then riveted. No real mess except the dab of sealer put in each rivet hole. It also seemed to me the rivets called out for the drain were just a hair too long - they tended to clinch and I had to re-do a few of them...

Miles - I hadn't thought of dry assembling the tank and then removing/replacing the ribs one at a time - I'll give that a try. I'm guessing that when installing the wet rib you inserted it with a slight cant and then rotated it into position? or were you able to just shove it straight in?

Acetone does work, just evaporates even quicker than MEK, and I do wear a 3M mask with VOC cartridges with the garage door open.

Thanks for all the replies.

==dave==

stiffeners riveted...time for the ribs...Maybe this weekend.
 
Also...

Something else I noticed after cleaning the blobs of proseal off the clecos...and then I thought, surely I'm not the only one who thought that...

4t3e2t.jpg


==dave==
 
... Miles - I hadn't thought of dry assembling the tank and then removing/replacing the ribs one at a time - I'll give that a try. I'm guessing that when installing the wet rib you inserted it with a slight cant and then rotated it into position? or were you able to just shove it straight in?....

IIRC, starting with a dry assembly in the cradle is in the -7 instructions. After brushing a layer of sealant on both the skin and the rib, I put the rib straight in. I tried to keep it centered so the rib didn't touch the sides until it was almost in. I wasn't able to fully seat the rib by pushing, but could get within about a 1/4 to 1/2 inch, then pulled the aft edge of the skin back a bit, inserted a cleco in the aftmost hole, then angled it up to catch the aftmost hole in the rib, then lever it partially into place. After a couple of these on the top and bottom, the skin dimples will find their nests in the rib and you can finish clecoing.

On a slightly different subject, I found that using acid brushes was much easier and neater than trying to spread sealant with tongue depressors. I used the 3/8" wide 7237T83 brush from McMaster-Carr and trimed the length down to about a 1/4" it stiffen it up a bit. They're cheap at $6 for a box of 48. so you can throw them away after each session.
FP02102012A0004V.jpg

With about a 1/16" thick layer on both the rib and skin, there's just about enough squeezout to make a decent fillet, and very little cleanup required. I've pressure tested both tanks, and have no leaks at skin to rib joints (though I did have one skin to baffle rivet I'll have to replace :mad:).
FP02102012A0004X.jpg
 
Miles-
Any idea as to the amount of proseal you used (per rib)? I have 5 ribs done & it looks like I'm averaging about 50 grams per rib :D... My fillets are pretty darn fat. :eek:
 
Daniel,

My log from 8-3-2012 (left tank) says I used a 26 - 27 gram batch per rib, which included the fillets but not encapsulating the rivet heads, which I went back and did later. That was a little more than Vince Frazier used on his Rocket build, where he said he used about 40 grams for two ribs. I ended up using about 3/4 of a quart kit per tank. Looking at the interior photo I posted above, my fillets might be a bit on the thin side compared to others I've seen. I guess only time will tell if they will hold up.
 
Last edited:
Follow up after first set of ribs...

I followed Miles advice after attempting assembly dry to see what would work. Thanks for the advice, it went pretty much as you described, and was actually easier than the initial assembly before match drilling. I used about 25 - 35g sealer per rib, 6 and 1/3 ribs total and the fuel cap flange; first number is the weight of the white portion, second is the approx mixed weight, with room for estimation error etc. The acid brushes worked well, too. One thing I'll do different on the second tank is finish with the j-channel. On this tank, due to the time I just did the ribs. The next day while the pro seal was still tacky I filled in a couple of spots, esp the nose portion of the two end ribs, and shaped the fillets, as the sealer had not completely covered the gaps between the fingers of the flange. I then cleaned out the excess along the rib lines where the j-channel is going to go so it will not run into a semi-dry layer of sealer. In hind sight it would have been less time consuming to apply sealer and insert the channel right after the ribs...

2u5uffd.jpg


33dytt3.jpg


syl0k7.jpg


Thanks again. Today I'll start setting rivets, and when I've removed enough clecos I'll get the second tank done to this point.

==dave==
 
2nd Tank

Im ready to seal on the rear baffle for the right tank. I just checked my logs and found out that the second tank took 50% less time than the first. There is hope yet! Yes- I still managed to get ProSeal everywhere.

Chuck
 
Back
Top